CustomView
From MODO 801, there’s a new type of server that can be created called an ILxCustomView, which allows 3rd party developers the ability to create custom UI and have it embed as a viewport into MODO. As with the rest of the SDK, this is also available through python using PySide.
Note that this is the only way to add pure Qt interfaces to MODO. Whenever possible, forms, trees, and the existing viewports and layouts should be used to present interfaces to ensure consistent look and feel. However, this isn’t always possible, which is why the custom viewport mechanism exists.
‘’NB: this is only available on Linux in MODO 801 but on Linux, OSX and Windows from MODO 901’’
Python Examples
Below are a few simple Python examples, but you can create plugins using C/C++ in the same manner.
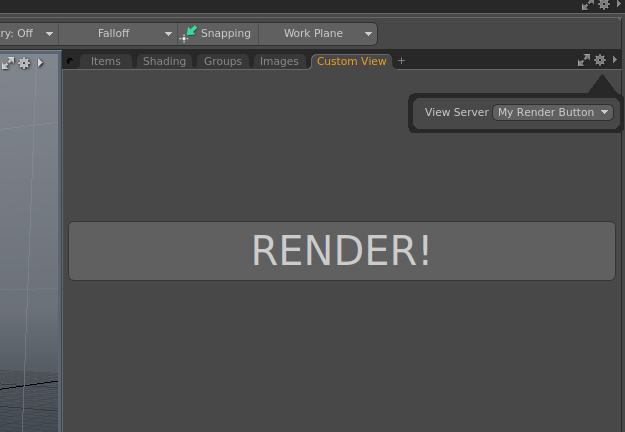
Example: My Render Button
The first example is a simple button with the text ?Render? and when pressed will, you guessed it, fire off a render command
1 2 3 4 5 6 7 8 9 10 11 12 13 14 15 16 17 18 19 20 21 22 23 24 25 26 27 28 29 30 31 32 33 34 35 36 37 38 39 40 41 42 43 44 45 | import lx
import lxifc
import PySide
from PySide.QtGui import *
def onClicked():
lx.eval("render")
# MyRenderButton Server
class MyRenderButton(lxifc.CustomView):
def customview_Init(self, pane):
if pane == None:
return False
custPane = lx.object.CustomPane(pane)
if custPane.test() == False:
return False
# get the parent object
parent = custPane.GetParent()
# convert to PySide QWidget
p = lx.getQWidget(parent)
# Check that it suceeds
if p != None:
layout = PySide.QtGui.QVBoxLayout()
renderButton = QPushButton("RENDER!")
f = renderButton.font()
f.setPointSize(30)
renderButton.setFont(f)
renderButton.clicked.connect(onClicked)
layout.addWidget(renderButton)
layout.setContentsMargins(2,2,2,2)
p.setLayout(layout)
return True
return False
lx.bless(MyRenderButton, "My Render Button")
|
This looks scary but is actually pretty straight forward. Firstly we create a class that implements a single function: customview_Init(). This has one argument, which is always a CustomPane. We can then extract the parent QWidget by calling GetParent on this object and using the helper ?lx.getQWidget()? function to convert it into a PySide widget. Once we have this, we can simply add our button using PySide. Simple!
The last line is to register the server with modo. Once this is done, create a ?Custom View? viewport and select the server from the list shown in the settings popover:
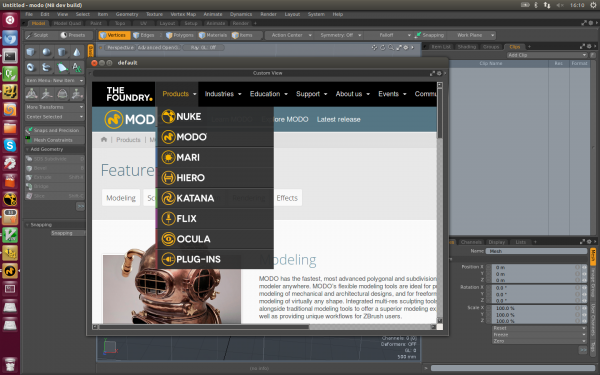
Example: Embedded Web browser
Here?s another example of creating a web browser that shows The Foundry community webpage:
1 2 3 4 5 6 7 8 9 10 11 12 13 14 15 16 17 18 19 20 21 22 23 24 25 26 27 28 29 30 31 32 33 34 35 36 37 38 39 | import lx
import lxifc
import PySide
from PySide.QtWebKit import *
class FoundryCommunityServer(lxifc.CustomView):
def customview_Init(self, pane):
if pane == None:
return False
custPane = lx.object.CustomPane(pane)
if custPane.test() == False:
return False
# get the parent object
parent = custPane.GetParent()
# convert to PySide QWidget
p = lx.getQWidget(parent)
# Check that it suceeds
if p != None:
layout = PySide.QtGui.QVBoxLayout()
web = QWebView()
web.load("http://community.thefoundry.co.uk/discussion/")
layout.addWidget(web)
layout.setContentsMargins(2,2,2,2)
p.setLayout(layout)
return True
return False
if( not lx.service.Platform().IsHeadless() ):
lx.bless(FoundryCommunityServer, "The Foundry Community")
|

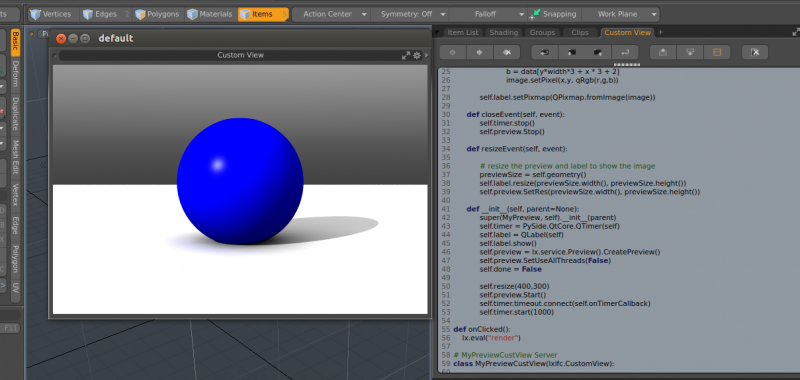
Example: Python Preview Window
This is a slightly more advanced view, but allows you to create your own Preview window and do pixel processing before showing in UI. Probably better suited to a C++ plugin
1 2 3 4 5 6 7 8 9 10 11 12 13 14 15 16 17 18 19 20 21 22 23 24 25 26 27 28 29 30 31 32 33 34 35 36 37 38 39 40 41 42 43 44 45 46 47 48 49 50 51 52 53 54 55 56 57 58 59 60 61 62 63 64 65 66 67 68 69 70 71 72 73 74 75 76 77 78 79 80 81 82 83 84 85 86 87 | import lx
import lxifc
import PySide
from PySide.QtGui import *
import PySide.QtCore
class MyPreview(QWidget):
def onTimerCallback(self):
previewImage = self.preview.GetBuffer()
width, height = previewImage.Size()
buf = lx.object.storage('b', width * height * 3)
imgsvc = lx.service.Image()
imgsvc.ImageGetBuffer(previewImage, lx.symbol.iIMP_RGB24, buf)
data = buf.get()
image = QImage(width, height, QImage.Format_RGB32)
for x in range(0,width):
for y in range(0,height):
r = data[y*width*3 + x * 3]
g = data[y*width*3 + x * 3 + 1]
b = data[y*width*3 + x * 3 + 2]
image.setPixel(x,y, qRgb(r,g,b))
self.label.setPixmap(QPixmap.fromImage(image))
def __del__(self):
self.timer.stop()
self.preview.Stop()
def resizeEvent(self, event):
# resize the preview and label to show the image
previewSize = self.geometry()
self.label.resize(previewSize.width(), previewSize.height())
self.preview.SetRes(previewSize.width(), previewSize.height())
def __init__(self, parent=None):
super(MyPreview, self).__init__(parent)
self.timer = PySide.QtCore.QTimer(self)
self.label = QLabel(self)
self.preview = lx.service.Preview().CreatePreview()
self.preview.SetUseAllThreads(False)
self.done = False
self.resize(400,300)
self.preview.Start()
self.timer.timeout.connect(self.onTimerCallback)
self.timer.start(1000)
def onClicked():
lx.eval("render")
# MyPreviewCustView Server
class MyPreviewCustView(lxifc.CustomView):
def customview_Init(self, pane):
if pane == None:
return False
custPane = lx.object.CustomPane(pane)
if custPane.test() == False:
return False
# get the parent object
parent = custPane.GetParent()
# convert to PySide QWidget
p = lx.getQWidget(parent)
# Check that it suceeds
if p != None:
layout = PySide.QtGui.QVBoxLayout()
myPreview = MyPreview()
layout.addWidget(myPreview)
layout.setContentsMargins(2,2,2,2)
p.setLayout(layout)
return True
return False
lx.bless(MyPreviewCustView, "My Preview Window")
|
Example: Modo Graph Viewer
This is a very simple TreeView showing the current state of all the modo graphs in the open scene.
1 2 3 4 5 6 7 8 9 10 11 12 13 14 15 16 17 18 19 20 21 22 23 24 25 26 27 28 29 30 31 32 33 34 35 36 37 38 39 40 41 42 43 44 45 46 47 48 49 50 51 | import PySide
from PySide.QtGui import *
import lxu.select
def addChannels(graphItem, item):
channelCount = item.ChannelCount()
if( channelCount != 0):
channels = QTreeWidgetItem(None, [ "CHANNELS" ])
graphItem.addChild( channels )
for i in range( channelCount ):
channelType = item.ChannelType(i)
childItem = QTreeWidgetItem(None, [ item.ChannelName(i), str(channelType) ])
channels.addChild( childItem )
def addSubItems(graphItem, item):
for i in range( item.SubCount() ):
child = item.SubByIndex(i)
childItem = QTreeWidgetItem(None, [child.Ident()])
graphItem.addChild( childItem )
addSubItems( childItem, child )
addChannels( childItem, child )
def addGraphItems(graphItem, graph):
for i in range( graph.RootCount() ):
child = graph.RootByIndex(i)
childItem = QTreeWidgetItem(None, [child.Ident()])
graphItem.addChild( childItem )
addSubItems( childItem, child )
addChannels( childItem, child )
def makeView():
scene = lxu.select.SceneSelection().current()
w = QMainWindow()
graphView= QTreeWidget(w)
graphView.setColumnCount(2)
for i in range( scene.GraphCount() ):
graph = scene.GraphByIndex(i)
graphItem = QTreeWidgetItem(None, [graph.Name()])
graphView.addTopLevelItem( graphItem )
addGraphItems( graphItem, graph )
w.setCentralWidget(graphView)
w.show()
return w
w = makeView()
|

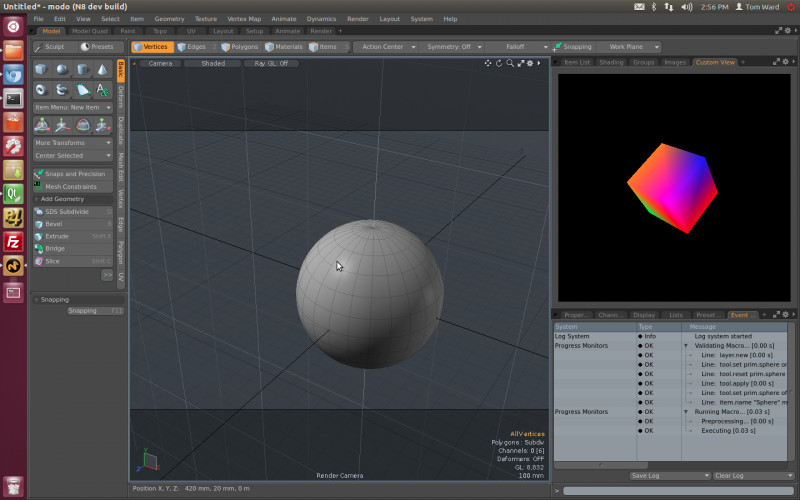
Example: C++ OpenGL Viewport
This is a more advanced example written in C++. This creates a simple opengl viewport and renders a rotating cube inside.
The code is pretty self explanatory, to compile you’ll need to use the LXSDK and Qt 4.8.5.

Python Script Editor
We ship a python script editor that is written entirely in Python and using PySide. It?s based off the Nuke and Hiero script editor which has the following features:
Syntax highlighting
auto complete
load/save scripts
error highlighting
auto-indentation
line numbering
Default Stylesheet
We’ve also created a default Stylesheet so that widgets are, by default, styled as similar as possible to modo. This can be overwritten in your own UI, but ideally custom viewports should as much as possible use the default stylesheet. Currently this is shipped as a css file in ?<modo>/resrc/stye/style.css?, but is subject to change
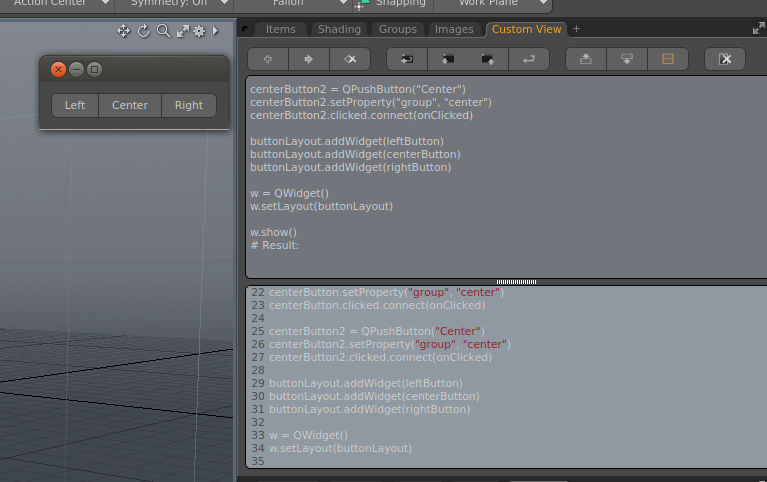
Buttons Groups
To make buttons group in the same manner as modo, you should tag a QPushButton with “left”, “right” or “center” to ensure correct bevelling.
Here’s a simple python example in how to do this:
1 2 3 4 5 6 7 8 9 10 11 12 13 14 15 16 17 18 19 20 21 22 23 24 25 26 27 28 29 30 31 32 33 34 35 | import PySide
from PySide.QtGui import *
def onClicked():
print "Hello!"
# Create button group
buttonLayout = QHBoxLayout()
buttonLayout.setSpacing(0)
leftButton = QPushButton("Left")
leftButton.setProperty("group", "left")
leftButton.clicked.connect(onClicked)
rightButton = QPushButton("Right")
rightButton.setProperty("group", "right")
rightButton.clicked.connect(onClicked)
centerButton = QPushButton("Center")
centerButton.setProperty("group", "center")
centerButton.clicked.connect(onClicked)
centerButton2 = QPushButton("Center")
centerButton2.setProperty("group", "center")
centerButton2.clicked.connect(onClicked)
buttonLayout.addWidget(leftButton)
buttonLayout.addWidget(centerButton)
buttonLayout.addWidget(rightButton)
w = QWidget()
w.setLayout(buttonLayout)
w.show()
|
More Information
./Customview (lx-customview.hpp)