Keyframing
Keyframes define the start and endpoint of the sequence that you want to animate.
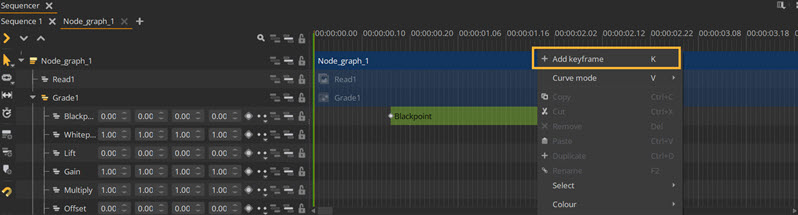
To add a keyframe to a node or particular property:
|
1.
|
On the desired frametime, right-click within the track of the parameter you want to add a keyframe to. You can also click on the icon ( ) for the track from the tree view list next to the timeline, or in the Properties panel. ) for the track from the tree view list next to the timeline, or in the Properties panel. |
|
2.
|
Click Add keyframe from the list of options.
|
|
3.
|
A keyframe will be added according to the current value in the dropdown list. |
Tip: Alternatively, you can press K while holding the mouse over the frametime you want to add a keyframe to.
To edit an existing keyframe:
|
1.
|
Go to the Properties panel of the node or property OR click the keyframe directly. |
|
2.
|
Use the move tool to move the keyframe. Alternatively, change the position of the Keyframe by changing the Relative frametime. |
|
3.
|
Edit the Interpolation mode using the dropdown menu. |
|
4.
|
Adjust the Value of the keyframe to alter its appearance. |
When multiple keyframes are added to a property, a green rectangle will appear between the keyframes in the timeline, as in the image below.