Quickstart Guide: Exporting Your Scene from Nuke
In this section we will go through exporting a pre-existing USD scene built using Nuke 16+ into Nuke Stage. This is made easy using the custom group node StageUSDExport. This workflow works well if you have shot footage and mapped images onto geometry to create a USD scene.
Note: When planning assets to import into Nuke Stage, for best results ensure they are built in Nuke 16+, using the new 3D system. Exporting from Nuke might not work as well if these points aren’t followed.
To export a scene from Nuke, use the group node StageUSDExport you downloaded from the Nuke Stage Add-ons section of the Downloads page.
Open this group node in Nuke via File > Import Comp Nodes… and it will appear in your Nuke node graph.
You can attach the group node to any USD nodes within Nuke. This will export any upstream USD and accompanying images.
Note: Avoid using Clone nodes with the export node.
Note: If you want to transform meshes in the scene in Nuke Stage, avoid features in Nuke that will cause meshes to skew. This includes the Skew node, or by rotating the transform pivot or applying a non-uniform scale to the mesh.
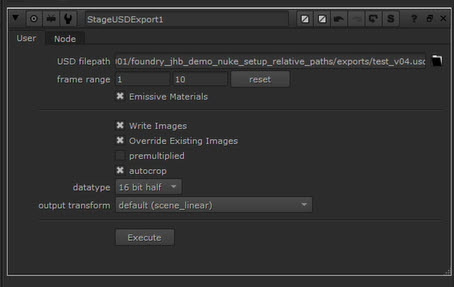
| 1. | Within the node, define the USD filepath for the scene to export. You can write to *.usda, *.usdc or *.usd. |
| 2. | Choose the frame range for the export. |
Note: If you input an image into a Material or Geo node, and there are animated knobs within nodes in the branch, use a FrameRange node in that branch to define the range of any animation.
| 3. | Enable Emissive Materials to create emissive materials in the USD file. Emissive materials are suitable for cards and other 2.5D scenes. |
| 4. | You can define whether to Write Images on export. When enabled, all nodes you've included in your node graph will be baked. They will be written out on export to include nodes like grades or crops. This means any exported scene should look exactly as it does in Nuke. |
When this option is disabled, it will use any existing input images in the node graph as the textures for the USD file, and will ignore any nodes. If you do write images, it will create all those images in a self-contained folder in the same location as you're writing your USD file.
| 5. | Choose whether to enable Override Existing Images to override images that may already exist, or keep the existing version by having this box unchecked. |
| 6. | All Images will be written in B44 EXR format from the node, but you can define the datatype, the output transform and whether or not to premultiply the images. |
| 7. | Define whether autocrop will be enabled. When enabled, it will enable the autocrop option for any Write nodes. Nuke Stage will handle animated crops of data windows as Nuke does. |
| 8. | Press Execute. The USD file and images will be written out to disk. |
This USD scene can then be loaded in Nuke Stage, where the scene will match what you saw in Nuke, providing all color transforms are the same.
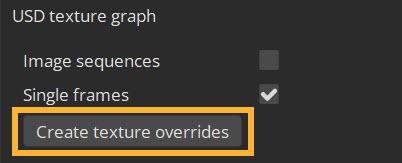
If you created any sequences in Nuke, ensure to create nodes for them in Nuke Stage by going to Project Graph > Scene > USD Stage > USD Texture Graph. Click the Create texture overrides button. This will ensure the best performance for EXR/ Notch playback.
For further information on exporting a USD scene from Nuke, including Managing Color Transforms, go to the User Guide page USD Export from Nuke.
Your USD scene is now ready to open in Nuke Stage. To try out editing a USD scene in Nuke Stage, you can go to Quickstart Guide: Loading and Editing a USD Scene to explore the compositing features and nodes available.