Keyframing
Keyframes define the start and endpoint of the sequence that you want to animate.
Adding a new keyframe in the Sequencer
To add a keyframe to a node or particular property:
| 1. | On the desired frametime, right-click within the track of the parameter you want to add a keyframe to. You can also click on the icon ( ) for the track from the tree view list next to the timeline, or in the Properties panel. ) for the track from the tree view list next to the timeline, or in the Properties panel. |
| 2. | Click Add keyframe from the list of options. |
| 3. | A keyframe will be added according to the current value in the dropdown list. |
Tip: Alternatively, you can press K while holding the mouse over the frametime you want to add a keyframe to.
Adding a new keyframe for an object Property
In your object’s Properties (e.g. camera or node), if a property can be animated, it has a keyframe icon next to it ( ). This icon will change depending on the state of the object property.
• Gray, no circle (): the property has no track in the sequencer.
• Gray with a white circle ( ): the property has a sequencer track, but has no keyframes.
• Orange ( ): the property has a track and keyframes.
Clicking the gray icon will prompt the Add track option to appear, and you can choose to create a track either in an existing sequence or a new one. A keyframe will also be added to the track at the current frametime.
Once the property has a sequencer track, the icon next to it will be highlighted orange. Clicking on it then will prompt track options to appear in a context menu. The context menu options are:
• Goto track
• Enable keyframe
• Enable autokey
• Add keyframe
• Copy keyframes
• Cut keyframes
• Remove keyframe
• Remove all keyframes
• Paste keyframes
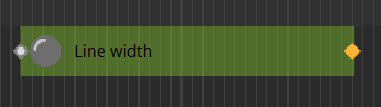
When multiple keyframes are added to a property, a green rectangle will appear in the track between the keyframes in the timeline, as in the image below.
Editing an existing keyframe in the Sequencer
To edit an existing keyframe, go to the Properties panel of the node or property OR click the keyframe directly. You can edit the below properties:
|
Control (UI) |
Function |
| Relative frametime | The frametime the keyframe is set at. Edit this by changing the property or by dragging the keyframe on the sequencer timeline to the desired frametime. |
| Enabled | When Enabled is unchecked, the keyframe is ignored. The keyframe icon will change to be an empty outline ( ). ).
|
| Interpolation mode | How values should be interpolated between the current keyframe and the next. For more information, go to the Interpolation page. |
| Value | The value of the property keyframe. |
Autokeying
You can autokey object tracks, so if you move the object in your Viewport it will keyframe the movement automatically. This applies to anything that can be animated.
Any changes to an autokeyed property will immediately create keyframes for it. If there's already a keyframe at that frametime, the value will be overwritten.
Autokey state is stored as part of the linked sequencer track, and is off by default. There's a user preference Panels > Sequencer > DefaultAutokey to instead enable if by default.
The icon will show a little A when autokey is enabled ( ).
).