Synchronization
Within Nuke Stage, RenderNode synchronization ensures that every GPU-driven machine in a multi-node cluster updates frames at the exact same moment. This is critical for seamless LED wall playback.
Accurate synchronization is achieved through a combination of dedicated hardware timing devices and Nuke Stage’s software-level coordination. NVIDIA Quadro Sync hardware distributes a genlock or framelock pulse to all GPUs, ensuring each render node operates from the same timing source. On top of that, Nuke Stage then manages networked Render Node processes, aligns frame output across nodes, and enforces consistent timing.
While the overall concept is straightforward, achieving reliable sync in practice can be challenging, with many subtle factors that influence timing and consistency. Small differences in hardware configurations or signal paths can introduce noticeable issues and may require targeted troubleshooting. However, with attention to the best practices outlined below, production-ready synchronization is entirely achievable.
Machine Setup
To run Nuke Stage across multiple RenderNodes, each node must be equipped with an NVIDIA RTX PRO Sync card (previously called NVIDIA Quadro Sync II) and a compatible GPU. A list of compatible GPUs can be found here, and the full hardware requirements for Nuke Stage are available at Hardware.
In addition to the Sync hardware, you will need a genlock source to provide a reference timing signal for all RenderNodes. This genlock signal can be distributed using one of two configurations:
Daisy-Chaining
The genlock signal is passed from one node to the next. A node can receive its timing reference from the previous node in the chain.
Direct
A RenderNode receives an independent connection from the genlock source. Nodes receive the timing signal directly from the reference device rather than through another node.
NVIDIA Drivers
For optimal stability and performance, each RenderNode should be updated to the latest compatible GPU driver, available on the NVIDIA Drivers page. When selecting a driver, choose the Production Branch / Studio option to ensure maximum reliability for virtual production workflows. It is recommended that all RenderNodes run the same driver version.
NVIDIA Driver Utility
The NVIDIA Driver Utility provides advanced controls for tuning GPU behavior. One of these options is prePresentWait mode for OpenGL, which some tools in Virtual Production require to be enabled. However, Nuke stage requires prePresentWait mode for OpenGL to be disabled.
If the NVIDIA driver utility has not been run on the RenderNode before, this option will be disabledby default. If there is any chance it has been enabled, it can be disabled by running the below command from the command line with administrator privileges.
configureDriver.exe --delete 10
NVIDIA Control Panel Settings
Proper configuration in the NVIDIA Control Panel is essential for consistent synchronization across all RenderNodes. The most important information can be found within the below Control Panel subsections.
Change Resolution
For virtual production workflows with a display processor (e.g., Brompton), proper usage of Extension Display Identification Data (EDID) ensures that all RenderNodes output compatible timing and resolution. This can be set up from the NVIDIA Control Panel > Display > Change Resolution.
A common approach is to use a native resolution that matches the processor’s input specifications. To do this:
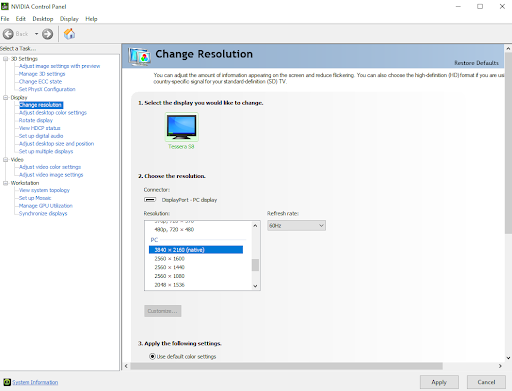
| 1. | Open the NVIDIA Control Panel, and navigate to Display > Change resolution. |
| 2. | Select the resolution marked as (native) in Resolution > PC. For example, below image uses 3840 × 2160 at 60 Hz. |
| 3. | Click Apply to ensure the native resolution is currently the active resolution. |
Using a native resolution is the safest approach, but frequently this native resolution won’t match the desired frequency for the setup. In this case, a Custom Resolution is needed. To create this, follow the below steps:
| 1. | In the NVIDIA Control Panel, navigate to Display > Change resolution. |
| 2. | Select the resolution marked as (native) in Resolution > PC. |
| 3. | Ensure the native resolution is currently the active resolution by clicking Apply. |
| 4. | Click the Customise button, found under the Resolution list. |
| 5. | Click Create Custom Resolution in the resulting popup. |
| 6. | Adjust the refresh rate (Hz) to the value needed. |
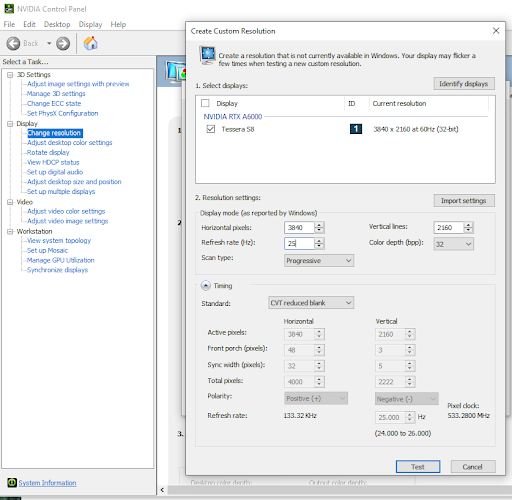
| 7. | Click Test and then select Yes in the resulting popup to save the configuration. |
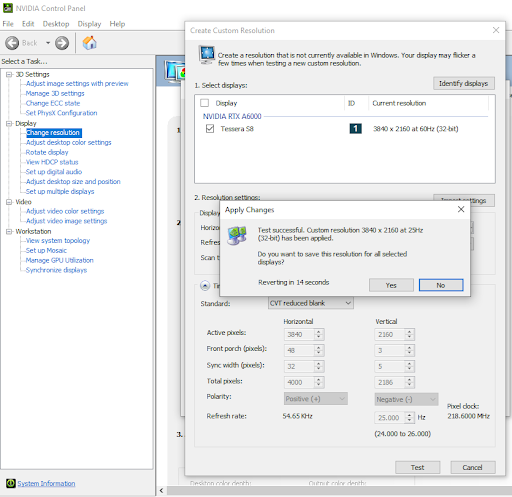
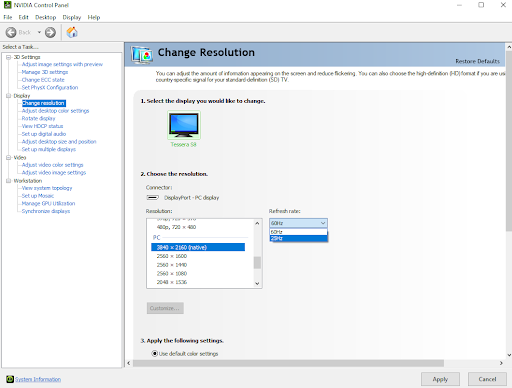
| 8. | The new frequency should then appear in the available list for the resolution, as below. Finally, ensure the new EDID is active by selecting it and clicking Apply. |
More information on EDIDs can be found on NVIDIA Help.
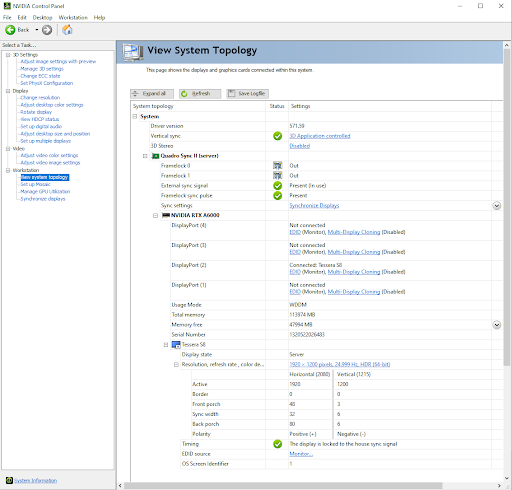
View System Topology
| 1. | Open the NVIDIA Control Panel, navigate to Workstation > View System Topology. |
| 2. | If the RenderNode is receiving sync directly through a BNC cable, ensure External sync signal is Present (in use) and has a green tick. |
| 3. | If the RenderNode receives sync through the NVIDIA card’s framelock port, Framelock sync pulse must be Present. |
Synchronize Displays
If the RenderNode is receiving genlock directly through a BNC cable:
| 1. | In the NVIDIA Control Panel, navigate to Workstation > Synchronize Displays. |
| 2. | Ensure that the timing server is selected to be On this system. |
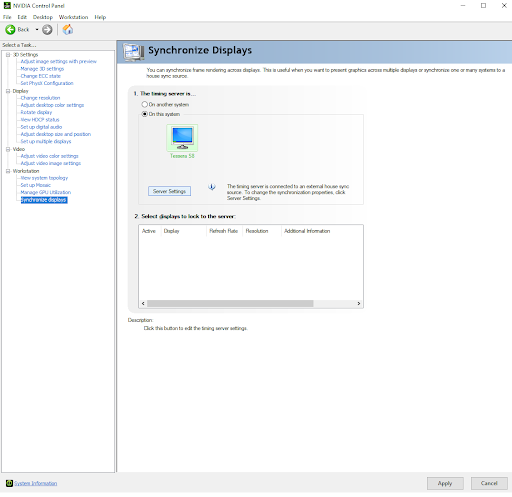
| 3. | Click Server Settings. |
| 4. | Make sure that the source is selected to be An external house sync signal (as in the image below). If everything is set up correctly, the Sync frequency in this pop up should be the frequency set by your house clock. If the frequency set for your display resolution does not match the house signal, you will be unable to select the external house sync signal. In this case, go to the Change Resolution section and follow the steps. |
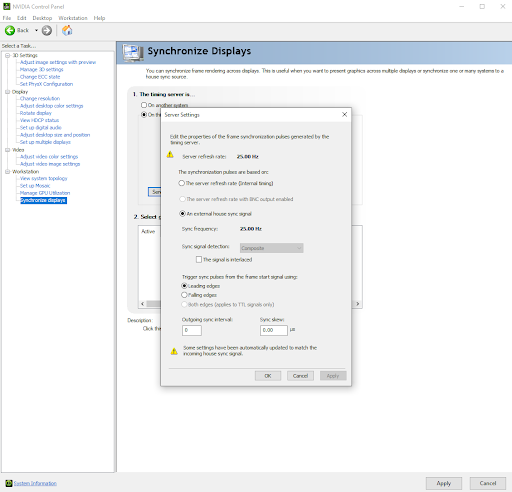
| 5. | Click Ok and then Apply. |
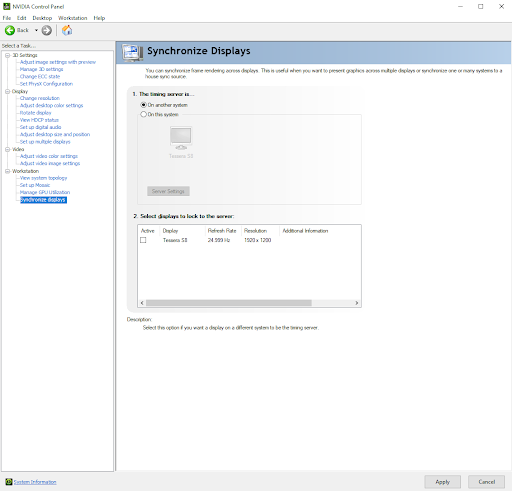
If the RenderNode is instead receiving sync indirectly through the NVIDIA card’s framelock port:
| 1. | In the NVIDIA Control Panel, navigate to Workstation> Synchronize Displays. |
| 2. | Set the timing server to On another system. |
| 3. | Click Ok and then Apply. |
Nuke Stage Settings
To ensure successful sync you will need to ensure the following things are done in the Nuke Stage Editor when setting up the Hardware.
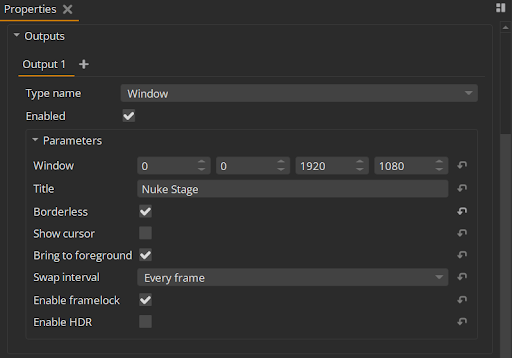
Go to Project Graph > Hardware > Outputs.
For each Output:
• Each Output created will need to be the full resolution of the windows display that it is on. This should match your resolution as set in the NVIDIA control panel above. Failure to set full screen resolution here will result in unsuccessful sync.
• Borderless must be enabled.
• Bring to foreground should be ticked.
• Swap Interval should be set to Every Frame.
• Enable Framelock must be ticked.
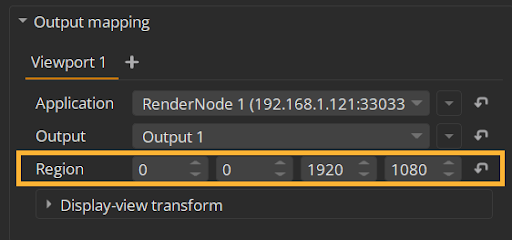
In many cases the LED will map to the entire display. However, if the LED maps only to a partial window within the display, this should be defined in Project Graph > Display > Output mapping. To do this:
| 1. | Ensure your Display is connected to the corresponding Output. |
| 2. | In the Region parameter, define the resolution of your display. |
Validating Sync in Stage
Once enabled and connected to RenderNodes, you can validate Sync in Nuke Stage using sync patterns in the Debug Views.
| 1. | Open the Render Debug panel, which is in the Setup tab in the default workspace. |
| 2. | Enable Visible. |
| 3. | Change Overlay to Sync. |
| 4. | There are two visual aids for verifying sync. The Lines Visible option is recommended, as it is less invasive than Strobe enabled: |
• Clicking Lines visible will show a moving grid around each RenderNode. If all is properly synced, the line should exactly match up with no tearing.The speed, thickness and colour of the lines can be configured in the settings.
• Clicking Strobe enabled will show rapidly flashing lights. If sync is setup correctly these lights should exactly match at all times. The colour, rate and height of the strobe can be configured in the settings. This view can also be used for dialing in the shutter offset of the camera relative to the LED processors.
Warning: This feature content contains imagery with flashing lights and strobe effects that may trigger seizures or cause discomfort in individuals with photo-sensitivity. User discretion is advised.
There is also some useful data within the Network Panel which can give an indication as to whether sync is set up and working correctly.
• Sync Barrier is the amount of time a render node spent waiting between being ready to start rendering the next frame, and being allowed to do so. RenderNodes are only allowed to start on the next frame once all RenderNodes have reported to the relay that they are ready to render the next frame. Typical values are 1-2ms, and all synced render nodes should show values in that range.
• Yield-to-await is the time spent by a RenderNode between starting rendering on a frame, and reporting that it is ready for the next frame. Crucially, this includes time spent waiting for the hardware sync barrier to present the rendered frame, so this will usually be longer than the time spent on just rendering the frame. Typically, the value should be roughly the expected frametime in ms. Possibly the value can be a little larger, because the measured time includes network round-trip between the relay and render node. Values across machines should all roughly match, within ~1ms.