Search is based on keyword.
Ex: "Procedures"
Do not search with natural language
Ex: "How do I write a new procedure?"
Contact Support
Importing Geometry and Point Clouds from Other Applications
Sometimes, you may need to import files or objects created in 3D applications, such as Maya or Boujou. Depending on what you want to import and from where, there are different ways of doing the import:
• To import geometry from OBJ (.obj) files, see Importing Geometry from OBJ Files.
• To import geometry or point clouds from FBX (.fbx) files, see Importing Geometry and Point Clouds from FBX Files. FBX is a standard file format many applications can export to, and .fbx files contain 3D scenes from which you can import cameras, lights, transforms, meshes, and point clouds into Nuke.
• To import geometry or point clouds from Alembic (.abc) files, see Importing Geometry and Point Clouds from Alembic Files. You can export to Alembic from most popular 3D applications.
Importing Geometry from OBJ Files
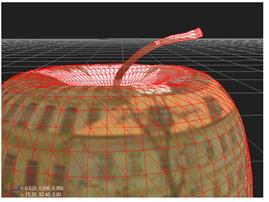
You can import into a Nuke scene 3D objects from other software programs that have been saved out in the .obj (Wavefront) format. You cannot manipulate .obj objects at the vertex level from inside Nuke, but you can texture and transform them.
|
|
| An imported OBJ object. |
To import an OBJ object
| 1. | Click 3D > Geometry > ReadGeo to insert a ReadGeo node. |
| 2. | In the ReadGeo parameters, click the file field’s folder icon. The file navigation dialog appears. |
| 3. | Navigate to the OBJ file, then click Open. Nuke reads in the OBJ file. |
| 4. | Drag the ReadGeo node’s img pipe to the Read node containing the clip you want to use as a texture. |
| 5. | Drag one of the Scene node’s numbered pipes to the ReadGeo node to place the OBJ object in the scene. |
Importing Geometry and Point Clouds from FBX Files
FBX is a standard 3D file format that gives you access to 3D scenes created in other applications supporting the same format. What you generally have in an .fbx file is an entire 3D scene containing cameras, lights, meshes, non-uniform rational B-spline (NURBS) curves, transformation, materials, and so on. From this scene, you can extract cameras, lights, transforms, and meshes into Nuke. This way, you can, for example, create a mesh in Maya, export it in a .fbx file, and use the same mesh again in Nuke.
Note: For the FBX SDK version used in Nuke, see Third-Party Library Versions.
Tip: If you have trouble with .fbx files, it may be because they were written with an older version of FBX. If they load very slowly, it is also possible that they are ASCII rather than binary. To get around these problems, you can use the FBX converter on the Autodesk website (http://usa.autodesk.com/fbx/download/). It converts between various different formats, including older FBX versions, ASCII, and binary, and is available on Windows, Mac, and Linux.
Importing Meshes from FBX Files
The ReadGeo node lets you import meshes (or NURBS curves/patch surfaces converted to meshes) from FBX files. Using one ReadGeo node, you can read in a single mesh or all the meshes in a .fbx file.
The mesh’s vertices, normals, UVs, and vertex colors are read on a per frame basis or at frame 0. If there are any shape or cluster deformers, they are applied to the vertices. Materials or textures are not read in.
To import a mesh from an .fbx file:
| 1. | Select 3D > Geometry > ReadGeo to insert a ReadGeo node into your script. |
| 2. | In the ReadGeo controls, click the folder icon next to the file field and navigate to the .fbx file that contains the mesh you want to import. Click Open. |
| 3. | From the animation stack dropdown menu, select the take you want to use. FBX files support multiple takes. Usually, one of them is a default take that contains no animation. |
| 4. | From the node name dropdown menu, select the mesh you want to import from the .fbx file. |
| 5. | To adjust the frame rate used to sample the animation curves, enter a new value (frames per second) in the frame rate field. The frame rate you enter is only used if you check use frame rate. Otherwise, the frame rate from the .fbx file is used. |
| 6. | If you want to import all the meshes in the .fbx file rather than just one, check all objects. This overrides whatever you have selected under node name. If the objects are animated, check read on each frame. This bakes each object's transform into the mesh points and preserves the animation. |
| 7. | If you want to modify the transform properties imported from the .fbx file, uncheck read transform from file and make the necessary modifications. As long as read transform from file is unchecked, your changes are kept. |
| 8. | To reload the transform properties from the .fbx file, click the Reload button. |
Importing Point Clouds from FBX Files
The ReadGeo node also lets you import point clouds from FBX files.
To import a point cloud from an .fbx file:
| 1. | Select 3D > Geometry > ReadGeo to insert a ReadGeo node into your script. |
| 2. | In the ReadGeo controls, click the folder icon next to the file field and navigate to the .fbx file that contains the point cloud you want to import. Click Open. |
| 3. | From the animation stack dropdown menu, select the take you want to use. FBX files support multiple takes. Usually, one of them is a default take that contains no animation. |
| 4. | In the objecttype dropdown, select PointCloud. |
| 5. | To adjust the frame rate used to sample the animation curves, enter a new value (frames per second) in the frame rate field. The frame rate you enter is only used if you check use frame rate. Otherwise, the frame rate from the .fbx file is used. |
| 6. | If you want to modify the transform properties imported from the .fbx file, uncheck read transform from file and make the necessary modifications. As long as read transform from file is unchecked, your changes are kept. |
| 7. | To reload the transform properties from the .fbx file, click the Reload button. |
Importing Geometry and Point Clouds from Alembic Files
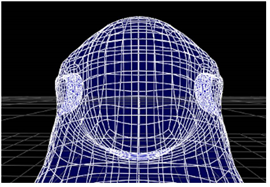
You can import meshes (or NURBS curves/patch surfaces converted to meshes) and point clouds from Alembic files (.abc file format) into a Nuke scene. During the import, Nuke allows you to control which nodes in the Alembic scene get loaded by using an import dialog. If there is only one item in the Alembic file, it loads automatically. Below is an example of an imported octopus Alembic file, courtesy of Sony Pictures Imageworks.
For more information on Alembic, see http://code.google.com/p/alembic/
Tip: In addition to meshes and point clouds, you can also import cameras and transforms from Alembic files.
To learn how to export files in the Alembic (.abc) format, refer to Exporting Geometry, Cameras, Lights, Axes, or Point Clouds for more information.
To Import Meshes and Point Clouds from an Alembic File
| 1. | Click Image > Read or press R on the Node Graph. |
The Read File(s) dialog displays.
| 2. | Select the Alembic file you want to import from the file location, then click Open. |
The Alembic import dialog displays. By default, all items are selected in the Scene Graph when the import dialog is opened, as shown below:

Selected parent items are indicated by a yellow circle, and selected child items by a yellow bar (these turn orange when you select them in the list). Unselected items do not have an indicator next to them.
| 3. | To import specific items, you must first deselect the root item by clicking on the yellow circle. This de-selects the root and any child items. Then, select specific items in the scenegraph by clicking on the blank space where the circles had been, as shown below: |

Alternatively, you can right-click on an item and select:
• Select as parent - to select this item and make it a parent to other items. This allows you to create a separate Nuke node for this item (and any child items underneath it) in the next step.
• Select as child - to select this item and make it a child to the nearest parent item up the tree.
• Deselect - to deselect this item (that is, not import it from the scene).
You can also select multiple items by pressing Ctrl/Cmd or Shift while clicking them.
| 4. | Do one of the following: |
• Click Create all-in-one node to create one Nuke node for everything that’s selected, regardless of whether the items are selected as parent or child.
• Click Create parents as separate nodes to create one Nuke node for each parent item (yellow circle) in the tree. This node contains all the child items (yellow bars) under the parent.
Tip: If you always want .abc files to import all-in-one without displaying the import scenegraph, enable Preferences > Behaviors > File Handling > always load abc files as all-in-one.
Nuke creates ReadGeo, Camera, and Axis nodes as necessary, depending on what you selected to import from the scene.
| 5. | On ReadGeo nodes, you can adjust the following: |
• If the objects you imported are animated, make sure read on each frame is checked. This preserves the animation. When read on each frame is disabled, use lock frame to select the frame the object is loaded at.
• If you don’t want to render motion blur, disable sub frame for faster UI interactions.
• In the frame rate field, define a frame rate (frames per second) to sample the animation curves.
• Use render points as to determine how point primitives are rendered: either as Nuke point clouds or Nuke particles.
• Enable use geometry colors to apply geometry color attributes read from .abc files and apply them to the Nuke geometry.
Note: When disabled, this control can cause differences in rendered output when compared to previous versions of Nuke. If this occurs, enable use geometry colors in the ReadGeo properties panel.
• Any mesh items imported are listed on the Scenegraph tab of the ReadGeo node. To display all items that exist in the Alembic file in the list, check view entire scenegraph. This allows you to add items to the list or remove them from it by clicking on the yellow and blank indicators on the right.
Tip: To load specific items from an Alembic file, you can also create a ReadGeo, Camera, or Axis node, check read from file, and click the folder icon on the File tab to browse to an .abc file.