Search is based on keyword.
Ex: "Procedures"
Do not search with natural language
Ex: "How do I write a new procedure?"
Creating Shapes
To create shapes:
| 1. | Double-click on the ModelBuilder node to open its properties. |
| 2. | Use the shape creation menu |
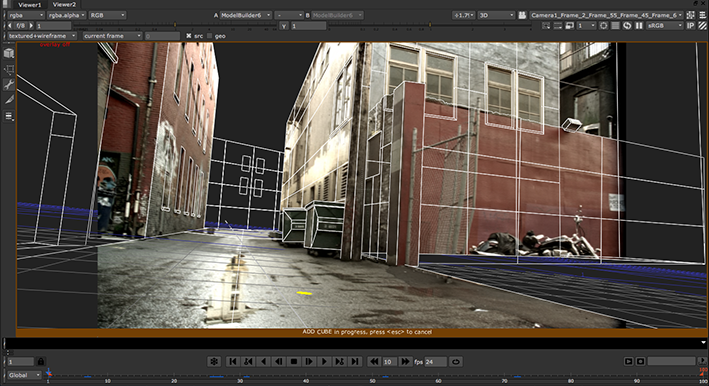
A colored border appears around the Viewer window to indicate that the action of creating a shape is in progress.

Tip: If you want to model a simple wall, a Card might be a good starting point. For an entire building, you may want to use a Cube instead.
You can adjust the shapes (for example, the number of rows or columns in them) on the Shape Defaults tab. These controls only apply when creating a shape - you cannot adjust them after the fact.
| 3. | Hover over the Viewer. You should see a yellow circle appear under the cursor. You can now: |
• click in the Viewer to set where you want the new shape created. If you click over empty space, the shape is created at a distance specified by the Distance control. There are no specific units for this value; low values position the shape close to the camera, and higher values mean further away.
• hold down Shift and click to snap to the surface of any geometry under the cursor.
• drag the mouse left or right to scale the shape.
The shape you selected appears in the Viewer and in the Scene list in the ModelBuilder properties.
| 4. | If the shape was created too close to the camera or too far away, Activate Edit Mode |

| 5. | If you have more than one object that you want to model in your src footage, you can repeat the above steps to create several shapes using a single ModelBuilder node. |
| 6. | Proceed to Editing Shapes’ Display Characteristics below. |
Tip: You can also use the Create buttons on the Shape Defaults tab to create shapes. This is exactly the same as using the shape creation menu in the Viewer.
Tip: If you want to use 3D geometry as a visual reference and connected it to the geo input, before creating a shape, you need to:
1. Activate Edit Mode ![]() in the ModelBuilder toolbar on the left hand side of the Viewer and set the selection mode menu to Select vertices
in the ModelBuilder toolbar on the left hand side of the Viewer and set the selection mode menu to Select vertices ![]() .
.
2. Drag in the Viewer to select vertices on the object that you want to model, bearing in mind that when you create a new shape, it’s automatically aligned with the selected vertices.
If you cannot see the object in the geo input, make sure Pass Through Geo is enabled in the ModelBuilder properties.
3. Use the shape creation menu ![]() in the ModelBuilder toolbar to select the basic 3D shape that best matches the object you are trying to model.
in the ModelBuilder toolbar to select the basic 3D shape that best matches the object you are trying to model.
ModelBuilder creates the shape to align with the selected vertices.
Sorry you didn't find this helpful
Why wasn't this helpful? (check all that apply)
Thanks for taking time to give us feedback.