Swapping Channels
Nuke features two main nodes for channel swapping: Shuffle and ShuffleCopy. Shuffle lets you rearrange the channels from a single image (1 input) and then output the result to the next node in your compositing tree. ShuffleCopy lets you rearrange channels from two images (2 inputs) and output the result. Let’s take a look at the ShuffleCopy node first.
|
|
| The ShuffleCopy matrix. |
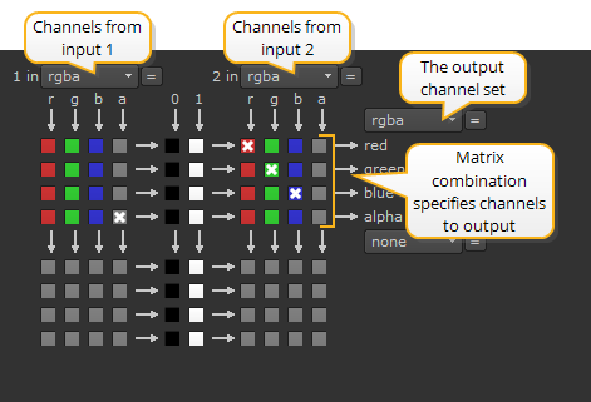
• Channels from Input 1 - the first group of channel boxes are the channels supplied by input 1 on the node. As shown above, the foreground element’s default rgba set is selected.
• Channels from Input 2 - the second group of channel boxes are the channels supplied by input 2 on the node.
To swap channels, do the following:
| 1. | Click Channel > Shuffle or ShuffleCopy to insert a Shuffle or ShuffleCopy node. Remember you use Shuffle when you only want to swap channels in a single upstream node, and ShuffleCopy when you want to swap channels in two separate nodes, like a foreground and background branch. |
| 2. | Select the incoming channels from the In 1 and In 2 (optional) dropdown menus. You can select up to eight channels in this manner. |
| 3. | Select the layers to which you wish to direct the incoming channels from the dropdown menus on the right. You can select up to eight channels in this manner. |
| 4. | If the outgoing layer to which you wish to direct channels does not yet exist, create it using the new option on the dropdown menus on the right. |
| 5. | Click as necessary on the resulting matrix to swap channels. |
Tip: If you just need to copy a channel from one data stream into another, use Channel > Copy, instead of ShuffleCopy. Then, specify the channel to copy and the destination channel for output.
Channel Outputs
The combination of the boxes checked in the channel matrix create the list of channels that are output to the layer selected in the top dropdown menu on the right.
This four channel stream acts as the second set of outputs from the node. It allows you to output another four channels from the node, for a total of eight channels of output to match the possible eight channels of input.
In this case, this second set of outputs has not been utilized.
Tip: While not required, it’s good practice to use the first set of outputs for swapping channels in the current data stream and the second set of outputs for creating new channels. This protects the default rgba set from unintentional overwriting, and makes it easier for other artists to understand the workings of your script.
The basic process then for swapping channels is to first select your incoming layers from the 1 in and 2 in (or, in the case of the Shuffle node, the in 1 and in 2) dropdown menus. Then, select your outgoing layers from the dropdown menus on the right. Then make the actual channel swaps by clicking on the resulting matrix.
For example, to take the simplest case, suppose, you wanted to copy the red channel of an rgba set into its alpha channel. You would click on the matrix to create the following configuration.
|
|
| Configuring the channel matrix. |
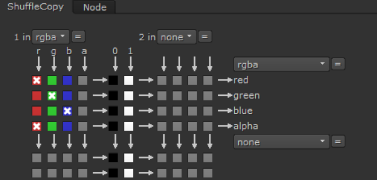
You can see that the matrix makes use of the r channel (standing for red) twice. It goes out once as the red channel, and another time as the alpha channel.
Assigning Constants
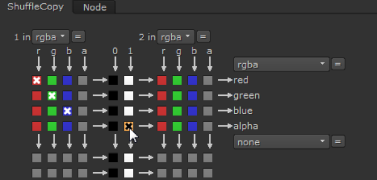
The shuffle nodes also include parameters that let you assign white (1) or black (0) constants to any incoming channel. So, for example, to reset the alpha channel to a full-frame image, you would configure the matrix as follows:
|
|
| Assigning constants to channels. |
Creating Swap Layers
Finally, note that if the layer to which you wish to output channels does not yet exist, you can create it using the new option on the dropdown menus on the right. Once you select the new option, you follow the same process for creating layers as is described under Creating Channels and Layers.