Modifying the Particles’ Movement
Bouncing Particles off Objects
With the ParticleBounce node, you can make your particles bounce off the shape of a 3D object instead of traveling through it. Connect this node to your other particle nodes, and adjust the ParticleBounce controls:
|
1.
|
To set your particles to bounce off the outside of the bounce object (specified by the object control), select a mode in the external bounce mode dropdown: none to apply no external bounce effect, bounce to bounce the particles, kill to end the life of the particles as they bounce. |
|
2.
|
Select a channel where a particle should be assigned to when a bounce is detected in the new channels dropdown. Setting this to none doesn’t perform any channel assignment. |
|
3.
|
In the bounce field, specify the strength of the external bounce effect, and adjust friction to control the amount of friction for external bounce effect. |
|
4.
|
To set your particles to bounce off the inside of the bounce object (specified by the object control), use the internal bounce mode dropdown: |
• none - to apply no internal bounce effect.
• bounce - to bounce the particles.
• kill - to end the life of the particles as they bounce.
|
5.
|
Select a channel where a particle should be assigned to when a bounce is detected in the new channels dropdown. Setting this to none doesn’t perform any channel assignment. |
|
6.
|
In the bounce field, specify the strength of the internal bounce effect, and adjust friction to control the amount of friction for the internal bounce effect. |
|
7.
|
Select the object you want to use for the bounce effect in the object dropdown: |
• plane, sphere or cylinder - add a Nuke standard primitive to use as the bounce surface for the particle system. You can use these shapes to quickly test your particle effects.
• input - add custom geometry attached to the geometry input.
|
8.
|
Use the transform controls to fine-tune your geometry's position to achieve the desired bounce result. |
|
|
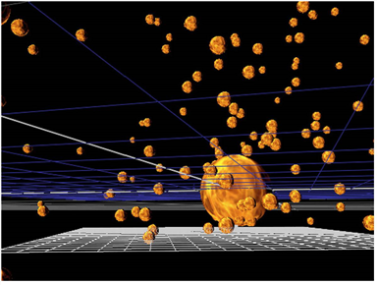
| Particles bouncing off a plane. |
Adding Drag to Particles
With the ParticleDrag node you can apply drag on your particles. This gradually slows them down over time.
|
1.
|
Connect the ParticleDrag node to your particle stream. |
|
2.
|
Adjust the ParticleDrag controls: |
• drag - increase to add a drag effect to your particles, slowing and stopping their movement as they are making distance from the particle center.
• rotational drag - increase to add a drag effect to your particles’ rotation, slowing and stopping their rotation.
Tip: You can also enter negative values to apply a reverse drag effect and speed the particles up.
Adding Turbulence Motion on Particles
The ParticleTurbulence node applies Perlin noise to the particle movement in the x, y and/or z directions.
|
1.
|
Connect a ParticleTurbulence node to your particle stream. |
|
2.
|
Adjust the ParticleTurbulence controls: |
• strength - set the strength for the turbulence effect on the x, y and z axes.
• scale - set the scale of the effect, or the size of the area affected, on the x, y and z axes.
• offset - set the offset applied to the effect, or the offset of the area affected, on the x, y and z axes.
Adding Spiral Motion to Particles
The ParticleVortex node applies a circular force to the particles and attracts them to an imaginary line, thus creating a whirlpool of particles.
|
1.
|
Connect the ParticleVortex node to your particle stream. |
|
2.
|
An arrow appears in the Viewer, which you can drag to determine direction and velocity of the vortex effect. The bigger and longer the arrow, the stronger the effect. Alternatively, you can use the from and to controls in the properties panel. |
|
3.
|
In the ParticleVortex properties panel modify the parallel effect with the parallel control. This accelerates the particles in the direction of the imaginary vortex center line. If you set this to 0, no parallel force is applied, and positive and negative values determine the direction of the force. Adjust the parallel falloff to choose how quickly strength of the parallel force falls off with respect to the distance by selecting the type of falloff, none for no falloff, inverse for inverse falloff, or inverse square for inverse falloff squared. |
|
4.
|
With the tangential slider you can force the particles to circulate the vortex center line. Adjust tangential falloff to choose how quickly strength of the tangential force falls off with respect to the distance by selecting the type of falloff, none for no falloff, inverse for inverse falloff, or inverse square for inverse falloff squared. |
|
5.
|
Use the radial slider to adjust the force that attracts the particles to (positive values), or repels (negative values), them from the center line. Adjust radial falloff to choose how quickly strength of the radial force falls off with respect to the distance by selecting the type of falloff, none for no falloff, inverse for inverse falloff, or inverse square for inverse falloff squared. |
Tip: If you want to create a helix of particles, you can turn up both the parallel and tangential values. This creates a particle vortex in a shape of a corkscrew.
|
|
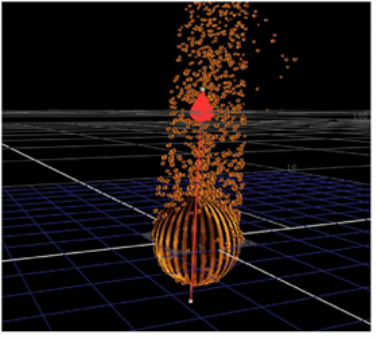
| ParticleVortex on a sphere. |
Adding a Wind Effect to Particles
With the ParticleWind, you can simulate a wind blowing on your particles.
|
1.
|
Connect the ParticleWind node to your particle stream. An arrow appears in the Viewer, which you can then use to determine direction and velocity of the wind. The bigger and longer the arrow, the stronger the wind effect. Alternatively, you can use the from and to controls in the properties panel. |
|
2.
|
In the ParticleWind controls, check air resistance to enable a drag effect on the wind. |
|
3.
|
Adjust the drag slider to increase or decrease the simulated air resistance. |