These pages teach you how to reformat images through scaling, cropping, and pixel aspect adjustments. You will also learn to adjust bounding boxes to minimize processing and rendering times.
You can use the Reformat node for three different purposes:
|
1.
|
To generate image sequences that match a desired image format in terms of both resolution and pixel aspect ratio (the width to height ratio of the format’s individual pixels). |
|
2.
|
To create thumbnails (low resolution frames which you might post to the web in order to storyboard a sequence). The node scales the frame until it fits inside a rectangle whose dimensions you specify. It also sets pixel aspect ratio to one (square). |
|
3.
|
To scale images. The scale factor is rounded slightly so that the output image has an integer number of pixels in the direction you select in the Reformat node’s controls. |
When you read in elements, Nuke stores their format settings and makes them available to the Reformat node. You can then apply one of the existing formats to your images, or create, edit, and delete formats yourself.
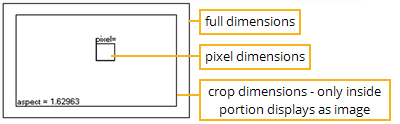
When creating a new format from scratch, you define the overall resolution, the cropped resolution (optional) and the pixel aspect ratio. As you define these parameters, the Reformat operator graphically displays them for you in the manner shown below.
To Create a New Output Format:
|
1.
|
Click Transform > Reformat to insert a Reformat node at an appropriate place in your script (generally before a Write node). |
|
2.
|
Connect a Viewer to the output of the Reformat node so you can see the effect of your changes. |
|
3.
|
Select new from the output format dropdown menu. The New format dialog appears. |
|
4.
|
Type a name for the new format in the name field. |
|
5.
|
In the file size fields, type the full output resolution (in pixels). |
|
6.
|
If you want to crop the full output resolution (for example, to create a letter box): |
• Check image area.
• Increment the x field to define the left boundary of the crop. (The display updates to show you the left boundary of the crop relative to the full-size input.)
• Increment the y field to define the bottom boundary of the crop.
• Increment the r field to define the right boundary of the crop.
• Increment the t field to define the top boundary of the crop.
|
7.
|
If the destination display device for the image sequence uses non-square pixels, type the appropriate pixel aspect ratio in the pixel aspect field (for example, if your destination is a digital video display, type 1.1). |
Note: You can also add formats to Nuke via entries to the menu.py file:
1. Open the menu.py file (located in same directory as your Nuke executable).
2. Add an entry similar to the following example:
nuke.addFormat ("720 486 0 0 720 486 0.9 NTSC_video")
where the numbers specify, respectively, the format’s full horizontal resolution, full vertical resolution, left crop position, bottom crop position, right crop position, top crop position, and pixel aspect ratio; and where the final text string designates the format’s name.
3. Save and close the menu.py file. The next time you launch Nuke the format is available for selection from the Project Settings dialog, Reformat node properties panel, and elsewhere.
To Edit a Format:
|
1.
|
Select the format you wish to edit from the output format dropdown menu. |
|
2.
|
From the same dropdown menu, select edit. The Edit format dialog appears. |
|
3.
|
Edit the name, file size, image area, and pixel aspect fields as necessary. |
|
4.
|
Click OK to save the changes to the format. |
To Delete a Format:
|
1.
|
Select the format you wish to delete from the output format dropdown menu. |
|
2.
|
From the same dropdown menu, select delete. The format is removed from the menu. |
To Apply a Format:
|
1.
|
If necessary, click Transform > Reformat to insert a Reformat node at an appropriate place in your script (generally before a Write node). |
|
2.
|
Connect a Viewer to the output of the Reformat node so you can see the effect of your changes. |
|
3.
|
From the type dropdown menu, select to format. |
|
4.
|
Select the format you wish to apply from the output format dropdown menu. |
|
5.
|
From the resize type field, select the method by which you want to preserve or override the original aspect ratio. Select: |
• width to scale the original until its width matches the format’s width. Height is then scaled in such a manner as to preserve the original aspect ratio.
• height to scale the original until its height matches the format’s height. Width is then scaled in such a manner as to preserve the original aspect ratio.
• fit to scale the original until its smallest side matches the format’s smallest side. The original’s longer side is then scaled in such a manner as to preserve original aspect ratio.
• fill to scale the original until its longest side matches the format’s longest side. The input’s shorter side is then scaled in such a manner as to preserve original aspect ratio.
• distort to scale the original until all its sides match the lengths specified by the format. This option does not preserve the original aspect ratio, so distortions may occur.
|
6.
|
When cropping the output, check center to position the crop area at the center of the frame. |
|
8.
|
When scaling an image with Key, Simon, and Rifmen filters, you may see a haloing effect which is caused by pixel sharpening these filters employ. If necessary, check clamp to correct this problem. |
Creating Thumbnails
|
1.
|
Click Transform > Reformat to insert a Reformat node at an appropriate place in your script (generally before a Write node). |
|
2.
|
Connect a Viewer to the output of the Reformat node so you can see the effect of your changes. |
|
3.
|
From the type dropdown menu, select to box. |
|
4.
|
In the width and height fields, type the output dimensions. The units are pixels. |
|
5.
|
Use the resize type dropdown menu to select the method by which you preserve or override the original pixel aspect ratio. Select: |
• width to scale the original until its width matches the value in the width field. Height is then scaled in such a manner as to preserve the original aspect ratio (this means that the output you specified in height may not match the result).
• height to scale the original until its height matches the value in the height field. Width is then scaled in such a manner as to preserve the original aspect ratio (this means that the output you specified in width may not match the result).
• fit to scale the original until its smallest side matches the corresponding value in width/height. The longer side is then scaled in such a manner as to preserve the original aspect ratio.
• fill to scale the original until its longest side matches the corresponding value in width/height. The smallest side is then scaled in such a manner as to preserve the original aspect ratio.
• distort to scale the original until its sides match the values in the width/height fields. This option does not preserve the original aspect ratio, so distortions may occur.
|
7.
|
When scaling an image with Key, Simon, and Rifmen filters, you may see a haloing effect which is caused by pixel sharpening these filters employ. If necessary, check clamp to correct this problem. |
Scaling Image Sequences
|
1.
|
Click Transform > Reformat to insert a Reformat node at an appropriate place in your script (generally before a Write node). |
|
2.
|
Connect a Viewer to the output of the Reformat node so you can see the effect of your changes. |
|
3.
|
From the type dropdown menu, select scale. |
|
4.
|
In the scale fields, enter scale factors for the width and the height. To scale each direction separately using different scale factors, click the 2 button. |
|
5.
|
Use the resize type dropdown menu to select the method by which you preserve or override the original pixel aspect ratio. Select: |
• width to scale the original so that it fills the output width. Height is then scaled in such a manner as to preserve the original aspect ratio.
• height to scale the original so that it fills the output height. Width is then scaled in such a manner as to preserve the original aspect ratio.
• fit to scale the original so that its smallest side fills the output width or height. The longest side is then scaled in such a manner as to preserve the original aspect ratio.
• fill to scale the original so that its longest side fills the output width or height. The smallest side is then scaled in such a manner as to preserve the original aspect ratio.
• distort to scale the original so that both sides fill the output dimensions. This option does not preserve the original aspect ratio, so distortions may occur.
|
7.
|
When scaling an image with Key, Simon, and Rifmen filters, you may see a haloing effect which is caused by pixel sharpening these filters employ. If necessary, check clamp to correct this problem. |
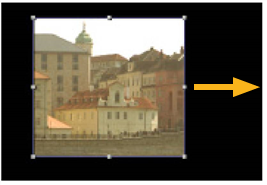
Cropping Elements
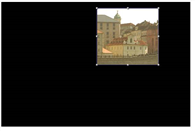
To crop a frame is to cut out the unwanted portions of the image area.
|
|
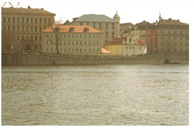
| The original image. |
Cropping the image. |
|
1.
|
Click Transform > Crop to insert a Crop node at an appropriate place in your script. |
|
2.
|
Connect a Viewer to the output of the Crop node so you can see the effect of your changes. |
|
3.
|
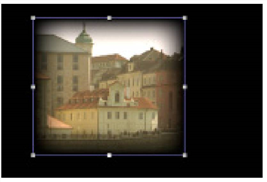
Define the crop boundaries: |
• In the Viewer, drag on any side of the frame to reposition it.
• Or, in the Crop properties panel, increment or decrement the box field (x stands for left side, y for bottom side, r for right side, and t for top side).
|
4.
|
To fill the cropped portion with black, check black outside. To fill the cropped portion by expanding the edges of the image, uncheck black outside. To adjust the image output format to match the cropped image, check reformat. |
|
5.
|
If you wish to vignette the edges of the cropped portion, increment the softness field. |