Loading Image Sequences
When you are ready to start compositing, you may want to begin by importing a background or foreground image sequence. Typically, you would read in both full- and proxy-resolution versions of the sequence. You can read in several image sequences in one go.
Importing Image Sequences
To import an image sequence using Nuke's file browser:
| 1. | Select Image > Read (or press R over the Nuke Node Graph). |
Tip: Pressing R with an existing Read node selected, opens the file browser at the location specified by that node.
| 2. | Browse to the image sequence you want to import. For instructions on using the file browser, see Using the File Browser. Select the file you want to open. If you want to open several files at the same time, Ctrl/Cmd+click on the files, and then click Open. |
A Read node is inserted in the Node Graph.
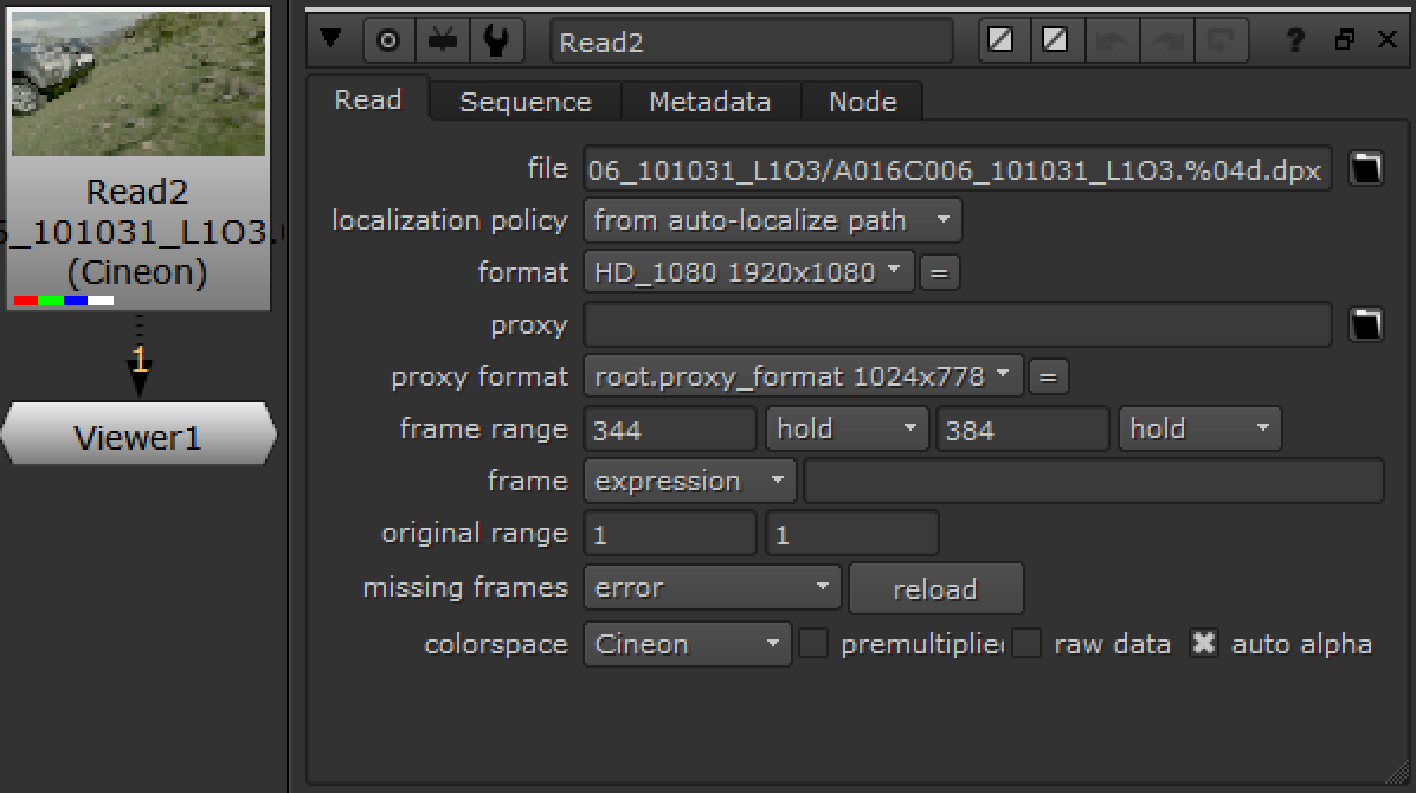
Nuke imports the image sequence and displays it as a thumbnail on the Read node. Generally, the Read node does not reformat or resize the sequence in any way, and the node’s properties panel is updated to display the native resolution and the frame range for the sequence. Note that the format and proxy format fields in the controls indicate the format of the images, they do not cause the images read from files to be resized to this format.
| 3. | You can cycle through the available versions of a file using the Alt+Up/Down arrow keys. If you want to skip ahead to the highest version available, press Alt+Shift+Up arrow key. |
Versions must written in the following format in order for Nuke recognize them:
../myFiles/grades/A003_C007_071105_v01_001.r3d
../myFiles/grades/A003_C007_071105_v02_001.r3d
../myFiles/grades/A003_C007_071105_v03_001.r3d
| 4. | If your sequence has a red, green and blue channel but no alpha channel, check the auto alpha box in the Read node control panel to set the alpha channel to 1. This prevents possible problems from occurring if Nuke tries to read the alpha channel and one doesn’t exist. The auto alpha box is unchecked by default. |
Note: Nuke reads images from their native format, but the Read node outputs the result using a linear colorspace. If necessary, you can change the Colorspace option in the Read node’s properties panel, or insert a Color > Colorspace node to select the color scheme you want to output or calculate.
Note: The maximum image size the Nuke Viewer can display is 2^32 = 4,294,967,296 pixels. This is the same as 64k x 64k, 128k x 32k, 256k x 16k, or 512k x 8k. If your image is larger than this, it is resized and you get the following warning:
“Viewer image is clipped to <size> x <size>!”
For example, if your image resolution is 60,000 x 4473, Nuke is able to display the image because the number of pixels is less than 2^32. However, if the resolution is 110,000 x 50,000 (more than 2^32 pixels), the image is resized to 85,899 x 50,000.
In addition to the Viewer, this limit is also applied to the bounding box of the images being passed between each node.
| 5. | If you have a proxy version of the image sequence, click the proxy field’s folder icon |
The proxy file does not need to match the proxy resolution in use. Depending on your settings, either the full-res or proxy file is scaled to the required proxy size. For more information, see Proxy Mode.
| 6. | You can access the metadata contained within the read file by clicking the Metadata tab. Once you know which keys exist in the file, you can reference them in expressions. See Expressions for more information. |
The metadata displayed depends on the file type. For example, a .jpg might only contain input/ keys, whereas QuickTimes contain input/ and quicktime/ keys. See Working with File Metadata for more information.
To Import an Image Sequence from an External File Browser
To load an image, you can also drag and drop the image into the Node Graph from an external file browser (such as Windows Explorer or Mac Finder). To load an entire image sequence this way, drag and drop the directory that contains the images into the Node Graph.
Notes on Importing MOV Files
When reading .mov files, Nuke attempts to select the "best fit" combination by reading an extended list of metadata key/value pairs from the QuickTime header, including nclc atom, gama atom, and ProRes codec headers. You can manually override the following MOV Options in the Read node Properties panel:
|
Control |
Description |
|---|---|
|
YCbCr matrix |
Sets the way Y’CbCr is converted to RGB. Rec 601 and Rec 709 follow the ITU.BC specifications. |
|
Data Range |
Sets the minimum and maximum color range values for decoded DNxHD files. If your source file was encoded with a reduced range (0-240 for 8-bit or 0-960 for 10-bit), set source range to Video Range to decode the full range (0-255 for 8-bit or 0-1023 for 10-bit). |
|
first track only |
When enabled, only the first view present in the file is displayed, regardless of how many views the file contains. When disabled, and there is more than one view set up in the project settings, you can switch between views using the buttons above the Viewer. |
|
[Metadata] Do not attach prefix |
When enabled, the metadata accompanying the file is saved without the quicktime prefix. Note: QuickTime container-specific metadata always carries the prefix. When disabled, all metadata is prefixed with quicktime for easy identification. |
|
[Metadata] Match key format |
When enabled, Nuke attempts to clean up meta keys into the standard Nuke metadata format. When disabled, the metadata is passed down the Node Graph unchanged. |
|
Video Codec |
Displays the codec used to encode the clip. |
Note: When reading .mov files, Nuke looks for metadata in the following order and uses it to govern the settings on the Read node, falling down to each level when the level above is unavailable or set to a reserved or unknown value:
1. Foundry -specific user data
2. prores header
3. nclc atom
4. gama atom
5. defaults based on codec type
Certain .mov files may appear different in Nuke relative to Apple’s Final Cut Pro, because Final Cut Pro introduces a gamma compensation based on assumptions about the content of the files and the viewing environment.
To limit the number of background processes that Nuke can run when reading .mov files, go to Preferences and set the number for QuickTime decoders to use in the Performance > Threads/Processes tab.
Notes on Importing AVI Files
.avi files can be supported by default or only via Nuke’s reader that is based on the FFmpeg open source library. If you get an error when using .avi files in Read nodes, you may need to use the prefix mov64: before the file path and file name, for example, mov64:\z:\job\FILM\IMG\final_comp_v01.####.avi.
Notes on Importing OpenEXR Files
Nuke supports multi-part OpenEXR 2.4.2 images, which allow you to store your channels, layers, and views in separate parts of the file in order to speed up processing. You can load multi-part OpenEXR files in exactly the same way as single-part OpenEXR files.
The OpenEXR file format allows the display window to have the lower left corner in any position. Unfortunately, Nuke needs all formats to have a lower left corner coordinate of 0,0. In the Read node control panel, under exrOptions, you can check the offset negative display window box to tell Nuke to offset the image so that the display window left side x coordinate is 0. If you uncheck the box, Nuke shrinks the format from both sides the amount that it’s negative in the x coordinate, in other words treat the area as overscan.
By default, the exr prefix is attached to metadata keys to make them distinct from other metadata in the tree. If you’d rather read metadata in “as is” without attaching a prefix, enable do not attach prefix.
When reading in .exr files, you can determine how pixels at the edge of the data window, or bounding box in Nuke terms, are treated using the edge pixels dropdown:
• plate detect - if the bounding box and format match exactly, then repeat all edges. Otherwise, add black at the edges.
• edge detect - for each matching edge, repeat the edge pixels. Add black at mismatched edges.
• repeat - always repeat the edge pixels outside the bounding box.
• black - always add black pixels outside the bounding box.
On Linux, the Nuke OpenEXR reader uses a memory-mapping function to improve performance reading PIZ-compressed .exr files. However, some customers have experienced hanging when reading large (frame size and number of channels) PIZ-compressed .exr files across an NFS network. If you experience this problem, you can tell Nuke not to use the mmap function by enabling this option. You can set it on a case-by-case basis or use a knobDefault in your init.py to always have it disabled. For more information on knobDefault, see the Nuke Python documentation (Help > Documentation).
Notes on Importing PSD Files
When loading a layered .psd file, a button called Breakout Layers appears under psd Options in the Read node control panel. Clicking this “breaks out” the .psd file into separate layers using some Shuffle nodes, and recombines these layers with a number of PSDMerge nodes. Each layer is grouped and labeled using a Backdrop node for clarity. In addition, a Crop node is inserted between the Shuffle and PSDMerge nodes, allowing you to adjust the bounding box for each layer individually.
The PSDMerge node is a type of merge node exclusive to this feature. In the control panel, there is an operation dropdown menu, a mask field (with an invert checkbox) and a mix slider. If the blend mode for a layer was set in Photoshop®, Nuke automatically sets this in the operation dropdown.
Note: The blend modes in PSDmerge are approximated and do not match Photoshop® exactly.
Naming Conventions
The file names of image sequences generally end in a number before the extension, for example image0001.rgb, image0002.rgb, image0003.rgb, and so on. When browsing for files like this, you may notice that the sequence appears as image####.rgb. Here, #### is Nuke’s way of indicating that the number is in a 4-digit incremental format. For a 3-digit format, such as image001.rgb, the frame number variable would be ###.
Nuke’s file browser also understands unpadded file names, such as image1.rgb, image2.rgb, image3.rgb, and so on. They appear as image#.rgb.
Changing the Relation Between the Current Frame and the
Frame Read In
By default, Nuke assumes an exact relation between the current frame processed, and the frame read in. For example, at frame 15, Nuke reads in image.0015.rgb. However, you can change this behavior using the frame parameter on the Read node. For instance, if you have a sequence that runs from image.0500.rgb to image.1000.rgb, you may want to read in image.0500.rgb at frame 1. Nuke lets you do this using expressions, specified start frames, and constant offsets. Each method is described below.
Using Expressions
| 1. | Select Image > Read to import an image sequence. |
| 2. | In the Read node controls, set the frame dropdown menu to expression. Enter an expression in the field on the right. The expression changes the relation between the current frame and the frame read in. |
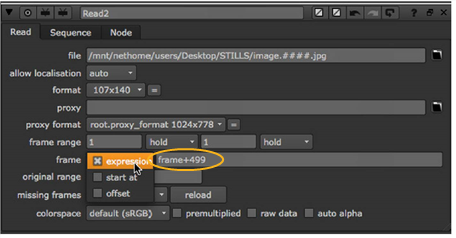
For example, if your clip begins from image.0500.rgb and you want to place this first frame at frame 1 rather than frame 500, you can use the expression frame+499. This way, 499 frames are added to the current frame to get the number of the frame that’s read in. At frame 1, image.0500.rgb is read in; at frame 2, image.0501.rgb is read in; and so on.
Another example of an expression is frame*2. This expression multiplies the current frame by two to get the number of the frame that’s read in. This way, only every other frame in the clip is used. At frame 1, image.0002.rgb is read in; at frame 2, image.0004.rgb is read in; at frame 3, image.0006.rgb is read in; and so on.
Specifying a Start Frame for a Clip
| 1. | Select Image > Read to import an image sequence. |
| 2. | In the Read node controls, set the frame dropdown menu to start at. Enter a start frame number in the field on the right. This specifies the frame where the first frame in the sequence is read in. In other words, all frames are offset so that the clip starts at the specified frame. |
For example, if your sequence begins from image.0500.rgb and you enter 1 in the field, image0500.rgb is read in at frame 1. Similarly, if you enter 100 in the field, image0500.rgb is read in at frame 100.
Offsetting All Frames by a Constant Value
| 1. | Select Image > Read to import an image sequence. |
| 2. | In the Read node controls, set the frame dropdown menu to offset. Enter a constant offset in the field on the right. This constant value is added to the current frame to get the number of the frame that’s read in. |
For example, if your clip begins from image.0500.rgb and you want to place this first frame at frame 1 rather than frame 500, you can use 499 as the constant offset. This way, 499 is added to the current frame to get the frame that’s read in. At frame 1, image.0500.rgb is read in; at frame 2, image.0501 is read in, and so on.
You can also use negative values as the constant offset. For example, if you use the value -10, Nuke subtracts ten from the current frame to get the frame that’s read in. At frame 20, image.0010.rgb is read in; at frame 21, image.0011.rgb is read in; and so on.