Monitor Output in Nuke Studio (SDI/HDMI)
The Monitor Out feature allows you to preview Viewer images in a floating window or on an external projector/video monitor to check the final result, including the correct output transform and aspect ratio.
A dedicated Monitor Out workspace provides easy access to the monitor out strip and its controls, but you can also access the controls through the MonitorOut in the node Properties panel.

Nuke and Nuke Studio support internal monitor out using a Floating Window and dedicated AJA or Blackmagic cards, selected from the Device dropdown in the MonitorOut's Properties:
• Floating Window - Nuke's native monitor out uses a floating monitor and does not require additional hardware. Mac users can also take advantage of additional HDR technology including an extended sRGBf LUT. See EDR Displays - Mac Only (Beta) for more information.
• Dedicated AJA or Blackmagic Design cards - Nuke supports various AJA and Blackmagic devices that can be selected from the Device dropdown after installation. See AJA and Blackmagic Design Monitor Out Devices for more information on supported hardware and drivers.
Note: Audio scrubbing is not currently available through monitor out cards. Audio scrubbing is only supported through internal audio output devices.
Nuke also supports monitor out through VR headsets. See Reviewing on VR Headsets (HMD) for information on supported headsets.
Nuke and Nuke Studio Monitor Out
Nuke's monitor out uses a floating monitor or additional hardware from AJA or Blackmagic to display monitor out. The floating monitor allows Mac users to take advantage of additional HDR technology including an extended sRGBf LUT. See EDR Displays - Mac Only (Beta) for more information.
| 1. | Navigate to Workspace > Monitor Out. |
The Monitor Out workspace is displayed with the Monitor Out toolbar under the Viewer by default.

If you're working with multi-view footage in Interactive ![]() buffer mode, the monitor shows the output from the selected Viewer including the A/B player mode currently in use, such as wipe or difference. In Active, Buffer A, or Buffer B mode, additional controls display to determine the stereo mode and view to output. See Stereoscopic Scripts or Stereoscopic and Multi-View Projects for more information.
buffer mode, the monitor shows the output from the selected Viewer including the A/B player mode currently in use, such as wipe or difference. In Active, Buffer A, or Buffer B mode, additional controls display to determine the stereo mode and view to output. See Stereoscopic Scripts or Stereoscopic and Multi-View Projects for more information.

| 2. | Click the cog |
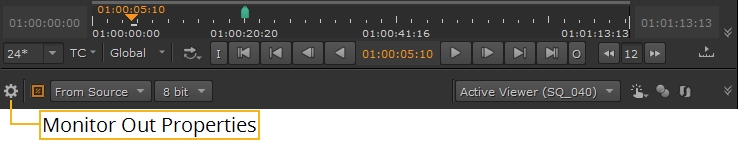
| 3. | Select the device you want to use from the output Device dropdown. All available devices are automatically detected and listed in this menu, along with the default options: |
• None - disables the monitor out feed.
• Floating Window - opens a floating monitor window, without the need for a monitor device and card. This is intended for full-screen use without displaying any of the interface.
Tip: Disable Minimize with Application to allow the floating window to remain visible when Nuke is minimized.
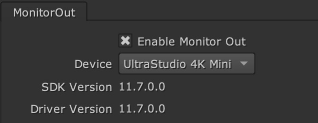
• Installed Cards - transfers the Viewer contents to the selected card and displays SDK and driver information associated with the card.
The Monitor Out and Properties panel duplicate some controls for convenience.

|
|
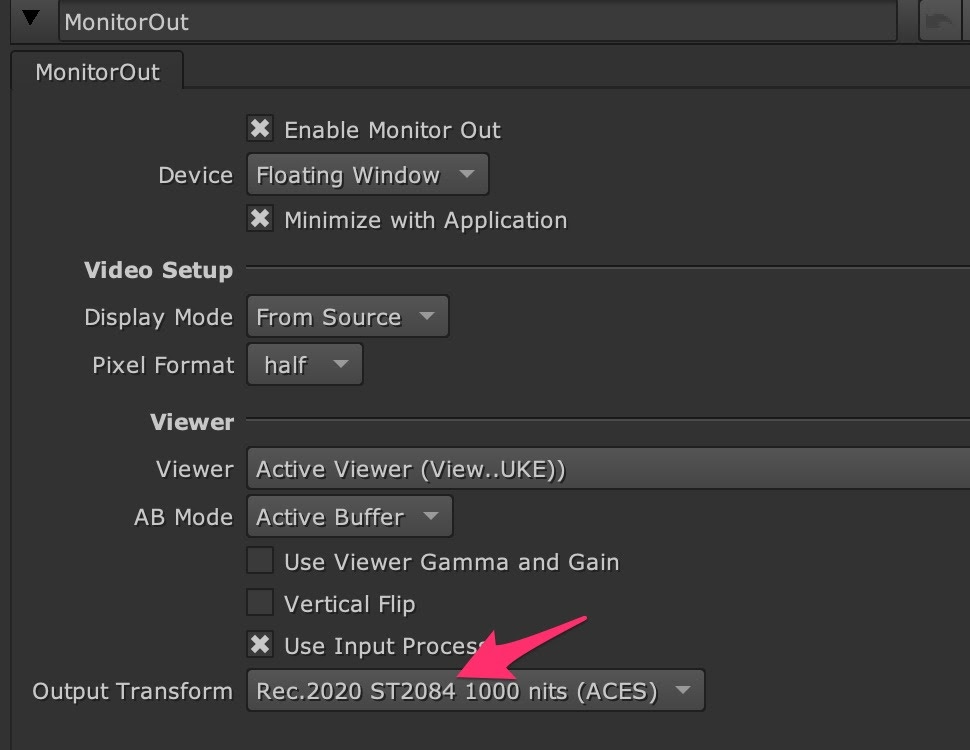
Display Mode |
Select the resolution output from the monitor card currently in use. The resolutions available depend on the card manufacturer. Note: Floating monitor out always uses the resolution of the Viewer in use. |
|
|
Pixel Format |
Select the pixel format output from the monitor card currently in use. The formats available depend on the card manufacturer. |
|
|
Viewer |
Select the Viewer to feed to the output monitor using the source viewer dropdown. Selecting Active Viewer always displays the Viewer that is currently selected in the workspace. |
|
|
|
Select the view mode using the AB Mode dropdown: • Active Buffer - the monitor always shows the output from the buffer currently in use by the selected Viewer. • Buffer A - the monitor always shows the output from the selected Viewer buffer A. • Buffer B - the monitor always shows the output from the selected Viewer buffer B. • Interactive - the monitor shows the output from the selected Viewer including the A/B player mode currently in use, such as wipe or difference. |
|
|
|
Click the button or enable Use Viewer Gamma and Gain to apply the active Viewer’s filtering, gamma, and gain to the monitor out. |
|
|
|
Click the button or enable Vertical Flip to flip the output vertically. |
|
|
Output Transform |
Select the color transform to apply to the image. If you’ve specified an OCIO configuration file in the preferences, these custom LUTs are also applicable. Note: If you plan to use the OCIO config file specified during exports, ensure that the Preferences > Project Defaults > Color Management > Export > use OCIO nodes when exporting to a Comp checkbox is enabled. |


EDR Displays - Mac Only (Beta)
If you're running Nuke on macOS Catalina or Big Sur and have a compatible screen capable of displaying values above 1, you can view your projects with HDR luminance ranges using sRGBf in OCIO Color Management. You can also display images in the P3 gamut, giving more accurate color on wide gamut displays.
Note: This feature requires a 2019 Mac Pro running macOS 10.15, or later, and a suitable display or a current generation iMac Pro, iMac or MacBook Pro with an HDR screen.
- On an Apple XDR, set the profile of your display to one of the HDR options in the OS System Display Preferences:
- In the Preferences, open the Color Management > HDR section and check Enable macOS HDR Color Profile (Display P3) (Beta).
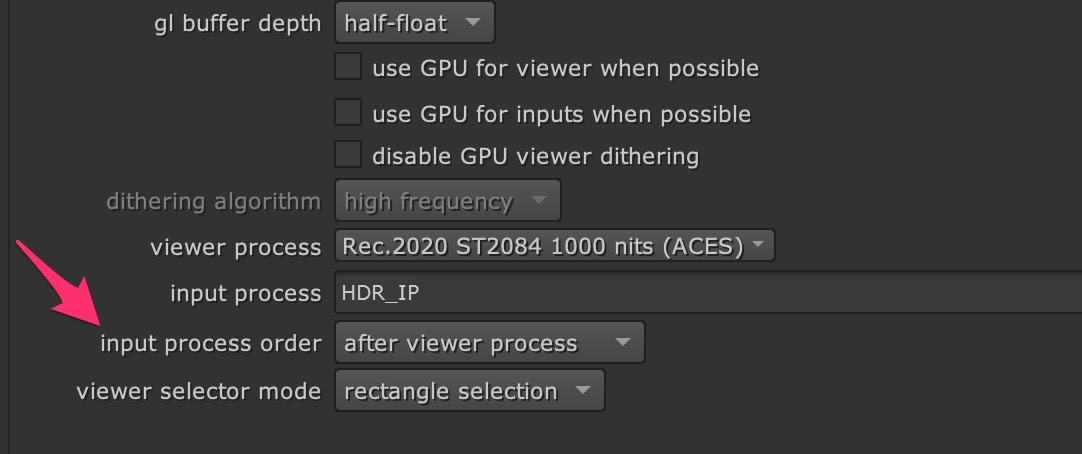
- In the Viewer Properties, set the gl buffer depth to half-float or float to allow HDR values to display.
- Set the Viewer Process to sRGBf using OCIO Color Management or provide your own extended color space. This ensures that the frame buffer is not clamped at 1.
- To use the HDR Video (P3-ST2084) setting on the monitor, select an appropriate ST2084 Output Transform in the MonitorOut Properties or in the Viewer.
• Pro Display XDR (P3-1600 nits)
• Apple Display (P3-500 nits)
• HDR Video (P3-ST2084) - 1000 nits
On other monitors, enable the High Dynamic Range checkbox.
Note: Enabling this control requires you to restart the application.
This control sets the Viewer colorspace to Display P3, so that the screen can display values above 1. This setting also applies the P3 colorspace to the following;
• All Viewers
• Node Graph
• Dope Sheet
• Curve editors
• Scopes

A further color space conversion is required to allow HDR images to display correctly. An example of how this can be achieved in Nuke can be seen using a gizmo created by a customer, Nick Shaw - the gizmo is available for download here: PQ-EDR_v101.gizmo
For more information on gizmos and how to use them, see Accessing Gizmos in Nuke.
Using this gizmo as an Input Process and setting the input process order to after viewer process renders the correct image in the Viewer.
The gizmo also contains a slider called Normalization (nits). This allows you to set the PQ nit value which is normalized to 1.0. This is useful, for example, to prevent clipping of a 1000 nit PQ signal on the 16" MacBook Pro's 500 nit display.
AJA and Blackmagic Design Monitor Out Devices
Our monitor out architecture interfaces directly with the AJA and BlackMagic Design device drivers, which are unified across their respective hardware lines, meaning all current supported cards for the versions detailed in Third-Party Libraries and Fonts should work.
You can select installed cards from the MonitorOut's Properties panel using the Device control. The SDK and driver versions for the selected card are displayed for convenience.
We've tested the following AJA and Blackmagic Design hardware:
Note: As a result of the current COVID-19 lockdown here in the UK, Foundry cannot guarantee that our usual high standards of QA have been applied to monitor output functionality.
|
AJA Card: |
KONA LHi |
KONA 4 |
KONA 5 |
KONA iOXT |
|---|---|---|---|---|
|
Note: 12-bit monitor output is only supported with dual connection cards, that is cards with two physical connections, not dual links combining two separate streams of data. |
||||
|
Formats |
||||
|
SD |
|
|
|
|
|
HD |
|
|
|
|
|
2K |
|
|
|
|
|
UHD |
|
|
|
|
|
4K |
|
|
|
|
|
Connection |
||||
|
BNC |
|
|
|
|
|
HDMI |
|
|
|
|
|
Stereoscopic Support |
||||
|
|
No |
Yes |
Yes |
No |
|
Platforms |
||||
|
|
Win, Mac, Linux |
Win, Linux |
|
Mac 10.9 and 10.10 |
|
Drivers |
||||
|
|
Driver 15.5.3 or later, available here: • Windows: https://www.aja.com/assets/support/files/7117/en/AJA-Software-Installer_Windows_v15.5.3_Release.zip • macOS: https://www.aja.com/assets/support/files/7114/en/AJA-Software-Installer_macOS_v15.5.3_Release.zip |
|||

|
Blackmagic Card: |
DeckLink SDI |
DeckLink HD Extreme 2 |
DeckLink Extreme 3D+ |
Intensity Pro 4K |
|---|---|---|---|---|
|
Note: Blackmagic Design cards don't currently support 10-bit output outside the SMPTE-range. Check that your footage does not contain illegal values to avoid artifacts in 10-bit output. |
||||
|
Formats |
||||
|
SD |
|
|
|
|
|
HD |
|
|
|
|
|
2K |
|
|
|
|
|
UHD |
|
|
|
|
|
4K |
|
|
|
|
|
Connection |
||||
|
BNC |
|
|
|
|
|
HDMI |
|
|
|
|
|
Stereoscopic Support |
||||
|
|
No |
No |
Yes |
No |
|
Platforms |
||||
|
|
Win, Mac, Linux |
Win, Mac, Linux |
Win, Mac, Linux |
Win, Mac, Linux |
|
Drivers |
||||
|
|
Driver 11.7 or later, available here: • Windows: https://www.blackmagicdesign.com/support/download/30fe73dc300d478db0b4772dd9fe2dcb/Windows • macOS: https://www.blackmagicdesign.com/support/download/30fe73dc300d478db0b4772dd9fe2dcb/Mac%20OS%20X • Linux: https://www.blackmagicdesign.com/support/download/30fe73dc300d478db0b4772dd9fe2dcb/Linux |
|||
|
Blackmagic Card: |
DeckLink Studio 4K |
DeckLink 4K Extreme |
DeckLink 4K Extreme 12G |
|---|---|---|---|
|
Formats |
|||
|
SD |
|
|
|
|
HD |
|
|
|
|
2K |
|
|
|
|
UHD |
|
|
|
|
4K |
|
|
|
|
Interface |
|||
|
BNC |
|
|
|
|
HDMI |
|
|
|
|
Stereoscopic Support |
|||
|
|
Yes (Both views through one output, so the Full Resolution option is not available.) |
Yes |
Yes |
|
Platforms |
|||
|
|
Win, Mac, Linux |
Win, Mac, Linux |
Win, Mac, Linux |
|
Drivers |
|||
|
|
Driver 11.7 or later, available here: • Windows: https://www.blackmagicdesign.com/support/download/30fe73dc300d478db0b4772dd9fe2dcb/Windows • macOS: https://www.blackmagicdesign.com/support/download/30fe73dc300d478db0b4772dd9fe2dcb/Mac%20OS%20X • Linux: https://www.blackmagicdesign.com/support/download/30fe73dc300d478db0b4772dd9fe2dcb/Linux |
||
Some monitor out cards allow you to extend or mirror your desktop so that the user interface is visible on the monitor. Please refer to your card’s documentation for more information.