Importing USD Items
You can import meshes, point clouds, lights, cameras and axes from USD files (.usd file format) into a Nuke scene. During the import, you can control which items in the USD scene are loaded using the import dialog.
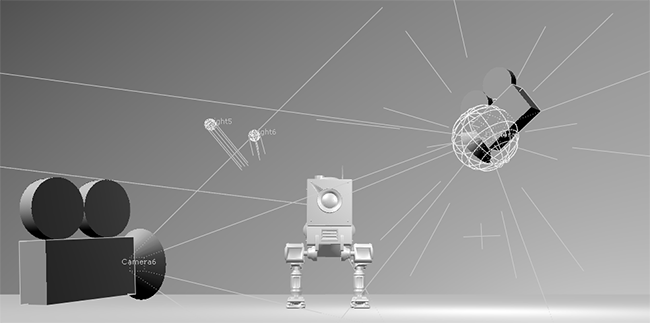
USD geometry, lights and cameras loaded into Nuke
Meshes and Point Clouds
You can load all mesh and point cloud items into a single ReadGeo node or specify certain prims as parents, which load in separate ReadGeo nodes along with all their children. If there is only one prim in the USD file, it loads automatically.
Lights, Cameras and Axes
Light, camera, and axis items are loaded using the relevant native Nuke 3D nodes, Light, Camera and Axis. If there is only one item in the USD file, it loads automatically.
Importing Items from USD Files
- Click Image > Read or press R on the Node Graph.
The Read File(s) dialog displays. - Select the .usd file you want to import from the file location, then click Open.
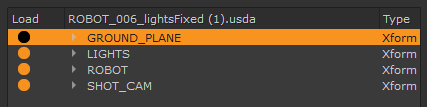
• Files containing only one item are loaded automatically into the relevant node in the Node Graph.
• Files containing more than one item display a scenegraph load dialog that allows you to create separate nodes from parents in the scenegraph. By default, all items are selected in the scenegraph.
- Click in the Load column to load or ignore the items you want to import.
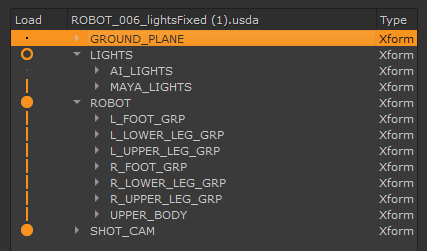
Note: Unsupported items are imported along with supported items, but are grayed-out in the scenegraph.

Parent full load
This prim and all its children are included in the relevant node.

Parent partial load
This prim and selected children are included in the relevant node.
If you click Create parents as separate nodes, full load and partial load parents and their children are loaded in separate nodes.

Item full load
This prim and all its children are included in the relevant node.

Item partial load
This prim and selected children are included in the relevant node.

No load
This prim and its children are not included in the relevant node.
- When importing mesh or axis items, you can also right-click on an item and choose:
• select as parent - select this prim and make it a parent. This allows you to create a separate node for this item and any child items.
• select as child - select this prim and make it a child to the nearest parent item up the tree.
• deselect - deselect this prim so that it is not imported.
- To import your selections, do one of the following:
• Click Create all-in-one node to create one node for everything that’s selected, regardless of whether the prims are selected as parent or child.
• Click Create parents as separate nodes to create one node for each parent prim marked with an orange circle in the scenegraph. Each node also contains all child items.
If you want to transform parts of the .usd file independently, you need to set the objects as parents so that they load in their own node. See Transforming Mesh Items for more information.
Nuke creates nodes for each parent you chose to import from the scene.