Visualize Unreal Scenes in NukeX and Nuke Indie (Beta)
The UnrealReader node connects NukeX or Nuke Indie to Unreal Editor using the Nuke Server plug-in. UnrealReader makes it quick and easy for you to generate live renders from Unreal Editor and control the results in Nuke, by breaking objects into layers, separating passes, building environment maps, and tweaking shot framing.
Note: UnrealReader is available with Nuke Studio, NukeX, Nuke Indie and Nuke Non-Commercial licenses. See About Nuke Indie for more details. You can also use UnrealReader in the non-commercial versions of Nuke Studio and NukeX. See About Nuke Non-commercial for more details.
All images courtesy of Epic Games Subway Sequencer project, available in Unreal Editor from the Epic Games Launcher.
UnrealReader synchronizes Nuke with a sequence in your Unreal Map and streams render passes directly into Nuke. UnrealReader connects over a TCP/IP connection, allowing Unreal Editor to be running on the same machine as Nuke or on another machine, even across different operating systems. Under the hood, UnrealReader incorporates Unreal’s Movie Render Queue system to provide an interactive compositing-oriented workflow directly inside the Nuke toolset.
Install Nuke Server to Connect Unreal Editor and Nuke
To install the Nuke Server and connect Unreal Editor to Nuke, follow along with this short installation video or scroll down for step by step guidance.
-
Download the Nuke Server plug-in for your operating system from https://www.foundry.com/products/nuke/download/unreal-nuke-server
-
Extract the contents of the archive and copy the Foundry subfolder to your Unreal plug-ins location. The default Unreal Editor installation locations are:
-
Open your Unreal Editor project, then use the search functionality to find and then enable the Nuke Server plug-in under Edit > Plugins.
-
Enable the plug-in and restart Unreal Editor if required.
-
Open the Nuke Server panel in Unreal Editor from Window > Nuke Server.
-
Click Start Server in the Nuke Server panel to start the server connection to Nuke.
-
In Nuke, create an UnrealReader node and connect it to a Viewer.
-
In the UnrealReader node Properties panel, click Connect to Server to establish the connection to Unreal Editor.
Note: You must be using Unreal Editor version 4.27.2 or 5.0.0
Windows
C:\Program Files\Epic Games\UE_4.27\Engine\Plugins
macOS
Macintosh HD/Users/Shared/Epic Games/UE_4.27/Engine/Plugins
OR
/Applications/Epic Games/UE_4.27/Engine/Plugins
Note: You can change the port number here if required, but make sure that you use the same port number in Nuke's UnrealReader node.
The Unreal Editor project is now connected to Nuke.
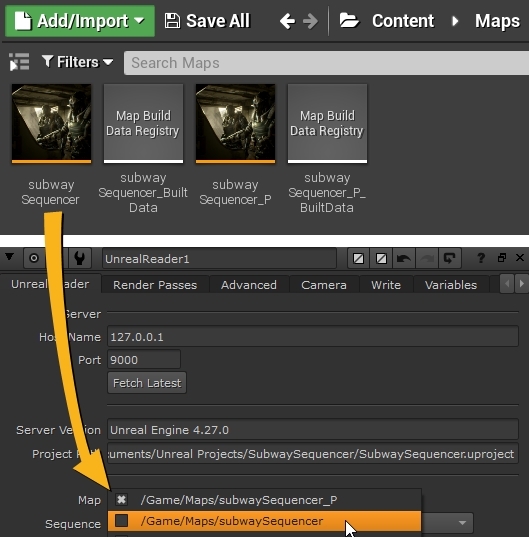
Choose Unreal Maps and Sequences in Nuke
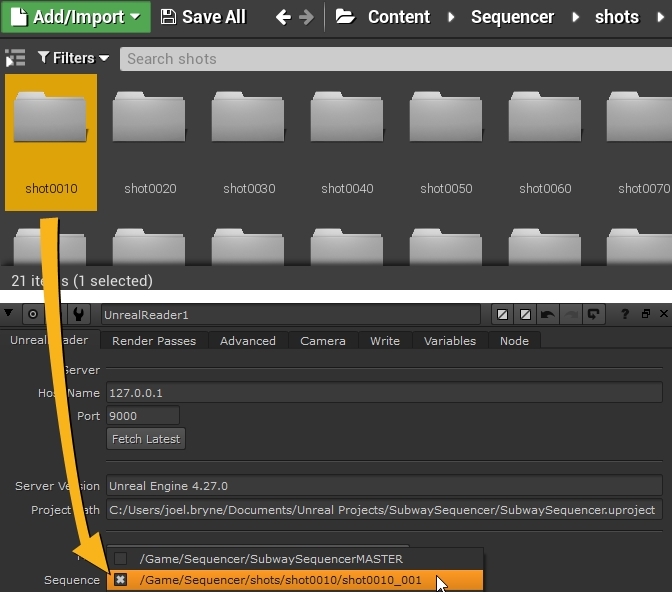
Nuke Server gives you the choice of which Map and Sequence to view from the live Unreal Editor session. You can select individual shot sequences or a source sequence to bring into Nuke's Viewer.
|
|
|
Selecting Unreal Maps in Nuke. |
|
|
|
Selecting Unreal Sequences in Nuke. |
Load Only the Render Passes You Need
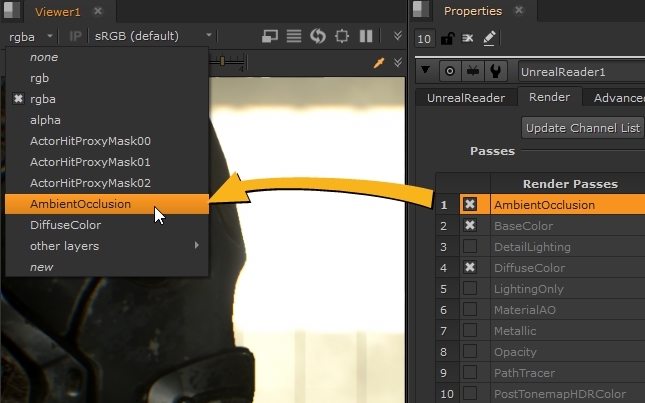
In the node Properties panel on the Render Passes tab, select which passes to bring in from Unreal and then click Update Channel List to bring in the channels you need for your work. If you need to add or remove channels, check and uncheck the required Unreal passes and click Update Channel List to update the channels in the Nuke script.
Load Stencil Layers from Unreal in Nuke
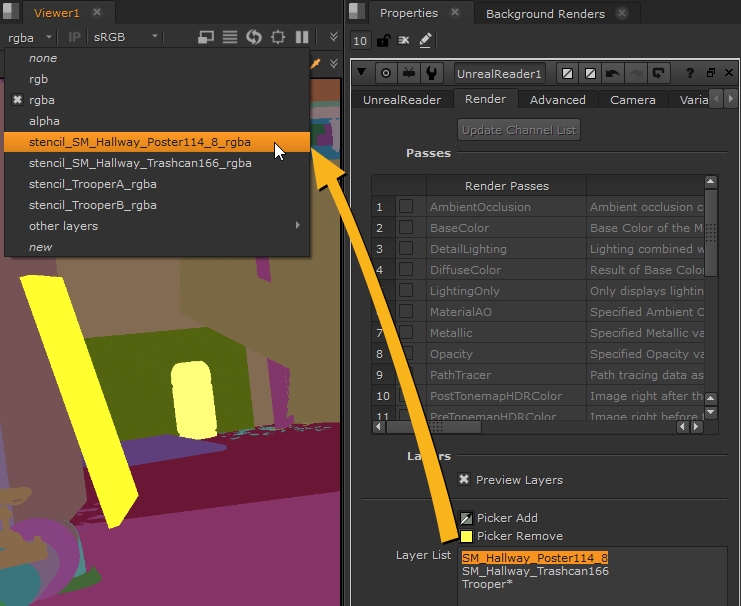
You can render individual Unreal actors in their own layers and remove occluding foreground elements and dynamic shadows, and select which render passes are generated with stencil layers. This gives you the flexibility to generate mattes for specific objects, or to layer up objects piece-by-piece, as you would in a traditional composite.
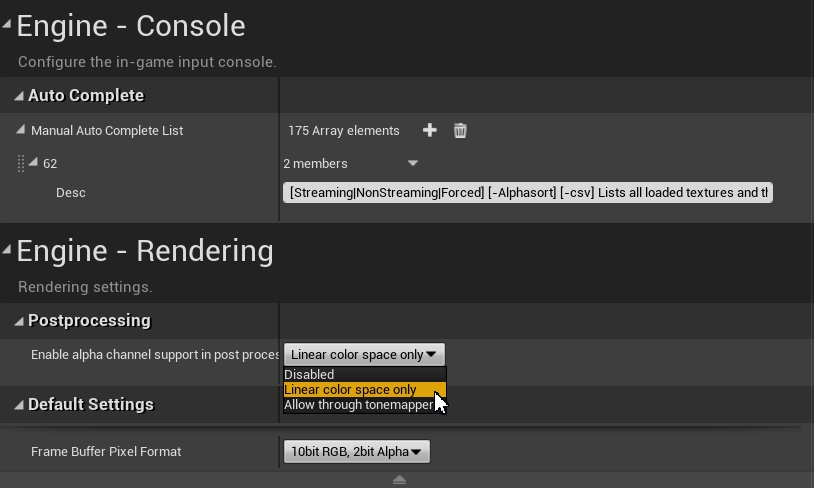
To get alpha channels that match your stencil passes, you must enable the following setting in Unreal:
Edit > Project Settings > Engine - Rendering > Postprocessing > Enable alpha channel support in post processing (experimental) > Linear color space only.
Note: You must restart Unreal Editor for this option to take effect.
To view stencil layers in the Nuke script:
-
In the node Properties panel on the UnrealReader tab, set the Render Mode to stencil layers.
-
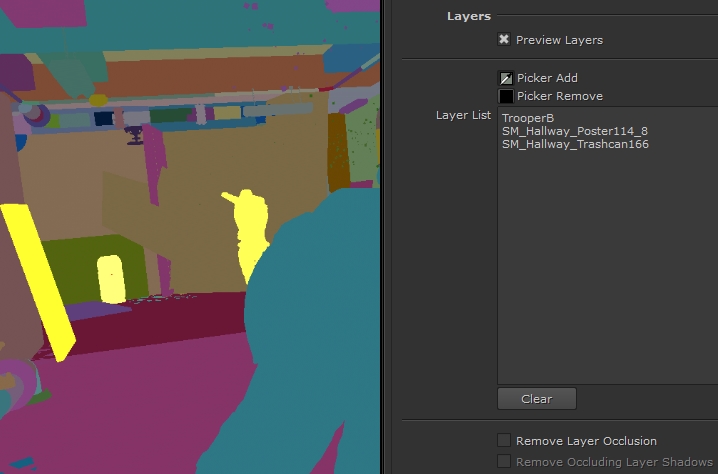
On the Render tab, enable Preview Layers to display the stencil layers in the Viewer.
-
Use the pickers and Layer List to select which layers to bring in from Unreal.
-
Click the color swatch
 next to Picker Add in the Properties to enable the eyedropper color picker.
 -
Ctrl/Cmd+click a layer to add it to the selection.
Selected layers are displayed in yellow in the Viewer and the layer names are added to the Layer List. -
Ctrl/Cmd + Click to add more layers to the selection.
-
When you are finished selecting layers, click the color swatch
 next to Picker Add in the Properties to disable the eyedropper color picker. You can also Ctrl/Cmd + right click in the Viewer to disable the eyedropper color picker.
 -
Click Update Channel List to bring in the channels you need for your work.
|
|
|
|
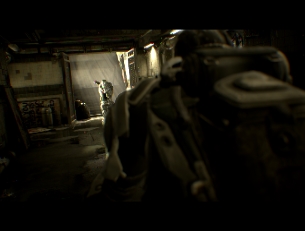
The full image |
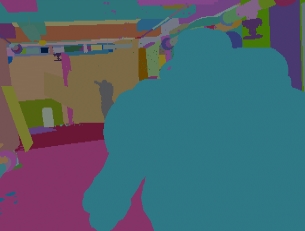
Stencil layers only |
Tip: You can marquee select multiple layers by holding Ctrl/Cmd+Shift and dragging in the Viewer.
The Layer List works in the same way as Cryptomatte's layer picking system. See Using the Matte List for more information.
We have added new Cryptomatte render pass ID Type grouping for segmenting your Unreal scene. Among the options now available for Cryptomatte division are per actor, per folder, and per material.
Match and Override Unreal Cameras
You can create a linked or unlinked camera that matches the Unreal sequence camera to integrate new elements into the scene, visualize the scene through point clouds, and enable comp of elements in 3D. In the node Properties panel on the Camera tab, click Create Camera to add the camera to the scene.
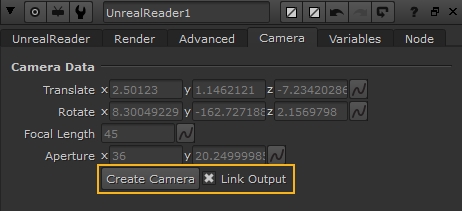
Note: Linked cameras allow you to update the camera in Nuke with any changes applied in the Unreal Editor session when you click UnrealReader > Fetch Latest in the node Properties. Unlinked cameras do not update, they retain the camera settings as they were when the Camera node was created.
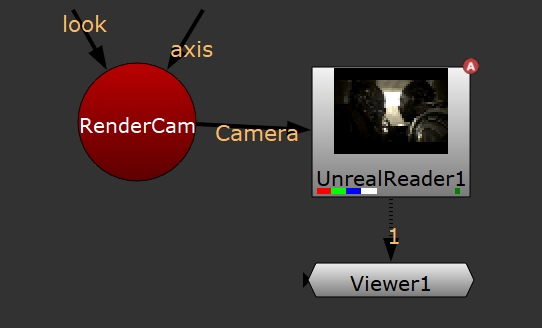
If you want to render from a certain angle in Nuke without updating the Unreal Editor project, you can override the Unreal camera’s translation and rotation at render time, directly from Nuke, by connecting a Nuke Camera node to the UnrealReader's Camera input. This is a non-destructive override that does not persist in the Unreal Editor project file.
Render Using the Unreal Movie Render Queue from Nuke
Nuke uses the Write controls on the UnrealReader tab to access the Unreal Editor Movie Render Queue to render your shots. UnrealReader creates a Read node that references the render automatically by default, but you can disable Create Read Node to change this behavior. Files are written to a location on the machine running Unreal Editor, specified by the File control.
We've added environment variable support in the UnrealReader Write > File control to assist with cross-operating system support when writing to shared network drives. You can now use the familiar Nuke variable syntax as follows:
[getenv <your_environment_variable>]
Important Information on Running Nuke Server
• UnrealReader is available with Nuke Studio, NukeX, and Nuke Indie licenses with valid maintenance. See About Nuke Indie for more details. You can also use UnrealReader in the non-commercial versions of Nuke Studio and NukeX. See About Nuke Non-commercial for more details.
• The Nuke Server plug-in supports Windows and macOS and Unreal 4.27.2 or 5.0.0.
Article: If you are running a customized build of Unreal Editor and have issues loading the Nuke Server plug-in, please see this article for more information:
https://support.foundry.com/hc/en-us/articles/4410634179858
• You can connect multiple Unreal sessions to Nuke using several UnrealReader nodes. Connecting Unreal to Nuke between two separate machines and connecting multiple Unreal sessions simultaneously has not been tested for all combinations of operating systems.
• The UnrealReader does not work when Unreal Editor is in Play Mode.
• To get alpha channels that match your stencil passes, you must enable the following setting in Unreal:
Project Settings > Engine - Rendering > Postprocessing > Enable alpha channel support in post processing (experimental) > Linear color space only