Reviewing Your Work with Monitor Out in Nuke (NDI - SDI/HDMI)
Monitor Out allows you to preview Viewer images in a floating window, NDI session, or on an external projector/video monitor to check the final result, including the correct output transform and aspect ratio.
A dedicated Viewer Monitor Out workspace provides easy access to the monitor out strip and its controls, but you can also access the controls by double-clicking a Viewer node to display the Properties panel.
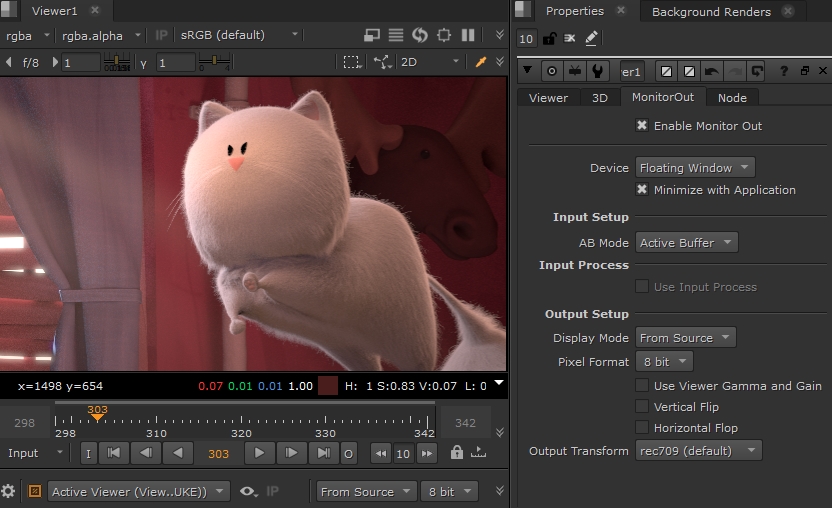
Nuke supports internal monitor out using a Floating Window, NDI sessions, and dedicated AJA or Blackmagic cards, selected from the Device dropdown in the Viewer Properties:
• Floating Window - Nuke's native monitor out uses a floating monitor and does not require additional hardware. Mac users can also take advantage of additional HDR technology including an extended sRGBf LUT. See Working with HDR Images for more information.
• NDI - A network protocol that enables video and metadata signals to be sent over standard IP networks in real-time. This option allows you to easily share a stream of the Viewer output to anyone else on the network.
Note: To view the NDI stream, you need the NDI Studio Monitor or NDI Video Monitor application installed. See Streaming Viewer Output Over the Internet with NDI® for more information.
• Dedicated AJA or Blackmagic Design cards - Nuke supports various AJA and Blackmagic devices that can be selected from the Device dropdown after installation. See AJA and Blackmagic Design Monitor Out Devices for more information on supported hardware and drivers.
Note: Audio scrubbing is not currently available through monitor out cards. Audio scrubbing is only supported through internal audio output devices.
Nuke also supports monitor out through VR headsets. See Reviewing on VR Headsets (HMD) for information on supported headsets.
Enabling Nuke Monitor Out
Nuke's monitor out uses a floating monitor, NDI session, or additional hardware from AJA or Blackmagic to display monitor out. The floating monitor allows Mac users to take advantage of additional HDR technology including an extended sRGBf LUT. See Working with HDR Images for more information.
- Navigate to Workspace > Viewer Monitor Out.
The Viewer Monitor Out workspace is displayed with the monitor out toolbar under the Viewer by default.
If you're working with multi-view footage, use Interactive buffer mode to show the output from the selected Viewer. See Stereoscopic Scripts or Stereoscopic and Multi-View Projects for more information.
 - Click the cog
 icon in the bottom-left of the Viewer Monitor Out panel to display the Properties panel or double-click the Viewer node.

- Select the device you want to use from the output Device dropdown. All available devices are automatically detected and listed in this menu, along with the default options:
• Floating Window - opens a floating monitor window, without the need for a monitor device and card. This is intended for full-screen use without displaying any of the interface.
• NDI - A network protocol that enables video and metadata signals to be sent over standard IP networks in real-time. This option allows you to easily share a stream of the Viewer output to anyone else on the network.
Note: To view the NDI stream, you need the NDI Studio Monitor or NDI Video Monitor application installed. See Streaming Viewer Output Over the Internet with NDI® for more information.
• Installed Cards - transfers the Viewer contents to the selected card and displays SDK and driver information associated with the card.
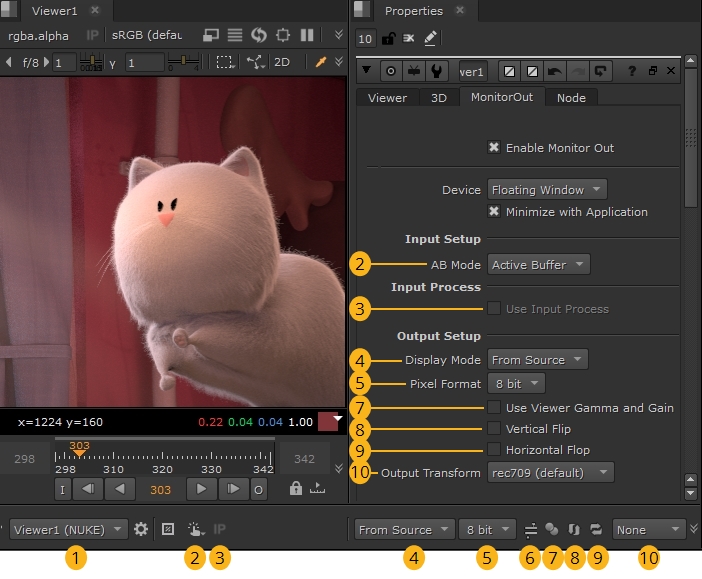
The Monitor Out panel and Viewer Properties panel duplicate some controls for convenience.
|
|
Viewer |
Select the Viewer to feed to the output monitor using the source viewer dropdown. Selecting Active Viewer always displays the Viewer that is currently selected in the workspace. |
|
|
|
Select the view mode using the AB Mode dropdown: • Active Buffer - the monitor always shows the output from the buffer currently in use by the selected Viewer. • Buffer A - the monitor always shows the output from the selected Viewer buffer A. • Buffer B - the monitor always shows the output from the selected Viewer buffer B. • Interactive - the monitor shows the output from the selected Viewer including the A/B player mode currently in use, such as wipe. |
|
|
|
Click the button or enable Use Input Process to apply an input process node before displaying the image on the external monitor or floating window. This allows you to display different color information in Nuke's Viewer and monitor or floating window. To define the node to use, enter its name in the Viewer node's input process field or, from the Node Graph right-click menu, select Edit > Node > Use as Input Process. |
|
|
Display Mode |
Select the resolution output from the monitor card currently in use. The resolutions available depend on the card manufacturer. Note: Floating monitor out always uses the resolution of the Viewer in use. |
|
|
Pixel Format |
Select the pixel format output from the monitor card currently in use. The formats available depend on the card manufacturer. |
|
|
|
Select the output range between 0-255, when the button is enabled and SMPTE-range 16-236, when the button is disabled. Note: This control is not included in the Viewer Monitor Out properties and is only displayed when a dedicated monitor out card is selected from the Device dropdown. |
|
|
|
Click the button or enable Use Viewer Gamma and Gain to apply the active Viewer’s filtering, gamma, and gain to the monitor out. |
|
|
|
Click the button or enable Vertical Flip to flip the output vertically. This control is handy if you're using a ceiling mounted projector. |
|
|
|
Click the button or enable Horizontal Flip to flop the output horizontally. |
|
|
Output Transform |
Select the color transform to apply to the image. If you’ve specified an OCIO configuration file in the preferences, these custom LUTs are also applicable. |
Comparing and Combining Multi-Viewer Output
Nuke monitor out functionality is controlled by Viewer nodes, so you can compare or combine multiple streams from as many Viewers as you like to ensure shot consistency. Each Viewer can be enabled separately to output your shots to multiple output devices, whether they're dedicated monitor out devices, NDI streams, or Nuke's native Floating Window.
-
Double-click a source Viewer to open its Properties panel.
-
Go to the Viewer Monitor Out tab and then select the device you want to use from the output Device dropdown.
All available devices are automatically detected and listed in this menu, along with the default options: -
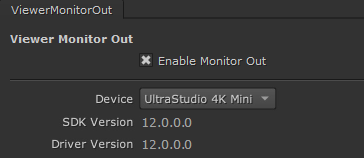
-
Repeat the process with as many Viewer nodes as you like. You can combine device types as you see fit, allowing you to compare dedicated monitor out, floating windows, and NDI streams as required.
• Floating Window - opens a floating monitor window, without the need for a monitor device and card.
• NDI - a network protocol that enables video and metadata signals to be sent over standard IP networks in real-time.
Note: To view the NDI stream, you need the NDI Studio Monitor or NDI Video Monitor application installed. See Streaming Viewer Output Over the Internet with NDI® for more information.
• Installed Cards - transfers the Viewer contents to the selected card and displays SDK and driver information associated with the card.
Note: SDI cards are grayed-out when they are in use by another Viewer and cannot be selected.
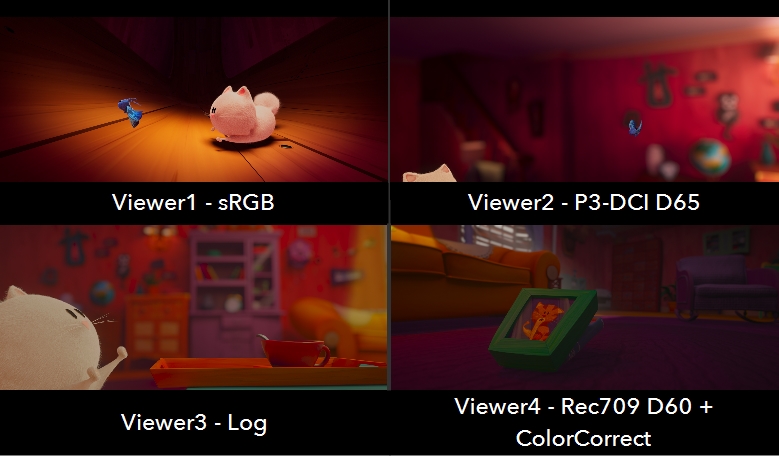
For example, using four Viewers and four Nuke Floating Windows, you could compare the format of multiple shots.
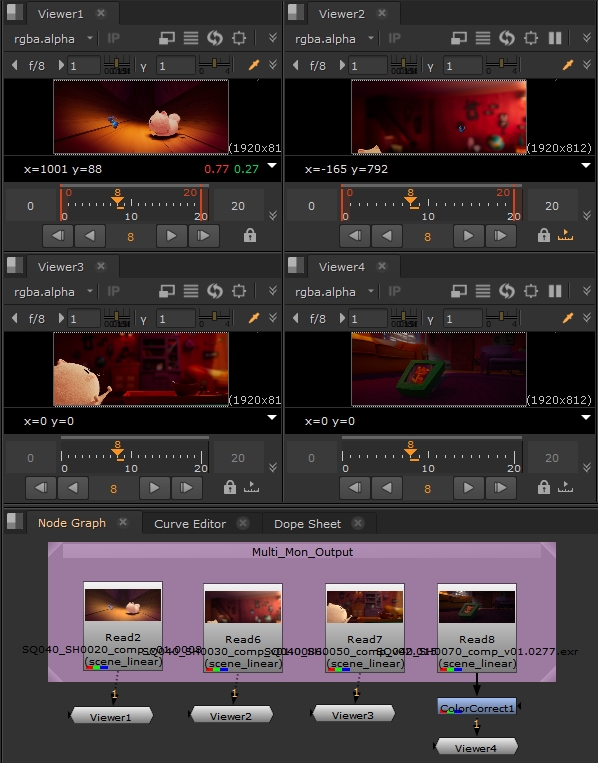
You can switch the Output Transform on each Viewer independently to check color consistency between the shots.
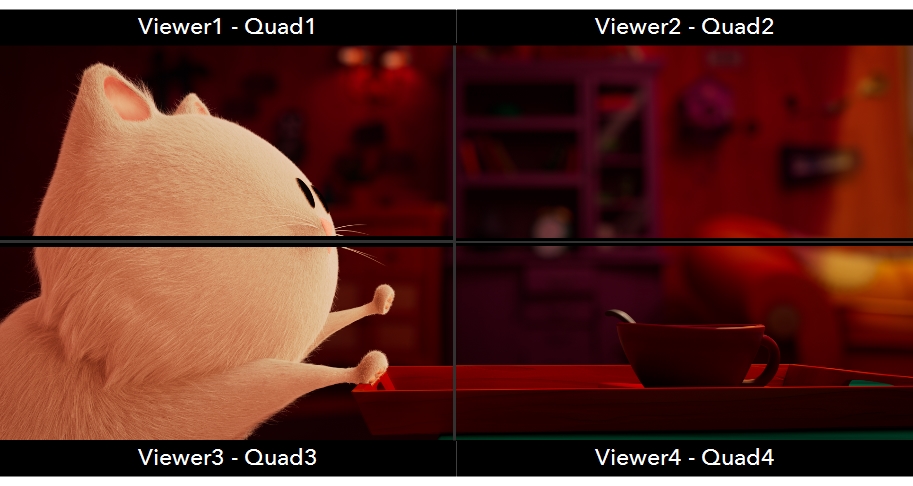
Using a similar four-Viewer setup, you could send four quadrants over NDI to four projectors to produce a larger image somewhere else on the same network. See Streaming Viewer Output Over the Internet with NDI® for more information.
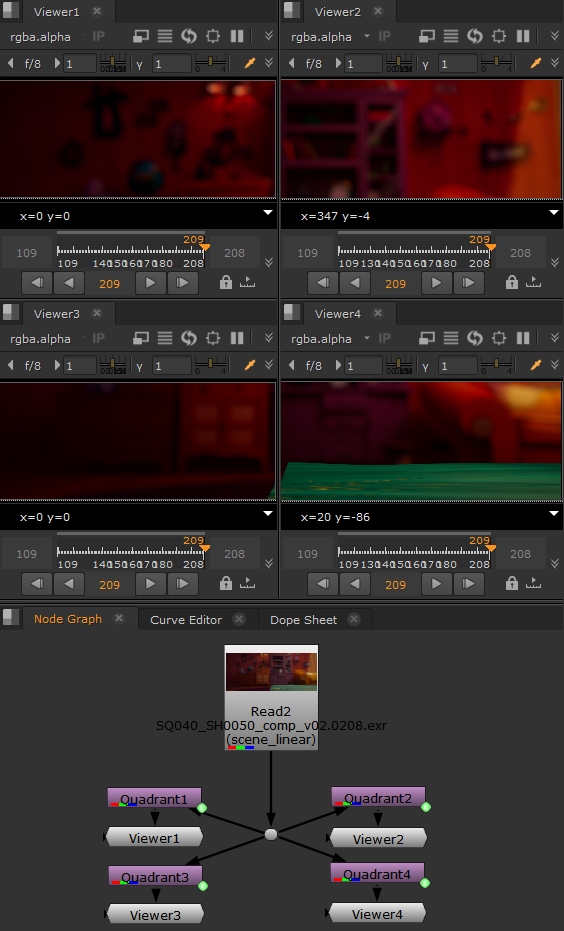
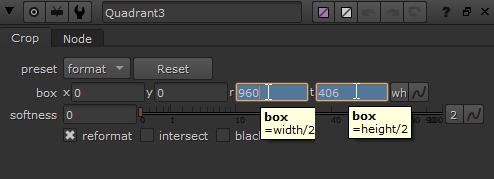
Each quadrant is a Crop node that defines which part of the overall image is handled by each Viewer. For example, Quadrant3 is set up as shown here, with simple expressions to handle different formats.
AJA and Blackmagic Design Monitor Out Devices
Our monitor out architecture interfaces directly with the AJA and BlackMagic Design device drivers, which are unified across their respective hardware lines, meaning all current supported cards for the versions detailed in Third-Party Libraries and Fonts should work.
You can select installed cards from the MonitorOut's Properties panel using the Device control. The SDK and driver versions for the selected card are displayed for convenience.

We've tested the following AJA and Blackmagic Design hardware:
|
AJA Card: |
KONA 4 |
KONA 5 |
KONA iO4k+ |
T-Tap Pro |
|---|---|---|---|---|
|
See https://www.aja.com/family/desktop-io and https://www.aja.com/products/t-tap-pro#techspecs for more details on supported formats. |
||||
|
Connection |
|
|||
|
BNC |
|
|
|
|
|
HDMI |
|
|
|
|
|
Stereoscopic Support |
|
|||
|
|
Yes |
Yes |
No |
No |
|
Platforms |
|
|||
|
|
Win, Linux |
Win, Linux |
Mac 11.x and 12.x |
|
|
Drivers |
|
|||
|
|
Driver 16.0.1 or later, available here: • Windows: https://www.aja.com/assets/support/files/8167/en/AJA-Software-Installer_Windows_v16.0.2_Release.zip • macOS: https://www.aja.com/assets/support/files/8170/en/AJA-Software-Installer_macOS_v16.0.2_Release.zip |
|
||
|
Blackmagic Card: |
UltraStudio 4K Mini |
4K Extreme |
4K Extreme 12G |
8K Pro |
|---|---|---|---|---|
|
See https://www.blackmagicdesign.com/uk/products/ for more details on supported formats per card. |
||||
|
Connection |
||||
|
BNC |
|
|
|
|
|
HDMI |
|
|
|
|
|
Stereoscopic Support |
||||
|
|
No |
No |
Yes |
No |
|
Platforms |
||||
|
|
Win, Mac, Linux |
Win, Mac, Linux |
Win, Mac, Linux |
Win, Mac, Linux |
|
Drivers |
||||
|
|
Driver 12.0 or later, available here: • Windows: https://www.blackmagicdesign.com/support/download/76b2edbed5884e1dbbfea104071f1643/Windows • macOS: https://www.blackmagicdesign.com/support/download/76b2edbed5884e1dbbfea104071f1643/Mac OS X • Linux: https://www.blackmagicdesign.com/support/download/76b2edbed5884e1dbbfea104071f1643/Linux |
|||
|
Blackmagic Card: |
DeckLink Studio 4K |
DeckLink 4K Extreme |
DeckLink 4K Extreme 12G |
|---|---|---|---|
|
See https://www.blackmagicdesign.com/uk/products/ for more details on supported formats per card. |
|||
|
Interface |
|||
|
BNC |
|
|
|
|
HDMI |
|
|
|
|
Stereoscopic Support |
|||
|
|
Yes (Both views through one output, so the Full Resolution option is not available.) |
Yes |
Yes |
|
Platforms |
|||
|
|
Win, Mac, Linux |
Win, Mac, Linux |
Win, Mac, Linux |
|
Drivers |
|||
|
|
Driver 12.0 or later, available here: • Windows: https://www.blackmagicdesign.com/support/download/76b2edbed5884e1dbbfea104071f1643/Windows • macOS: https://www.blackmagicdesign.com/support/download/76b2edbed5884e1dbbfea104071f1643/Mac OS X • Linux: https://www.blackmagicdesign.com/support/download/76b2edbed5884e1dbbfea104071f1643/Linux |
||
Some monitor out cards allow you to extend or mirror your desktop so that the user interface is visible on the monitor. Please refer to your card’s documentation for more information.

