Output (Write) Nodes
With the correct resolution and format selected, you then insert Write nodes to indicate where you want to render images from the script.
|
|
| Inserting Write nodes for rendering. |
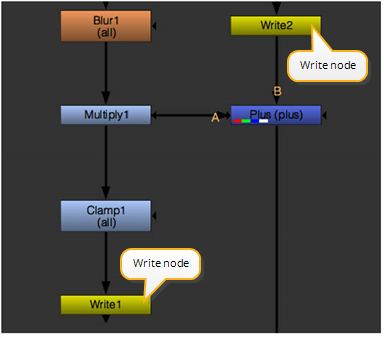
One Write node is usually placed at the bottom of the compositing tree to render the final output. However, Write nodes have both input and output connectors, so they may be embedded anywhere in the compositing tree.
You can execute renders for a single Write node or all Write nodes in your compositing script.
To Render a Single Write Node
| 1. | Select the node in the script from which you want to render an image. |
| 2. | Select Image > Write (or press W over the Node Graph). Nuke attaches a Write node and opens its properties panel. |
| 3. | Connect a Viewer to the Write node you want to render and verify that the correct resolution is displayed for output. If necessary, press Ctrl/Cmd+P to toggle between full-res and proxy resolution. The displayed output resolution is used for rendering. |
| 4. | In the properties panel, click the file or proxy field’s folder icon (depending on whether you want to render high res or low res images) and browse to the directory where you want to store the rendered sequence. For instructions, see Using the File Browser. |
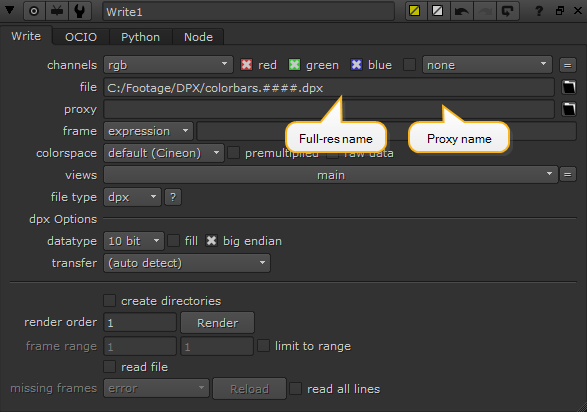
| 5. | After the path, type a name for the rendered image and then click OK. If you’re rendering an image sequence, include the frame number variable (for example, ####) in the name. |
See To Render Selected or All Write Nodes in the Script below for examples of valid file names with the frame number variable.
| 6. | If necessary, adjust the following controls: |
• Using the channels dropdown menu and checkboxes, select the channels you want to render.
• Using the frame dropdown menu and input field, set the relation between the currently processed frame and the numbering of the frame written out. For more information, see Changing the Numbering of Rendered Frames.
• check read file if you want the output of the Write node to be produced by reading the rendered file back in rather than by processing the upstream node tree. For more information on this and the missing frames control, see Using a Write Node to Read in the Rendered Image.
• From the output transform dropdown menu, select which lookup table to use when converting between the images’ color space and Nuke’s internal color space.
• From the file type dropdown menu, select the file format for the rendered images. If you don’t specify a file format, Nuke uses the extension in the file name to figure out the format.
• Check the limit to range box if you want to disable the node when executed outside of a specified frame range. In the frame range fields, enter the range of frames you want to make executable with this Write node.
| 7. | In the Write node properties, click the Render button. |
| 8. | In the Render dialog, adjust the render settings if necessary: |
• Frame range - set the frame range you want to render.
• Use proxy - check to use proxy mode.
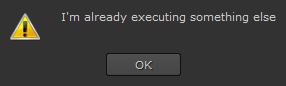
• Render using frame server - enable this checkbox if you want to use Nuke's frame server to render the frames specified in the current render task. When the frame server is disabled, Nuke can only perform one render task at a time. Executing another render displays a warning and the current render is paused until you acknowledge the message:
See Rendering Using the Frame Server for more information.
• Continue on error - check to keep rendering even if an error occurs during the process.
• Views - set which views to include in the render. See Selecting Which Views to Render for more information.
| 9. | Click OK. |
Tip: When specifying the frame range to render, you can enter complex frame ranges into the frame range prompt dialog. For example, if you enter 1-5 8 10 15 22-25, it only renders those frames. You can also increment rendered frames using something like 10-50x10, which resolves to only frames 10, 20, 30, 40, and 50 from the range.
Likewise, you can specify multiple ranges on the command line, for example:
nuke -F 1-5 -F 8 -F 10 -F 15 -F 20-40x5 -x myscript.nk
Tip: When rendering with the Write node, you can force a certain data type by adding the data type and a colon before the file path. For example, you can enter ftiff:C:\Temp\test.tif as the file path to render a file whose data type is ftiff and extension .tif.
To Render Selected or All Write Nodes in the Script
| 1. | Connect a Viewer to a Write node you want to render and verify that the correct resolution is displayed for output. |
| 2. | If necessary, press Ctrl/Cmd+P to toggle between full-res and proxy resolution. The displayed output resolution is used for rendering. |
| 3. | If you want, you can change the order in which your Write nodes are rendered by giving them custom render order numbers in the render order field. |
| 4. | Do one of the following: |
• With the desired Write node selected, select Render > Render selected (or press F7).
• Select Render > Render all (or press F5).
| 5. | In the Render dialog, adjust the render settings if necessary. The default values are drawn from the Viewer you have active. |
• Frame range - set the frame range you want to render.
• Use proxy - check to use proxy mode.
• Render using frame server - disable this checkbox if you don't want to use Nuke's frame server to render the frames specified in the current render task. If you disable the frame server, Nuke can only perform one render task at a time. Executing another render displays a warning and the current render is paused until you acknowledge the message:
See Rendering Using the Frame Server for more information.
• Continue on error - check to keep rendering even if an error occurs during the process.
• Views - set which views to include in the render. See Selecting Which Views to Render for more information.
| 6. | Click OK. |
Tip: When specifying the frame range to render, you can enter complex frame ranges into the frame range prompt dialog. For example, if you enter "1-5 8 10 15 22-25", it only renders those frames. Likewise, you can specify multiple ranges on the command line, for example:
nuke -F 1-5 -F 8 -F 10 -F 15 -F 22-25 -x myscript.nk
You can see the progress of your render in the status window that appears. When the render is complete, the rendered images are added to the directory you specified.
Tip: When rendering with the Write node, you can force a certain data type by adding the data type and a colon before the file path. For example, you can enter ftiff:C:\Temp\test.tif as the file path to render a file whose data type is ftiff and extension .tif.
Selecting Which Views to Render
The Write nodes in a script determine which views are available at render time, but the Render dialog can be used as a filter to limit the views rendered from those available. Write nodes and the Render dialog default to all available views.
For example, if your script contained two Write nodes calling for the main view and left and right views, but the Render dialog is set to render main, then only the main view is rendered.
Conversely, if the Write nodes are calling for the left and right views, but the Render dialog is set to render main, then no views are rendered.
A slightly more complex example is shown in the image.
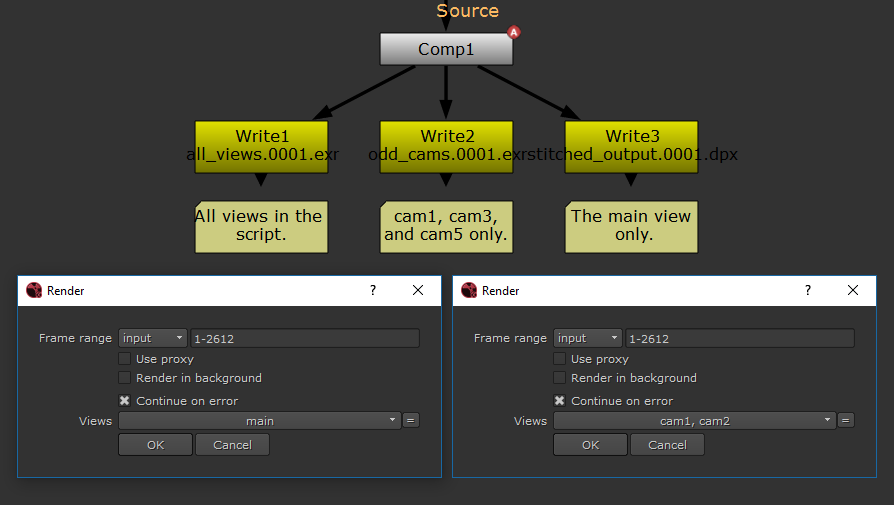
In the example above, the left-hand dialog is set to render only main and the right-hand dialog is set to render only cam1 and cam2.
So, in the case of the first render, Write1 renders main, Write2 renders nothing, and Write3 renders main.
In the case of the second render, Write1 renders cam1 and cam2, Write2 renders cam1, and Write3 renders nothing.
Notes on Rendering MOV Files
If you are rendering .mov files, you can:
• choose the codec from the Codec dropdown menu.
• FPS - set the playback frames per second for the output file.
• Set the Codec Profile or Pixel Format used to write the file, depending on the Codec chosen.
• Audio File - allows you to specify a separate audio file to include in the output. Either enter the file path manually or click the browse button to locate the audio file.
• Audio Offset - sets the start time of any audio file specified in the Audio File control. The unit of measure is specified using the Units control. Negative values cause the audio to begin before the video and positive values cause the audio to begin after the video.
Advanced MOV Options
You can adjust advanced codec options by opening the Advanced dropdown. The options available vary, depending on the Codec you're using to render the output.
For a full description of the .mov options available, see
|
Control |
Description |
|---|---|
|
Animation Codec |
|
|
Data Range |
Sets the minimum and maximum color range values for encoding DNx files: • Full Range - encodes with the full data range (0-255 for 8-bit or 0-1023 for 10-bit). • Video Range - encodes with a reduced, or video/legal, data range (16-240 for 8-bit or 64-960 for 10-bit). |
|
Fast Start |
When enabled, MOVs are playable while still down loading during streaming. |
|
Write Timecode |
When enabled, a time code track is added to the rendered .mov file. You can also use the quicktime/reel metadata, if present, to give the track its reel name. You can add this key using the ModifyMetaData node if it doesn’t exist. Note: The input/timecode key must be present in the sequence metadata in order to write a time code. |
|
GOP Size |
Sets how many frames can be placed together to form a compression GOP (group of pictures). Note: Use caution with this control as large alterations can stop other applications reading the rendered file. |
|
Apple ProRes Codec |
|
|
Data Range |
Sets the minimum and maximum color range values for encoding DNx files: • Full Range - encodes with the full data range (0-255 for 8-bit or 0-1023 for 10-bit). • Video Range - encodes with a reduced, or video/legal, data range (16-240 for 8-bit or 64-960 for 10-bit). |
|
Fast Start |
When enabled, MOVs are playable while still down loading during streaming. |
|
Write Timecode |
When enabled, a time code track is added to the rendered .mov file. You can also use the quicktime/reel metadata, if present, to give the track its reel name. You can add this key using the ModifyMetaData node if it doesn’t exist. Note: The input/timecode key must be present in the sequence metadata in order to write a time code. |
|
Avid DNxHD Codec |
|
|
Data Range |
Sets the minimum and maximum color range values for encoding DNx files: • Full Range - encodes with the full data range (0-255 for 8-bit or 0-1023 for 10-bit). • Video Range - encodes with a reduced, or video/legal, data range (16-240 for 8-bit or 64-960 for 10-bit). |
|
Fast Start |
When enabled, MOVs are playable while still down loading during streaming. |
|
Write Timecode |
When enabled, a time code track is added to the rendered .mov file. You can also use the quicktime/reel metadata, if present, to give the track its reel name. You can add this key using the ModifyMetaData node if it doesn’t exist. Note: The input/timecode key must be present in the sequence metadata in order to write a time code. |
|
Avid DNxHR Codec |
|
|
Data Range |
Sets the minimum and maximum color range values for encoding DNx files: • Full Range - encodes with the full data range (0-255 for 8-bit or 0-1023 for 10-bit). • Video Range - encodes with a reduced, or video/legal, data range (16-240 for 8-bit or 64-960 for 10-bit). |
|
Fast Start |
When enabled, MOVs are playable while still down loading during streaming. |
|
Write Timecode |
When enabled, a time code track is added to the rendered .mov file. You can also use the quicktime/reel metadata, if present, to give the track its reel name. You can add this key using the ModifyMetaData node if it doesn’t exist. Note: The input/timecode key must be present in the sequence metadata in order to write a time code. |
|
H.264 Codec |
|
|
Quality |
Selects a preset level that automatically adjusts the Advanced controls. Higher values produce larger files with better quality. Select Custom to adjust the Advanced controls manually. |
|
YCbCr Matrix |
Sets the way RGB is converted to Y’CbCr. Rec 601 and Rec 709 follow the ITU.BC specifications. Auto uses a set a heuristics to determine the best color matrix to use, including Format-based, which sets the color matrix to Rec 601 for formats with a width below 840 pixels and Rec 709 for formats with a width of 840 pixels or above. |
|
Data Range |
Sets the minimum and maximum color range values for encoding DNx files: • Full Range - encodes with the full data range (0-255 for 8-bit or 0-1023 for 10-bit). • Video Range - encodes with a reduced, or video/legal, data range (16-240 for 8-bit or 64-960 for 10-bit). |
|
Fast Start |
When enabled, MOVs are playable while still down loading during streaming. |
|
Write Timecode |
When enabled, a time code track is added to the rendered .mov file. You can also use the quicktime/reel metadata, if present, to give the track its reel name. You can add this key using the ModifyMetaData node if it doesn’t exist. Note: The input/timecode key must be present in the sequence metadata in order to write a time code. |
|
GOP Size |
Sets how many frames can be placed together to form a compression GOP (group of pictures). Note: Use caution with this control as large alterations can stop other applications reading the rendered file. |
|
B Frames |
Sets the maximum number of B frames that can be consecutive in the rendered file. The default, 0, does not impose any maximum number of B frames in the output. |
|
Bitrate |
Sets the target bitrate that the codec attempts to reach, within the limits set by the Bitrate Tolerance and QuantizerMin/Max controls. |
|
Bitrate Tolerance |
Sets the amount that the bitrate can vary from the Bitrate setting. Setting this tolerance too low can result in renders failing. |
|
Quantizer Min |
Sets the quality range within which the codec can vary the image to achieve the specified bitrate. Higher ranges can introduce image degradation. |
|
Quantizer Max |
|
|
Motion JPEG A Codec |
|
|
Quality |
Selects a preset level that automatically adjusts the Advanced controls. Higher values produce larger files with better quality. Select Custom to adjust the Advanced controls manually. |
|
YCbCr Matrix |
Sets the way RGB is converted to Y’CbCr. Rec 601 and Rec 709 follow the ITU.BC specifications. Auto uses a set a heuristics to determine the best color matrix to use, including Format-based, which sets the color matrix to Rec 601 for formats with a width below 840 pixels and Rec 709 for formats with a width of 840 pixels or above. |
|
Data Range |
Sets the minimum and maximum color range values for encoding DNx files: • Full Range - encodes with the full data range (0-255 for 8-bit or 0-1023 for 10-bit). • Video Range - encodes with a reduced, or video/legal, data range (16-240 for 8-bit or 64-960 for 10-bit). |
|
Fast Start |
When enabled, MOVs are playable while still down loading during streaming. |
|
Write Timecode |
When enabled, a time code track is added to the rendered .mov file. You can also use the quicktime/reel metadata, if present, to give the track its reel name. You can add this key using the ModifyMetaData node if it doesn’t exist. Note: The input/timecode key must be present in the sequence metadata in order to write a time code. |
|
Bitrate |
Sets the target bitrate that the codec attempts to reach, within the limits set by the Bitrate Tolerance and QuantizerMin/Max controls. |
|
Bitrate Tolerance |
Sets the amount that the bitrate can vary from the Bitrate setting. Setting this tolerance too low can result in renders failing. |
|
Quantizer Min |
Sets the quality range within which the codec can vary the image to achieve the specified bitrate. Higher ranges can introduce image degradation. |
|
Quantizer Max |
|
|
Motion JPEG B Codec |
|
|
Quality |
Selects a preset level that automatically adjusts the Advanced controls. Higher values produce larger files with better quality. Select Custom to adjust the Advanced controls manually. |
|
YCbCr Matrix |
Sets the way RGB is converted to Y’CbCr. Rec 601 and Rec 709 follow the ITU.BC specifications. Auto uses a set a heuristics to determine the best color matrix to use, including Format-based, which sets the color matrix to Rec 601 for formats with a width below 840 pixels and Rec 709 for formats with a width of 840 pixels or above. |
|
Data Range |
Sets the minimum and maximum color range values for encoding DNx files: • Full Range - encodes with the full data range (0-255 for 8-bit or 0-1023 for 10-bit). • Video Range - encodes with a reduced, or video/legal, data range (16-240 for 8-bit or 64-960 for 10-bit). |
|
Fast Start |
When enabled, MOVs are playable while still down loading during streaming. |
|
Write Timecode |
When enabled, a time code track is added to the rendered .mov file. You can also use the quicktime/reel metadata, if present, to give the track its reel name. You can add this key using the ModifyMetaData node if it doesn’t exist. Note: The input/timecode key must be present in the sequence metadata in order to write a time code. |
|
Bitrate |
Sets the target bitrate that the codec attempts to reach, within the limits set by the Bitrate Tolerance and QuantizerMin/Max controls. |
|
Bitrate Tolerance |
Sets the amount that the bitrate can vary from the Bitrate setting. Setting this tolerance too low can result in renders failing. |
|
Quantizer Min |
Sets the quality range within which the codec can vary the image to achieve the specified bitrate. Higher ranges can introduce image degradation. |
|
Quantizer Max |
|
|
MPEG-4 Codec |
|
|
Quality |
Selects a preset level that automatically adjusts the Advanced controls. Higher values produce larger files with better quality. Select Custom to adjust the Advanced controls manually. |
|
YCbCr Matrix |
Sets the way RGB is converted to Y’CbCr. Rec 601 and Rec 709 follow the ITU.BC specifications. Auto uses a set a heuristics to determine the best color matrix to use, including Format-based, which sets the color matrix to Rec 601 for formats with a width below 840 pixels and Rec 709 for formats with a width of 840 pixels or above. |
|
Data Range |
Sets the minimum and maximum color range values for encoding DNx files: • Full Range - encodes with the full data range (0-255 for 8-bit or 0-1023 for 10-bit). • Video Range - encodes with a reduced, or video/legal, data range (16-240 for 8-bit or 64-960 for 10-bit). |
|
Fast Start |
When enabled, MOVs are playable while still down loading during streaming. |
|
Write Timecode |
When enabled, a time code track is added to the rendered .mov file. You can also use the quicktime/reel metadata, if present, to give the track its reel name. You can add this key using the ModifyMetaData node if it doesn’t exist. Note: The input/timecode key must be present in the sequence metadata in order to write a time code. |
|
GOP Size |
Sets how many frames can be placed together to form a compression GOP (group of pictures). Note: Use caution with this control as large alterations can stop other applications reading the rendered file. |
|
B Frames |
Sets the maximum number of B frames that can be consecutive in the rendered file. The default, 0, does not impose any maximum number of B frames in the output. |
|
Limit Bitrate |
When enabled, the maximum Bitrate is capped and the Bitrate Tolerance is set to 0. This control is designed to reduce output file size, but the render quality is generally lower. |
|
Bitrate |
Sets the target bitrate that the codec attempts to reach, within the limits set by the Bitrate Tolerance and QuantizerMin/Max controls. |
|
Bitrate Tolerance |
Sets the amount that the bitrate can vary from the Bitrate setting. Setting this tolerance too low can result in renders failing. |
|
Quantizer Min |
Sets the quality range within which the codec can vary the image to achieve the specified bitrate. Higher ranges can introduce image degradation. |
|
Quantizer Max |
|
|
PHOTO JPEG Codec |
|
|
Quality |
Selects a preset level that automatically adjusts the Advanced controls. Higher values produce larger files with better quality. Select Custom to adjust the Advanced controls manually. |
|
YCbCr Matrix |
Sets the way RGB is converted to Y’CbCr. Rec 601 and Rec 709 follow the ITU.BC specifications. Auto uses a set a heuristics to determine the best color matrix to use, including Format-based, which sets the color matrix to Rec 601 for formats with a width below 840 pixels and Rec 709 for formats with a width of 840 pixels or above. |
|
Data Range |
Sets the minimum and maximum color range values for encoding DNx files: • Full Range - encodes with the full data range (0-255 for 8-bit or 0-1023 for 10-bit). • Video Range - encodes with a reduced, or video/legal, data range (16-240 for 8-bit or 64-960 for 10-bit). |
|
Fast Start |
When enabled, MOVs are playable while still down loading during streaming. |
|
Write Timecode |
When enabled, a time code track is added to the rendered .mov file. You can also use the quicktime/reel metadata, if present, to give the track its reel name. You can add this key using the ModifyMetaData node if it doesn’t exist. Note: The input/timecode key must be present in the sequence metadata in order to write a time code. |
|
Bitrate |
Sets the target bitrate that the codec attempts to reach, within the limits set by the Bitrate Tolerance and QuantizerMin/Max controls. |
|
Bitrate Tolerance |
Sets the amount that the bitrate can vary from the Bitrate setting. Setting this tolerance too low can result in renders failing. |
|
Quantizer Min |
Sets the quality range within which the codec can vary the image to achieve the specified bitrate. Higher ranges can introduce image degradation. |
|
Quantizer Max |
Quantizer Max |
|
PNG Codec |
|
|
Data Range |
Sets the minimum and maximum color range values for encoding DNx files: • Full Range - encodes with the full data range (0-255 for 8-bit or 0-1023 for 10-bit). • Video Range - encodes with a reduced, or video/legal, data range (16-240 for 8-bit or 64-960 for 10-bit). |
|
Fast Start |
When enabled, MOVs are playable while still down loading during streaming. |
|
Write Timecode |
When enabled, a time code track is added to the rendered .mov file. You can also use the quicktime/reel metadata, if present, to give the track its reel name. You can add this key using the ModifyMetaData node if it doesn’t exist. Note: The input/timecode key must be present in the sequence metadata in order to write a time code. |
|
Uncompressed Codec |
|
|
YCbCr Matrix |
Sets the way RGB is converted to Y’CbCr. Rec 601 and Rec 709 follow the ITU.BC specifications. Auto uses a set a heuristics to determine the best color matrix to use, including Format-based, which sets the color matrix to Rec 601 for formats with a width below 840 pixels and Rec 709 for formats with a width of 840 pixels or above. |
|
Data Range |
Sets the minimum and maximum color range values for encoding DNx files: • Full Range - encodes with the full data range (0-255 for 8-bit or 0-1023 for 10-bit). • Video Range - encodes with a reduced, or video/legal, data range (16-240 for 8-bit or 64-960 for 10-bit). |
|
Fast Start |
When enabled, MOVs are playable while still down loading during streaming. |
|
Write Timecode |
When enabled, a time code track is added to the rendered .mov file. You can also use the quicktime/reel metadata, if present, to give the track its reel name. You can add this key using the ModifyMetaData node if it doesn’t exist. Note: The input/timecode key must be present in the sequence metadata in order to write a time code. |
Nuke writes the selected colorspace and other information into the metadata of the file. If you then read the rendered file in, Nuke reads that metadata and is able to pick the correct defaults for the file. To see the file metadata yourself, use a ViewMetaData node.
When writing .mov files, some users have reported receiving the following error at the end of rendering:
Failed to flatten movie data: the movie is open in another application.
This is because the output file has been opened by some other process. This can be the Finder on Mac trying to show a preview, an OS file system search trying to index the file, or a virus checker, for example. The workaround is to turn off Fast Start in the Write node controls to skip the flattening process that is affected.
Notes on Rendering OpenEXR Files
Nuke supports multi-part OpenEXR 3.1.4 files, which allow you to store your channels, layers, and views in separate parts of the file. Storing the data this way can make loading .exr files faster, as Nuke only has to access the part of the file that is requested rather than all parts. However, for backwards compatibility, you also have the option to render your .exr files as single-part images.
To set how the data is stored in your rendered .exr file, open the Write properties and set interleave to:
• channels, layers and views - Write channels, layers, and views into the same part of the rendered .exr file. This creates a single-part file to ensure backwards compatibility with earlier versions of Nuke and other applications using an older OpenEXR library.
• channels and layers - Write channels and layers into the same part of the rendered .exr file, but separate views into their own part. This creates a multi-part file and can speed up Read performance, as Nuke only has to access the part of the file that is requested rather than all parts.
• channels - Separate channels, layers, and views into their own parts of the rendered .exr file. This creates a multi-part file and can speed up Read performance if you work with only a few layers at a time.