Retiming a Sequence
Kronos allows you to retime a sequence by speed or by frame. Speed retimes describe the retime by a percentage of full speed, either against the output or input frames. For example, the default setting Output Speed = 0.5 is equal to a 50% retime on the output frames. Frame retimes describe the retiming in terms of ‘at frame 100 in the output clip, I want to see frame 50 of the source clip‘.
Note: Input Range in the Kronos properties defines which frames are used for the retime. When you first create the node, the range is automatically set to the frame range of the Source clip. If you change the Source clip later, you need to click the Reset button to make sure Input Range matches the current input.
Retiming a Sequence Using Output Speed
To apply a constant retime:
|
1.
|
Ensure that the Viewer is connected to the Kronos node and Timing is set to Output Speed. |
|
2.
|
Select the required interpolation Method using the dropdown: |
• Frame - the nearest original frame is displayed.
• Blend - a mix between two frames is used for the in-between frame. This is quick to render and is useful when tweaking the timing on a curve before setting the Method to Motion.
• Motion - vector interpolation is used to calculate the in-between frame.
|
3.
|
Enter a value for the Output Speed control. Values below 1 slow down the clip and values above 1 speed up the clip. The default value is 0.5, creating a half-speed slow down. Quarter-speed would be 0.25. |
|
4.
|
Play through the sequence to view the retime. |
|
6.
|
If you’d like to add motion blur to your retimed footage, proceed to Adding Motion Blur. |
To use varying retimes:
Tip: If you want to retime at a certain event in the clip, you may find that using Input Speed is easier to predict where keyframes should be placed.
|
1.
|
Ensure that the Viewer is connected to the Kronos node and Timing is set to Output Speed. |
|
2.
|
Select the required interpolation Method using the dropdown: |
• Frame - the nearest original frame is displayed.
• Blend - a mix between two frames is used for the in-between frame. This is quick to render and is useful when tweaking the timing on a curve before setting the Method to Motion.
• Motion - vector interpolation is used to calculate the in-between frame.
|
3.
|
Move the playhead to the frame you want to start retiming and enter the required Output Speed. |
|
4.
|
Click the Animation button and select Set Key. |
|
5.
|
Move the playhead to the frame you want to change the retime value and enter the required Output Speed. |
A new keyframe is added automatically.
|
6.
|
Once you've added all the required keyframes, click the Curve Editor tab to view your keyframes in context of the sequence. |
|
8.
|
If you’d like to add motion blur to your retimed footage, proceed to Adding Motion Blur. |
To apply a constant retime:
|
1.
|
Ensure that the Viewer is connected to the tree before the Kronos node and Timing is set to Input Speed. |
|
2.
|
Select the required interpolation Method using the dropdown: |
• Frame - the nearest original frame is displayed.
• Blend - a mix between two frames is used for the in-between frame. This is quick to render and is useful when tweaking the timing on a curve before setting the Method to Motion.
• Motion - vector interpolation is used to calculate the in-between frame.
|
3.
|
Enter a value for the Input Speed control. Values below 1 slow down the clip and values above 1 speed up the clip. The default value is 0.5, creating a half-speed slow down. Quarter-speed would be 0.25. |
|
4.
|
Connect the Viewer to the Kronos node, and then play through the sequence to view the retime. |
|
6.
|
If you’d like to add motion blur to your retimed footage, proceed to Adding Motion Blur. |
To use varying retimes:
|
1.
|
Ensure that the Viewer is connected to the tree before the Kronos node and Timing is set to Input Speed. |
|
2.
|
Select the required interpolation Method using the dropdown: |
• Frame - the nearest original frame is displayed.
• Blend - a mix between two frames is used for the in-between frame. This is quick to render and is useful when tweaking the timing on a curve before setting the Method to Motion.
• Motion - vector interpolation is used to calculate the in-between frame.
|
3.
|
Move the playhead to the frame you want to start retiming and enter the required Input Speed. |
|
4.
|
Click the Animation button and select Set Key. |
|
5.
|
Move the playhead to the frame you want to change the retime value and enter the required Input Speed. |
A new keyframe is added automatically.
|
6.
|
Once you've added all the required keyframes, connect the Viewer to the Kronos node, and then click the Curve Editor tab to view your keyframes in context of the output sequence. |
|
8.
|
If you’d like to add motion blur to your retimed footage, proceed to Adding Motion Blur. |
Retiming a Sequence Using Frame
To apply a constant retime:
|
1.
|
Ensure that the Viewer is connected to the Kronos node and Timing is set to Frame. |
|
2.
|
Select the required interpolation Method using the dropdown: |
• Frame - the nearest original frame is displayed.
• Blend - a mix between two frames is used for the in-between frame. This is quick to render and is useful when tweaking the timing on a curve before setting the Method to Motion.
• Motion - vector interpolation is used to calculate the in-between frame.
|
3.
|
Go to a frame in the timeline, and set Frame to the input frame you want to appear at that output position. For a constant retime, you’ll need two key frames to retime the clip. |
For example, to slow down a 50 frame clip by half, you can set Frame to 1 at frame 1, and to 50 at frame 100. To do a four times slow down, set Frame to 1 at frame 1, and to 25 at frame 100.
|
4.
|
Play through the sequence to view the retime. |
|
6.
|
If you’d like to add motion blur to your retimed footage, proceed to Adding Motion Blur. |
To use varying retimes:
|
1.
|
Ensure that the Viewer is connected to the Kronos node and Timing is set to Frame. |
|
2.
|
Select the required interpolation Method using the dropdown: |
• Frame - the nearest original frame is displayed.
• Blend - a mix between two frames is used for the in-between frame. This is quick to render and is useful when tweaking the timing on a curve before setting the Method to Motion.
• Motion - vector interpolation is used to calculate the in-between frame.
|
3.
|
Go to a frame in the timeline, and set Frame to the input frame you want to appear at that output position. You’ll need atleast two key frames to retime the clip. |
For example, to speed up a 50 frame clip and then return to normal speed at the end:
• Set Frame to 1 at frame 1,
• Set Frame to 10 at frame 20,
• Set Frame to 40 at frame 30,
• Set Frame to 50 at frame 50.
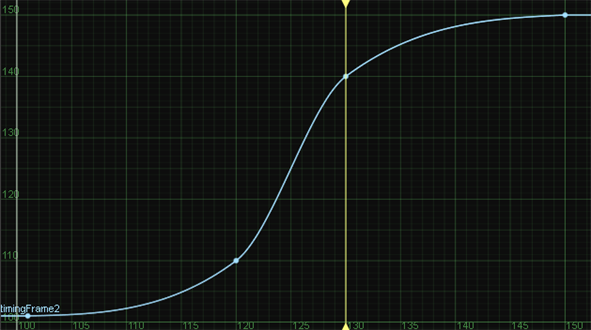
These keyframes produce the following curve in the Curve Editor.

|
5.
|
If you’d like to add motion blur to your retimed footage, proceed to Adding Motion Blur. |

