Keying with Cryptomatte
Cryptomatte creates ID mattes automatically, using organizational information already available at render time. Using the Cryptomatte plug-in in Nuke allows you to select mattes and write out your selection to a channel. This makes it quick and easy to create masks from your mattes and isolate objects or sections of an object to make adjustments.
To use Cryptomatte, your input image or sequence must have a Cryptomatte layer. To add a Cryptomatte layer, you must use Cryptomatte in the application you render from, such as Maya, to create ID mattes and add them as a render layer before rendering. You can then read the image or sequence into Nuke and use the Cryptomatte plug-in.
Note: Matte ID layers that have not been generated using Cryptomatte cannot be accessed using the Cryptomatte plug-in in Nuke.
Cryptomatte Metadata and Manifests
Cryptomatte uses metadata contained in multi-channel file types, such as .exr, to store information about the name of the Crypomatte, the type of hash used, and the conversion method used to convert the hash value into pixel color data.
Note: Only one hash type, MurmurHash3_32, and one conversion method, unit32_to_float32, are currently supported.
There are two possible sources of the manifest, it can either be embedded into the metadata of an .exr file, or stored on disk in a sidecar file. The type of manifest source is normally chosen at the rendering stage. The renderer is configured to render out an .exr with the manifest either embedded inside, or generated as a separate sidecar file. The Cryptomatte plug-in allows artists to select the source of the manifest using the Manifest Source control in the node Properties. This means the source can be overridden if needed which gives artists more flexibility.
The manifest contains the names and the IDs of all Cryptomatte objects in the form of a JSON dictionary where the names are the keys and the IDs are the values, for example:
"bunny": "13851a76"
Where bunny is the name of one Cryptomatte object, and 13851a76 is its ID.
A manifest is not required, and if the Cryptomatte manifest is missing or its content is corrupted, you are still able to select or deselect mattes, however it's not possible to recover the matte name. In this case, Cryptomatte adds a floating-point value of the selected ID, wrapped by angle brackets, to the Matte List. For more information about the Matte List, see the Using the Matte List section in this topic.

In this example, the green entry, bunny, is the original matte name, added while the manifest was present.
The red entry, <3.36000126251e-27>, is the floating-point hash value of the matte ID, wrapped by angle brackets, added after the manifest was removed.
Using the Cryptomatte Plug-in
To use the Cryptomatte plug-in:
- Read in an image or sequence with a Cryptomatte layer.
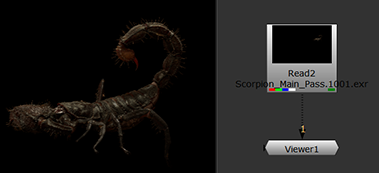
- Place a Cryptomatte node downstream of the Read node.
The Cryptomatte layer is visible in the Viewer.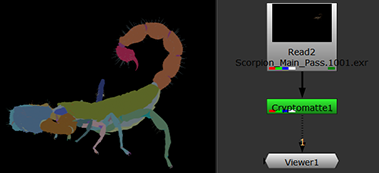
- In the Cryptomatte Properties, choose a Cryptomatte layer from the Layer Selection menu.
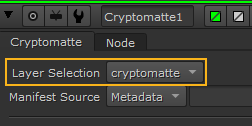
If you have multiple Cryptomatte layers available, they are listed here. If you have just one Cryptomatte layer, it is selected by default.
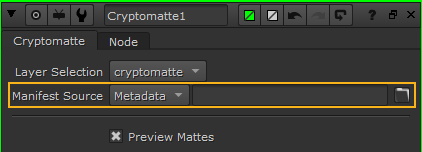
- Choose a manifest source option from the Manifest Source dropdown. If your manifest is embedded in the input image, choose Metadata, otherwise choose Sidecar and navigate to the manifest JSON file in the sidecar field.
- Use the Preview checkbox to toggle the Cryptomatte matte boundaries visibility in the Viewer.
This is useful for quickly switching back and forth between the selected mattes and the original input image to ensure you are selecting the correct parts of an object. - Click the Matte Output dropdown to choose the channel to which the extracted matte is written out.
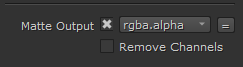
If you don't want the matte to be written to a channel, you can select none from the Matte Output dropdown, or un-tick the Matte Output checkbox.
Note: For more information on channels in Nuke, see Channels.
- Enable the Remove Channels option to remove all channels except rgba and the chosen matte output channel.
This can be useful when using the extracted matte as you may not need all other channels.
Adding and Removing Mattes
You can add and remove mattes from the matte selection in the Cryptomatte Properties using the Picker Add and Picker Remove controls, or through the Matte List. You can also remove all mattes from the matte selection using the Clear button.
To add mattes using the Picker Add option:
- Click the color swatch
 next to Picker Add in the Cryptomatte Properties to enable the eyedropper color picker.
 - Ctrl/Cmd + Click a matte to add it to the selection.
Selected mattes are displayed in yellow in the Viewer and the matte names are added to the Matte List.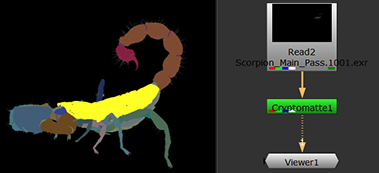
- Ctrl/Cmd + Click to add more mattes to the selection.
Tip: You can marquee select multiple mattes by holding Ctrl/Cmd + Shift and dragging in the Viewer.
The alpha output is produced as a result of your selections.
- When you are finished selecting mattes, click the color swatch
 next to Picker Add in the Cryptomatte Properties to disable the eyedropper color picker. You can also Ctrl/Cmd + right click in the Viewer to disable the eyedropper color picker.
Adding Additional Mattes Using Encryptomatte
The Encryptomatte node takes any alpha input and converts it into a Cryptomatte-selectable ID, which can be selected downstream using the Cryptomatte node. The new matte can be merged over or under existing Cryptomattes and can be added to an existing Cryptomatte layer or a new layer created in the Encryptomatte node.
-
Add an Encryptomatte node upstream of your Cryptomatte node.
-
Connect a matte to the Encryptomatte node's Matte input. This could be a Roto or RotoPaint node or a keyer.
-
You can select manual to enter a Matte Name of your choice. Some nodes, such as NoOp don't auto-complete the Matte Name.
-
Select the Merge Operation, over or under, to determine how the new matte interacts with those already present in a Cryptomatte layer.
-
The new matte can be added and removed as normal using the Picker Add and Picker Remove tools.
The Matte Name is automatically filled in from the node name connected.
|
|
|
|
A new matte merged over existing mattes in the same layer. |
A new matte merged under existing mattes in the same layer. |
Using the Matte Output
Once you have selected your mattes, you can use the chosen matte output channel as a mask, for example, for grading or to remove objects from view.
To grade your image using the selected mattes as a mask:
- Add a Grade node and connect it to your image or sequence. Connect the Mask input to the Cryptomatte node.
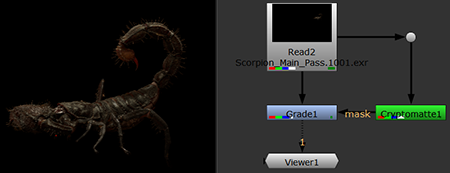
- Grade the image using the Grade node controls.
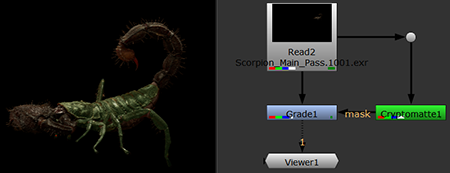
Only the masked areas are graded.
You can now select and deselect mattes to refine which parts of the image are affected by the mask.
- Click the color swatch next to Picker Remove in the Cryptomatte Properties to enable the eyedropper color picker.
- Ctrl/Cmd + Click a matte to remove it from the selection.

Deselected mattes are removed from the Matte List.
Note: You don't need to be viewing the Cryptomatte node to select and deselect mattes.
Using the Matte List
The Matte List displays a list of currently selected matte names. This list can be modified in text form or using the Picker Add and Picker Remove controls.
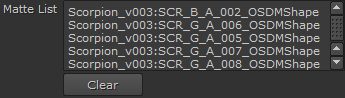
It may sometimes be useful to add or remove matte names from the Matte List in text form, as parts of an object may not always be visible in the Viewer which means selecting them using the color picker can be difficult.
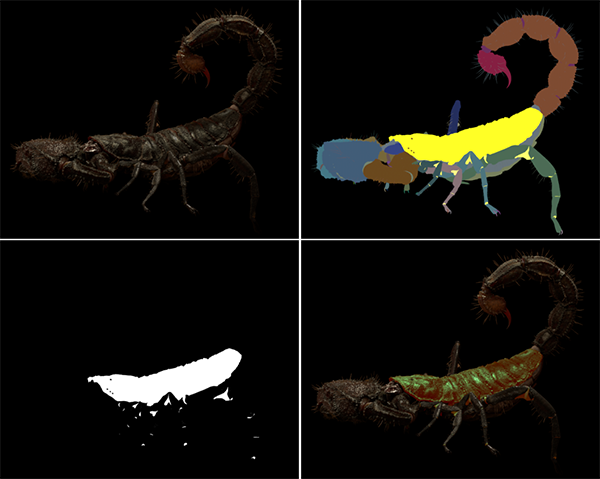
For example, selecting all the scorpion's legs in this sequence would be difficult as half of them are hidden behind the body. To avoid scrubbing through the timeline to try and located the legs, you can instead add all the legs easily by typing their matte names into the Matte List.

In the same way, mattes that are not currently visible can be removed from the matte selection by deleting the Matte List entry.
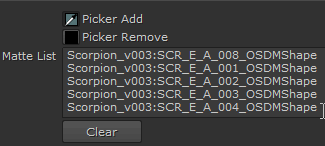
The Matte List also supports basic wildcard functionality so asterisks (*) can be used to select multiple mattes on one line. Asterisks (*) can be appended to a word to represent any number or character, for example:
scorpion* selects scorpion1, scorpion2, ... scorpionN
When using Picker Remove, only lines in the Matte List referencing the exact matte ID selected with the color picker are removed from the Matte List, for example:
selecting scorpion1 removes scorpion1 from the Matte List.
Expressions referencing a set of matte IDs, such as scorpion*, cannot be removed or changed even if the set contains only the selected matte ID, for example:
if scorpion* references only scorpion1, scorpion* is not removed from the Matte List. You can also use the asterisk (*) to reference all matte IDs.
Additionally, you can remove mattes using the - (minus) remove expression, which allows you to make more complex selections easily. For example, rather than adding multiple elements of the same object to the Matte List individually, you can add all mattes and selectively remove just those you don't want.
scorpion* selects scorpion1, scorpion2, ... scorpionN
-scorpion1 removes just one matte, but leaves the rest selected in the Matte List.
Rendering Cryptomatte Files
Nuke renders Cryptomatte layers using the Write node in the same way as other channel data, but there are a few controls in the Properties that must be set correctly for the layers to render as expected:
Tip: Click the Export Write button in the Encryptomatte node's Properties to automatically choose these settings.
-
Set the channels dropdown to all. Cryptomatte data is not stored in the rgba layer, but in dedicated Cryptomatte layers.
-
Set the file type to exr to render Cryptomatte layers. You can't render Cryptomatte layers in any other format.
-
Set the datatype to 32 bit float. 16 bit half is not supported by Cryptomatte.
-
Set the metadata control to all metadata. The metadata is required to determine the layers contained in the file.
All other Write node settings can be used as required. See Write for more details on the Write node's Properties.