Open the Tutorial Project File
The project file for this tutorial includes several node trees for the keying operations described in this chapter.
To Open the Project File
|
1.
|
Launch the Nuke application and choose File > Open Comp from the menu bar. |
|
2.
|
In the file browser, navigate to your Nuke_Tutorials/Keying/ folder, select the keying_tutor.nk project file and click Open. |
|
3.
|
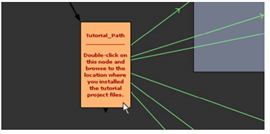
Double-click on the Tutorial_Path node, located on the left side of the script, to open its control panel. |
|
4.
|
In the Tutorial_Path control panel, click the “file folder” button. Browse to the location where you installed the tutorial project files, and then click Open to select the location. |

After you select the correct path, the error messages should clear from the Read nodes, and the thumbnails in the script update with the correct images.
|
5.
|
Close the Tutorial_Path control panel. Then, choose File > Save Comp As to save a copy of the project file. |
|
6.
|
Move the mouse pointer over the Node Graph, and press F to frame the entire contents of the project file. |
The green arrows (lines) show the links between the Tutorial_Path node and the Read nodes.
|
7.
|
If you wish, press Alt+E to hide the expression arrows. |
The Tutorial_Path node saves the location of the project files on your computer, so you don’t need to repeat this for future sessions.