Classic 3D Compositing
Nuke’s Classic 3D system workspace allows you to set up a 3D composite for camera moves, set replacement, and other applications where you need to simulate a "real" dimensional environment.
Overview
This chapter explains how to set up a 3D scene in Nuke's Classic 3D System, and how to add objects and cameras in the 3D workspace. You’ll also see how to texture objects, transform objects and cameras, and render out scenes for use in other areas of your script.
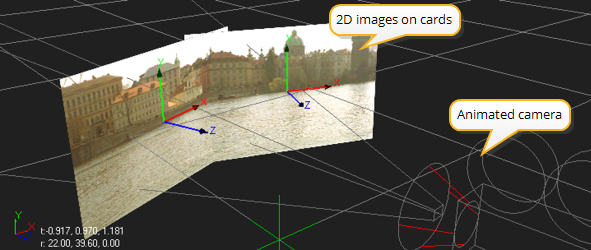
Although the 3D workspace has many potential uses, you’re most likely to use it - at least initially - to create pan-and-tile scenes. These are scenes with 2D image planes arranged into a curved shape, and then rendered out through an animated camera to give the illusion of a seamless environment.
|
|
|
Simple pan-and-tile scene. |
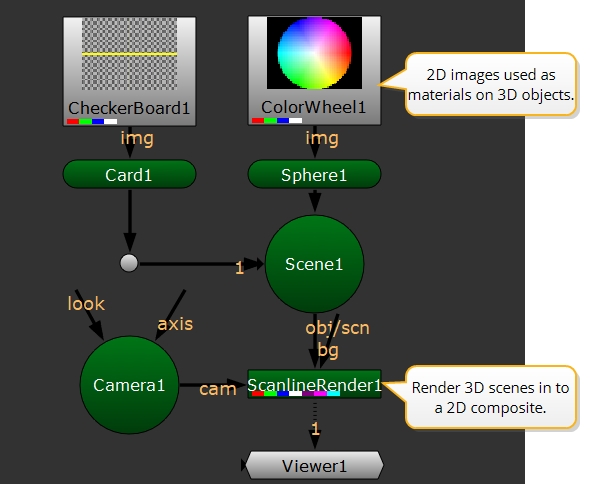
The 3D objects in Nuke appear as round shapes to differentiate them from objects that perform 2D operations. As shown above, you can mix 2D and 3D objects together in the node tree. For example, you can texture a 3D object with a 2D clip, or take the rendered output from a 3D scene and use it as a 2D background.
|
|
| Script with 2D and 3D operators |
'Classic' 3D System
There are two 3D systems, and sets of nodes, in Nuke - the Classic 3D System and the New 3D System.
The Classic 3D System nodes are green by default, and New 3D System nodes are colored depending on the node type.
The Classic 3D System nodes are found in right click node menu under 3D > 3D Classic, whereas the New 3D System Nodes are under 3D > 3D.
Read more about the difference between the two systems at 3D Compositing with the New 3D System.