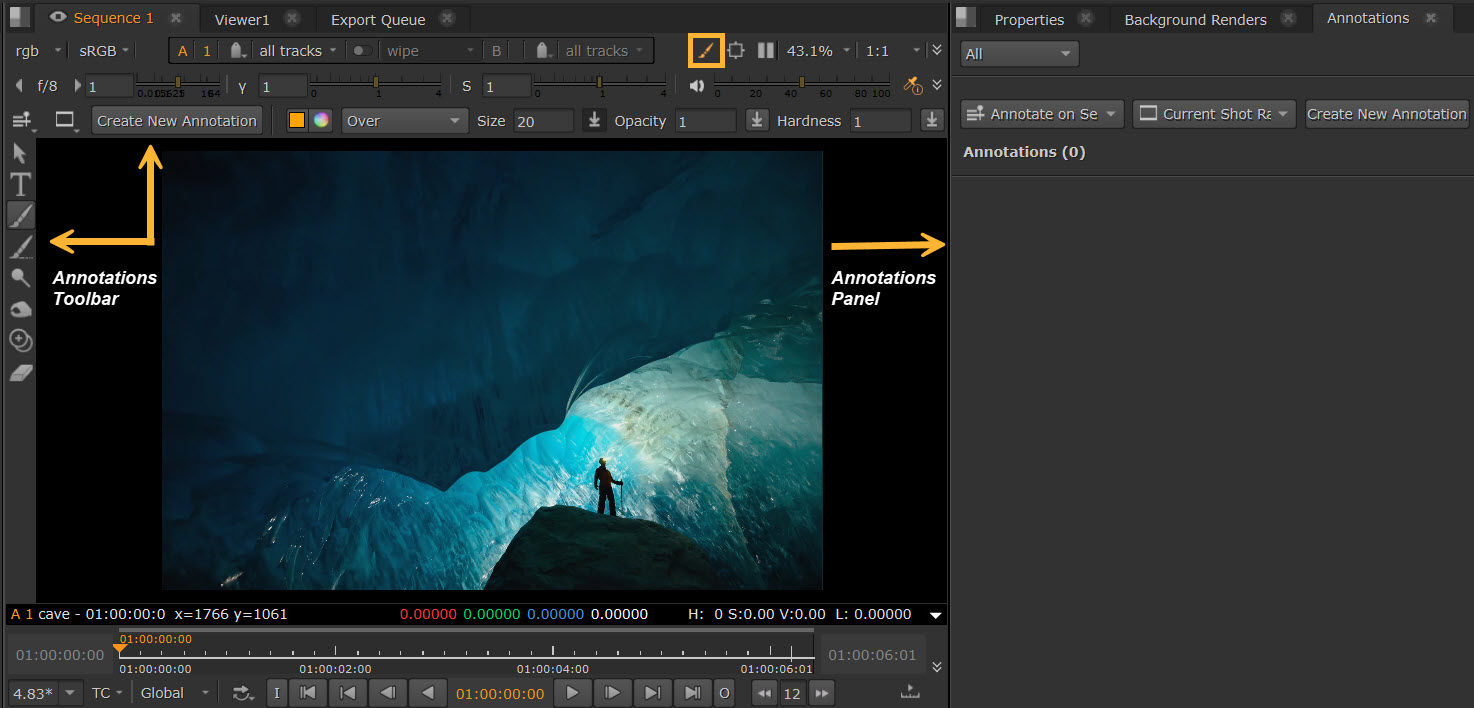
Annotations
In Nuke Studio and Hiero, you can use annotations to add instructions and feedback for compositors. You can add annotations to a single frame, a frame range or timecoded section marked with in and out points, a clip, or a whole sequence.
The Annotations Panel allows you to post comments and notes in reply. The Annotations Toolbar includes a variety of painting tools to help visually indicate your thoughts on the images in the Viewer.
Workflow
The following steps show an example of Nuke Studio workflow for annotations:
| 1. | In the Viewer, open the Annotations Tools by selecting the annotations button  in the Viewer. See Annotations Tools. in the Viewer. See Annotations Tools. |
| 2. | Add an annotation to a Clip or a Sequence by using the Annotations Panel and Annotations Toolbar. See Adding Annotations. |
| 3. | You can choose to edit an annotation after it has been created. See Editing and Deleting Annotations. |
| 4. | You can respond to comments by leaving Notes. See Adding Notes. |
| 5. | You can burn annotations in via Quick Export. See Rendering Out Annotations. |
| 6. | You can export frames with annotations to .png or .jpg via Custom Export. See Export to PNG or JPEG. |
| 7. | You can use Create Comp to view your annotation comments in a Compositing environment. See Create Comp with Annotations. |
Note: This workflow is also supported in Sync Review sessions.
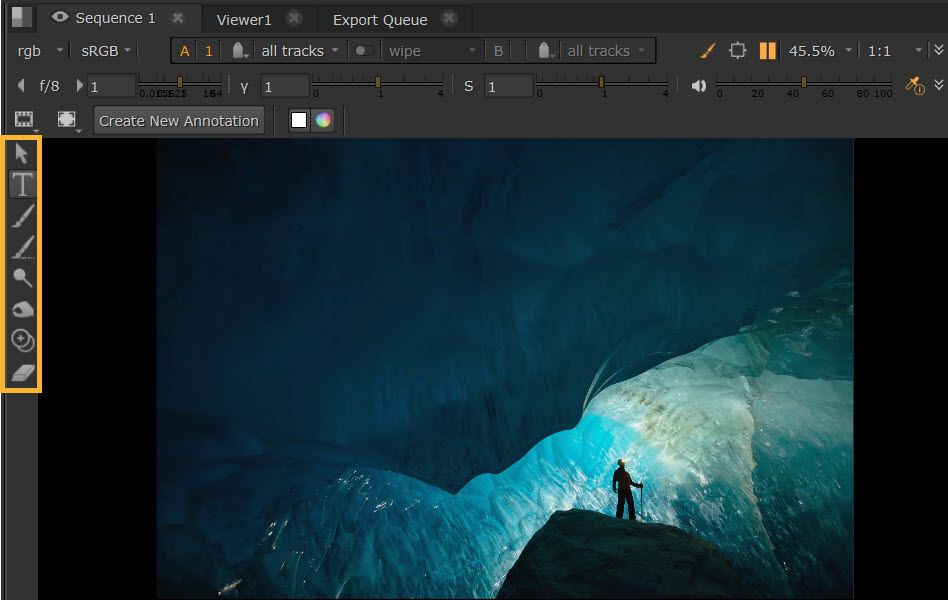
Annotations Tools
Open the Annotations Tools by selecting the annotations button at the top-right of the Viewer.
When in the default Nuke Studio workspace, this will open both the Annotations Panel on the right, and an Annotations Toolbar down the left side and horizontally above the Viewer.
Adding Annotations
To add an annotation, do the following:
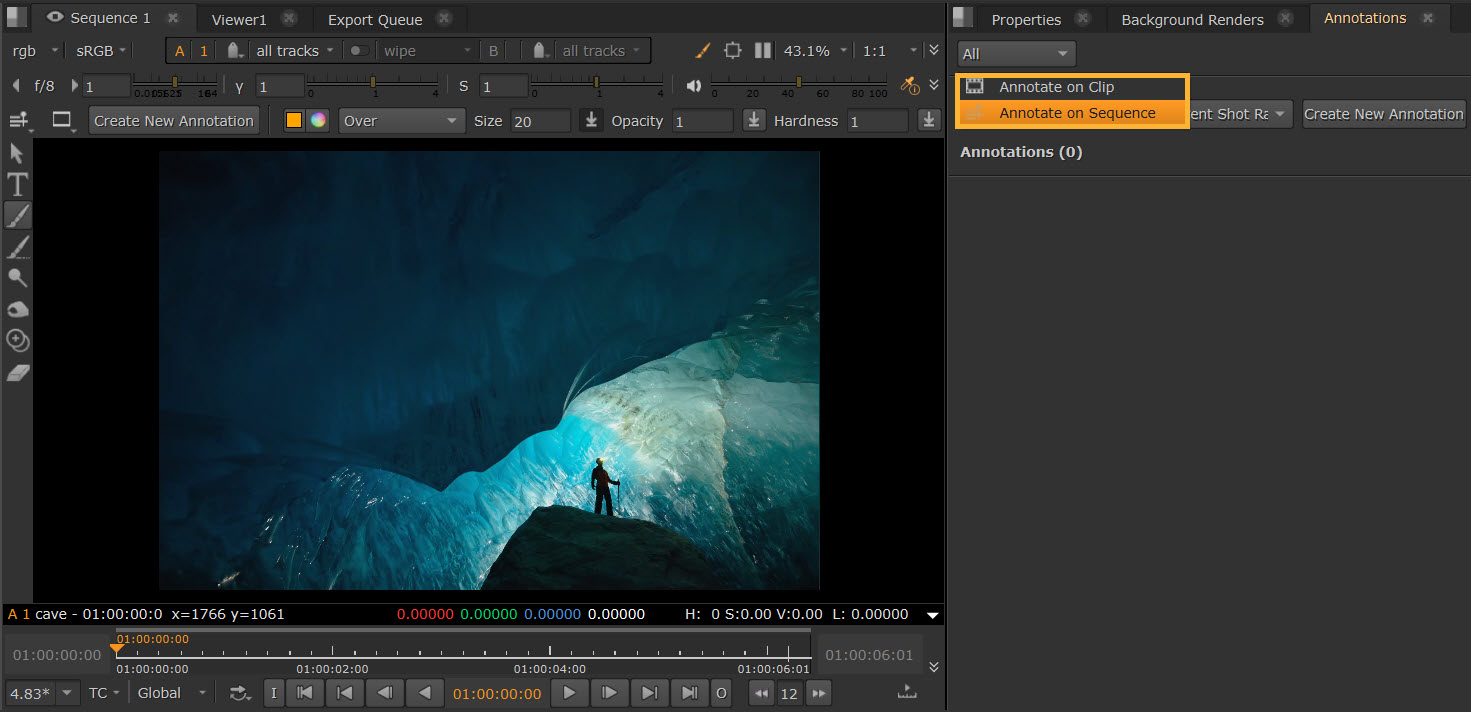
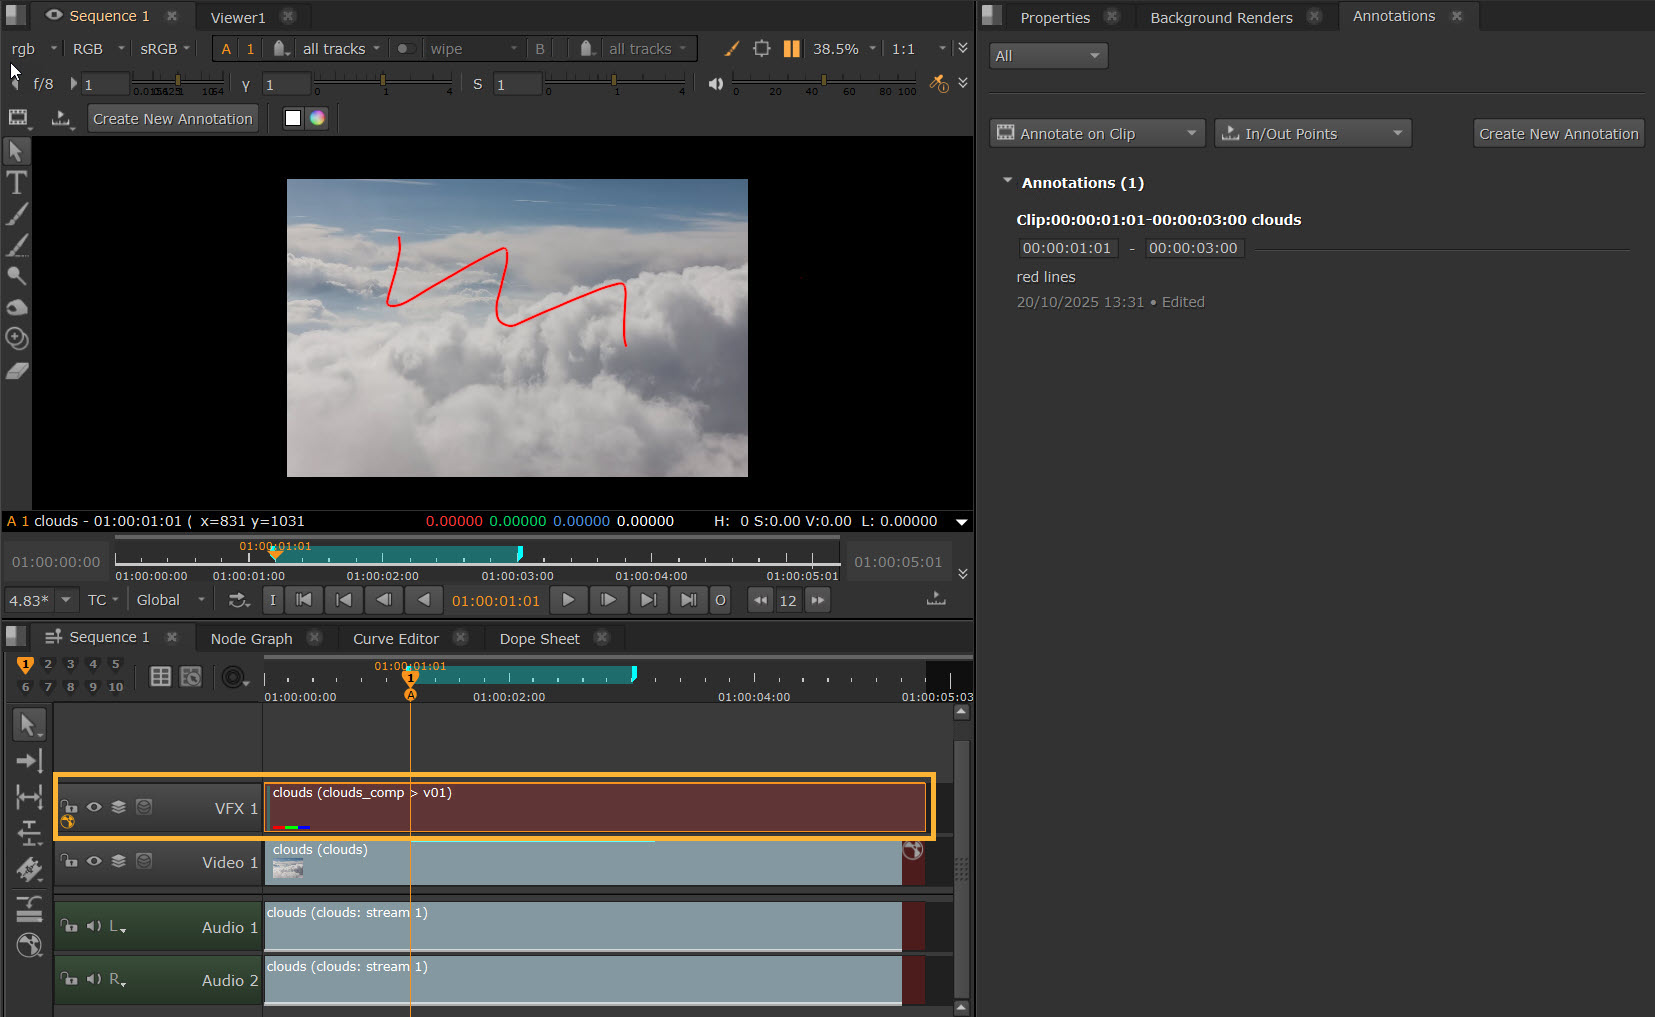
| 1. | After you have opened the Annotations Panel, move the playhead on the timeline to where you want to add your annotation. Select either Annotate on Clip or Annotate on Sequence from the dropdown. |
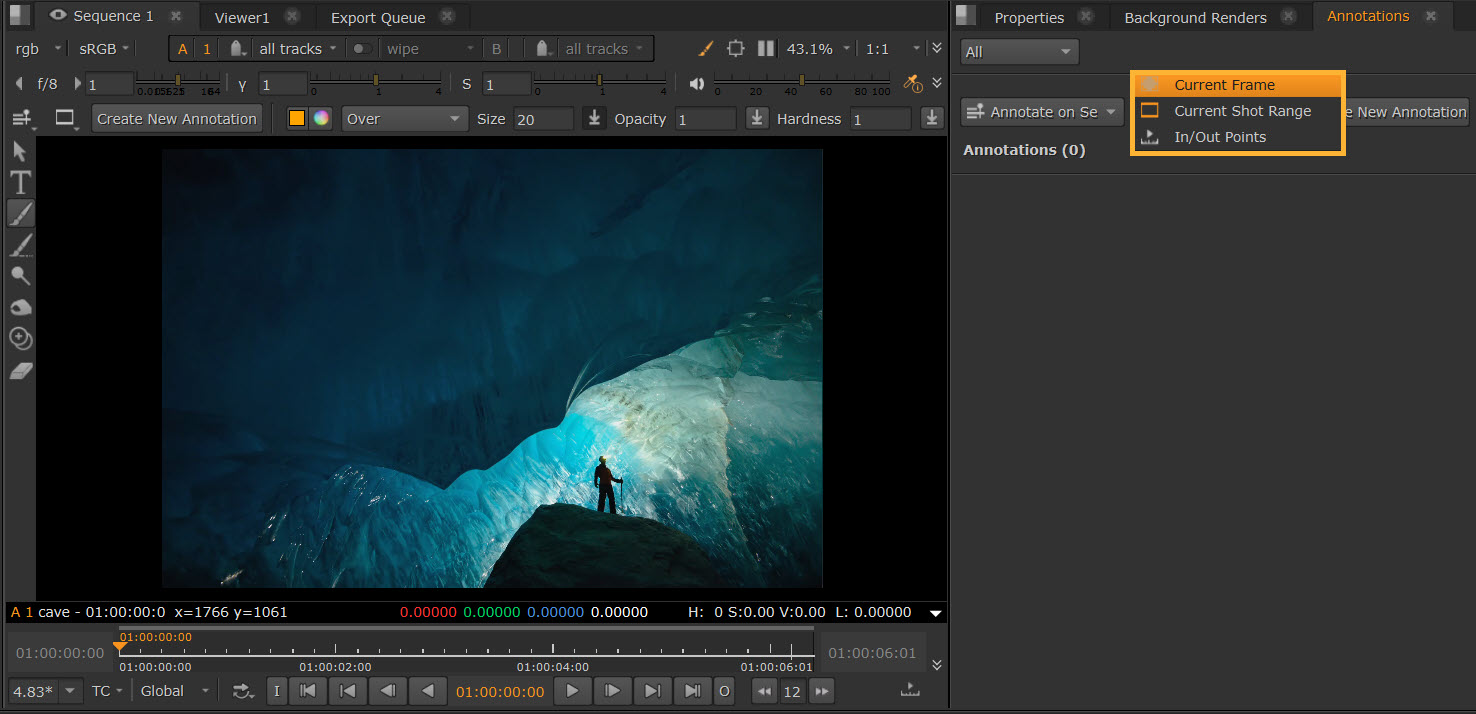
Select whether to add the annotations to Current Frame, Current Shot Range, or In/Out Points on the dropdown.
Then select Create New Annotation.
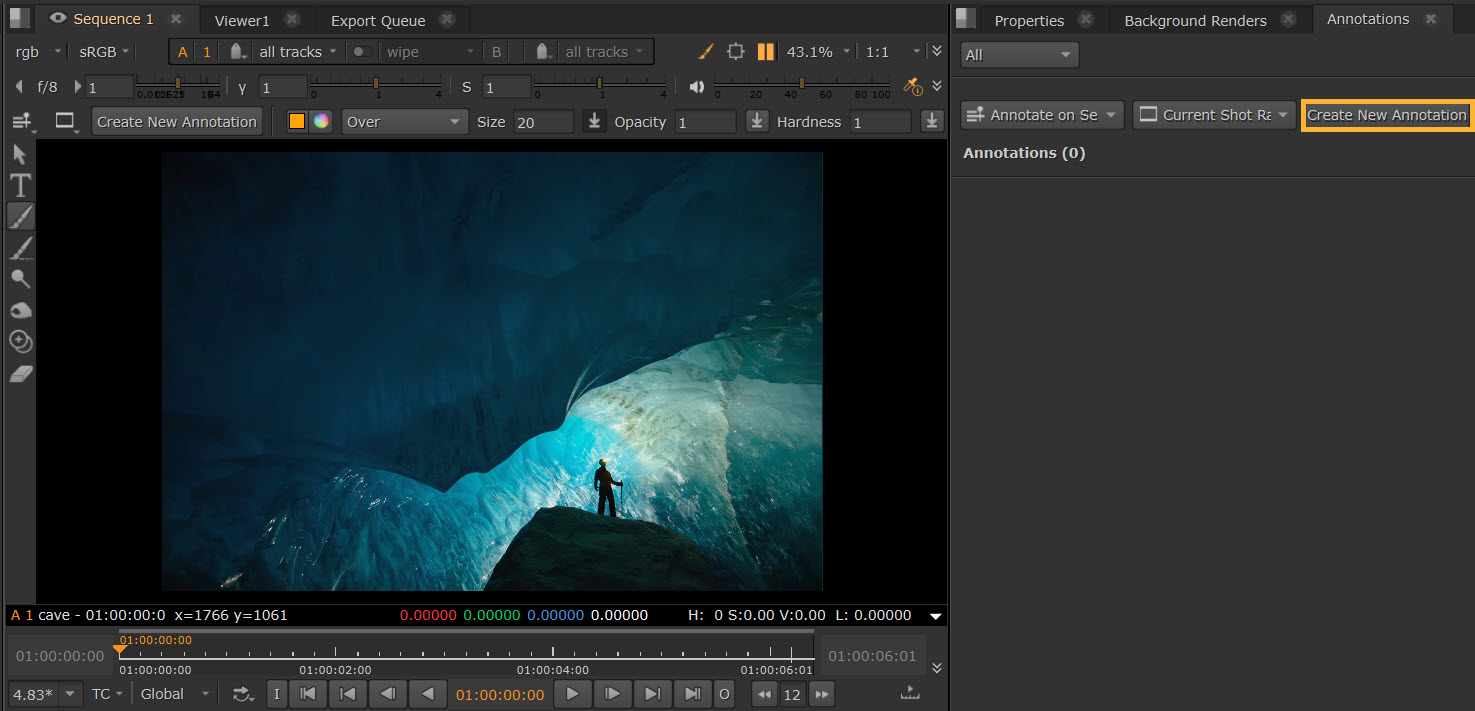
| 2. | A text field to start typing a comment opens automatically. Select OK when you have finished typing. |
Tip: To finish typing, you can also use Ctrl+Enter. To cancel you can press the ESC key.
Tip: Use Ctrl+N while the panel is selected to create a new annotation. This functionality only works in the panel, not in the Viewer.
You can adjust the frames or timecode in and out points via the orange fields.

Tip: The Annotations Panel supports emojis and various language characters. It also supports some Markdown syntax, so you can easily make text bold (using ** **), add italics (using * *), bullet lists (using -), and more. You can read more about Markdown syntax on this Markdown Guide webpage, though note that not everything is supported currently.
| 3. | Use the Annotation Toolbar to add any visual annotations to the image in the Viewer, such as using brushes. See Painting with the Annotations Toolbar. Any changes you make here are saved to the same timecode, and are linked to your comment. |
| 4. | You’ll notice that blue markers are added to the timeslider and timeline to show where your annotation is located. These can be adjusted directly by dragging the ends of the markers. Holding Shift also moves either in or out. |
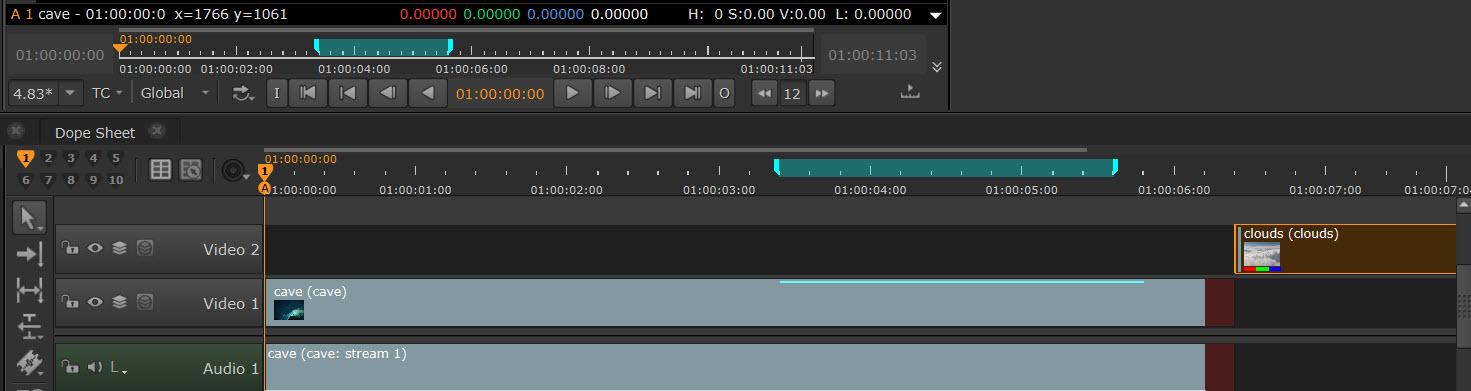
Note: There is no longer a separate Annotations track on the Timeline and your annotations are marked by a blue chip.
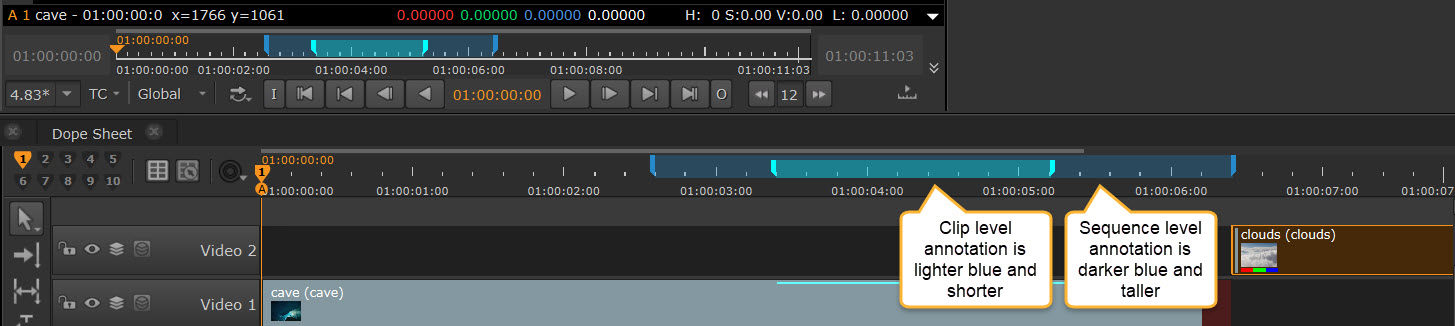
If there are multiple annotations in one area, you can see them both. Sequence level annotations are taller and darker blue, clip level annotations are shorter and lighter blue/cyan.
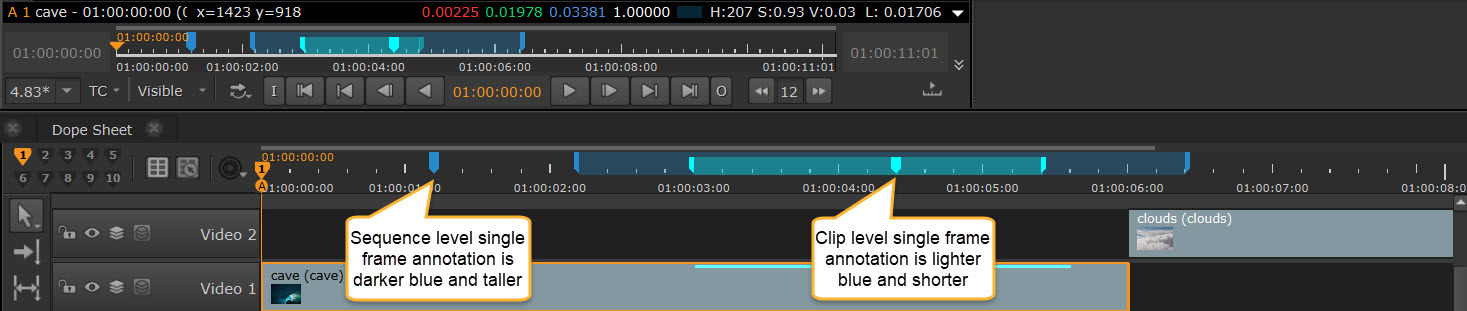
Single frame annotations are shown by a single marker on the timeline, with the same size and color differentiation for clip and sequence level.
Moving or trimming a clip moves its annotation with it. This is because clip level annotations are attached to the clip they are added to.
If, once moved or trimmed, the annotation remains inside the track item range, it continues to display markers. However, if you trim the clip in a way that removes the annotated frame, the marker(s) is no longer displayed.
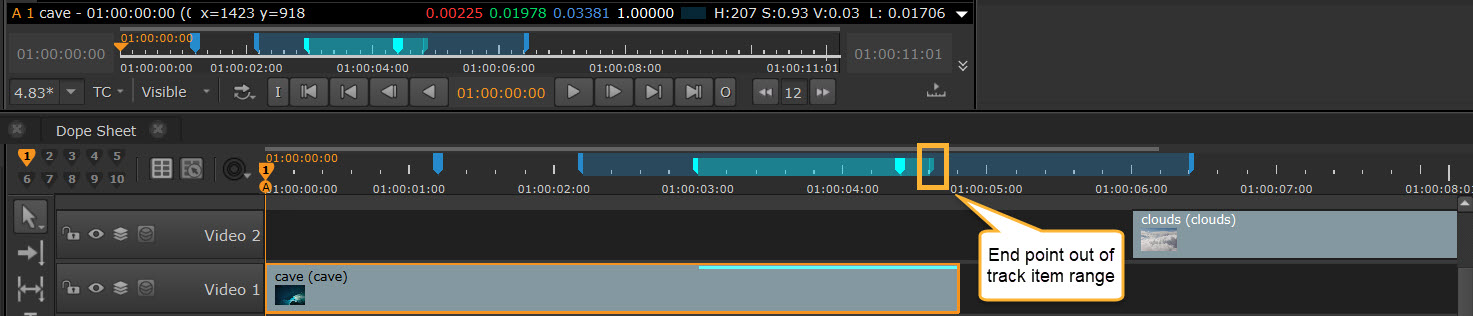
However, it is still attached to the clip, so if you then re-open the clip from the project bins in Timeline view, you can see the annotation there once more.
| 5. | Once annotations have been added, the Annotations Panel shows comments for the active Viewer, if any exist. |
To find specific annotations, you can also select the relevant blue marker on the timeslider to have it display on the Annotations Panel and in the Viewer. Similarly, clicking the comment in the Annotations Panel jumps to the relevant point on the Timeline.
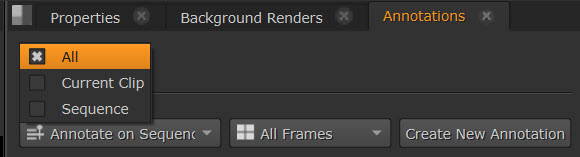
By default, in the Annotations Panel, the comments are ordered by where they are placed in the sequence. You can also use the Filter dropdown at the top of the Annotations Panel: Current Clip, Sequence, and All to only show comments from specific clips or just the sequence.
Note: You can use the Python API to set metadata on comments. Using this you can customize the Annotations Panel in a variety of ways, such as setting comment usernames, adding background colors for comments, and locking annotation editing. See the HieroPythonDevGuide to learn more.
Painting with the Annotations Toolbar
You need the annotations button toggled on to start painting. If you already have an annotation created in the Annotations Panel at this location, the drawn annotation is now part of that. If you don't already have an annotation created in the Annotations Panel at this location, one is created when you start to draw. If you have an annotation at this location but want another annotation at this location, that's possible by clicking Create New Annotation again.
You can choose between using Text, Brush, Vanishing Brush, Dodge, Burn, Clone, and Eraser mode by selecting the brush selection buttons in the Annotations Toolbar. Selecting each one will bring up different options in the horizontal toolbar.
Apply any drawing directly onto images in the Viewer. Any drawing you do will be saved to the same timecode or frames as the annotation that you have open.
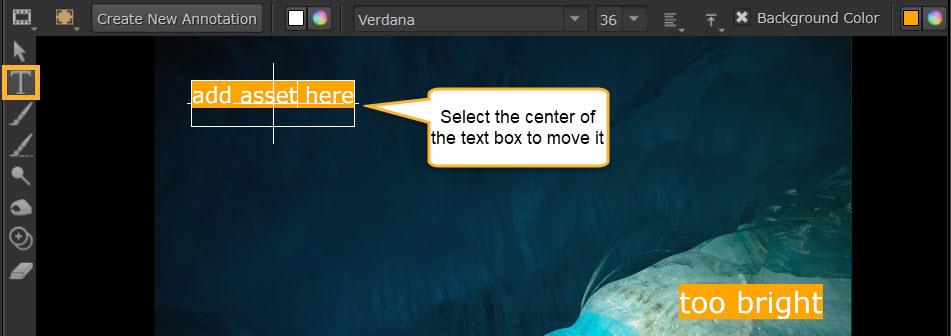
Text
To use the Text tool, simply click in the Viewer to create a text box and start typing into it.
The Text tool shows options to set the font color, style, and size. The font style dropdown will show all fonts on your system.
There are also alignment tools for horizontal and vertical alignment, and you can set a background color by toggling it on or off via the checkbox.
You can move a text box by clicking and dragging the center of the cross in the center of the text box. You can also rotate by using the longer right axis.
Tip: Use T keyboard shortcut to enable the Text tool. Use Esc to exit.
Tip: The text tool supports emojis and various language characters.
Note: The text written with the Text tool is available via Python, so that text can be uploaded to the production tracking software and be searchable if needed.
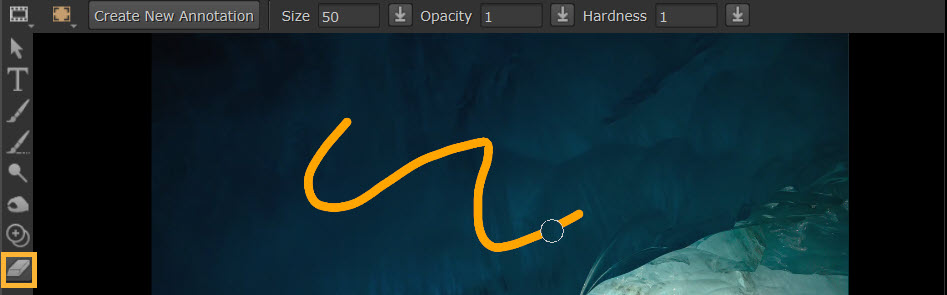
Brush
By enabling the Brush tool, you can paint directly onto the Viewer. The Brush tool will show options for color, blending modes, brush size, opacity and hardness.
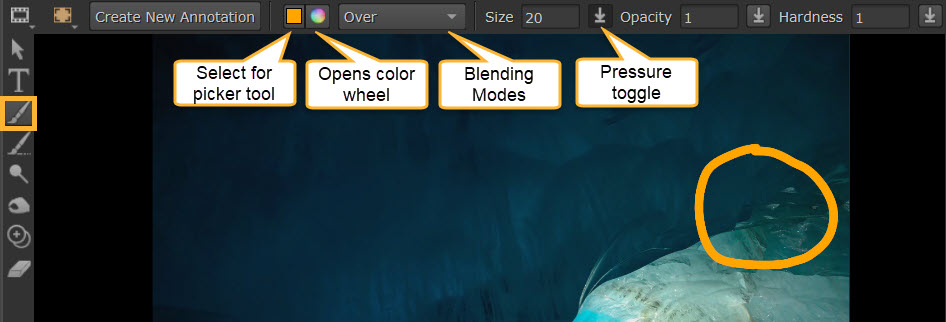
• The color wheel icon opens a color wheel to pick from, or select the color square icon for a color picker tool to grab from source.
Tip: When using the color picker tool, use Alt+Ctrl to grab from behind annotations. Alt+Ctrl+Shift to grab from a selection.
• Adjust the size of the brush by setting a Size value in the toolbar, or by holding Shift and dragging the brush size inwards or outwards.
• Blending Modes: Choose from the dropdown to determine how the paint will be applied in relation to the rest of the image.
• Pressure: This toggle button  is for controlling pressure. Enabling it will mean that pressure affects the size, opacity, or hardness of your stroke. Opacity pressure is enabled by default.
Tip: Use N keyboard shortcut to switch between Brush and Eraser tools.
Vanishing Brush
The Vanishing brush allows paint to vanish shortly after its application. For example this can be used for demonstration purposes where you don't want the brush strokes to remain. You can use the brush on the Viewer and it will automatically vanish after a short time.

Note: Use M keyboard shortcut to switch to using the Vanishing brush.
Dodge and Burn
The Dodge and Burn tools help to annotate shadows and light. Dodge lightens the image, and Burn darkens the image.
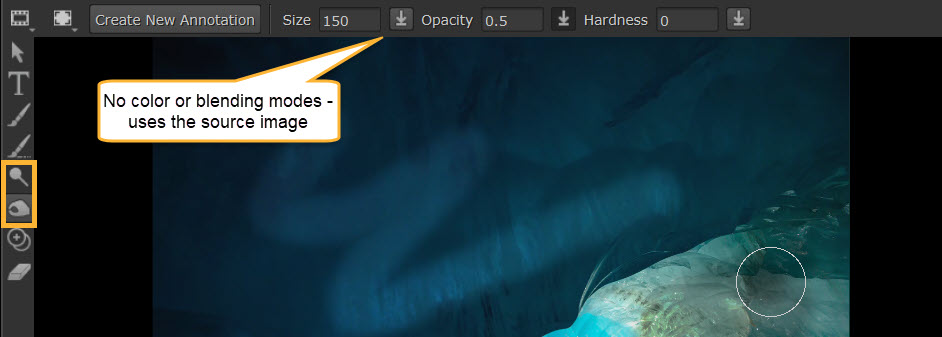
• There are no color picker or blending modes for Dodge and Burn - it will grab the color from the source image.
• Size, opacity, hardness, and pressure work the same way as the Brush tool.
Tip: Use D keyboard shortcut to switch between Dodge and Burn tools.
Clone
The Clone tool allows you to clone parts of your image. Select Ctrl to edit the clone under your cursor and stretch the scale of it.
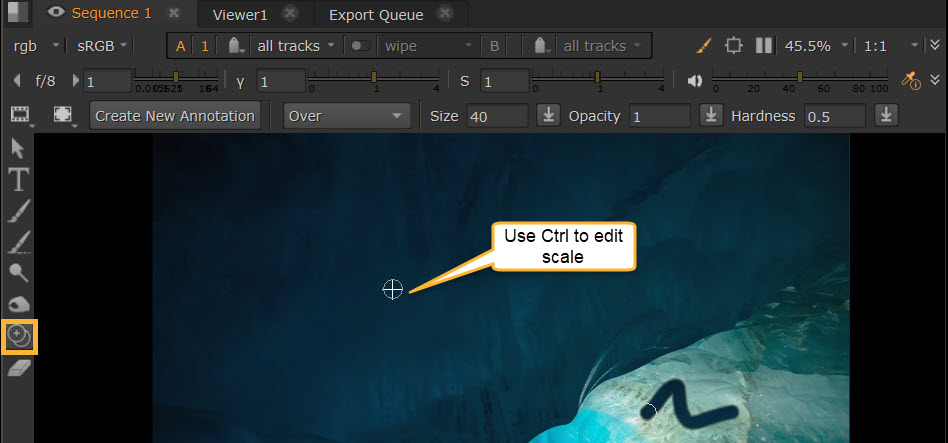
Tip: Use C keyboard shortcut to switch to using the Clone tool.
Eraser
The Eraser tool allows you to remove any Brush, Dodge, Burn, or Clone you have already added.
Tip: Use N keyboard shortcut to switch between Brush and Eraser tools.
Editing and Deleting Annotations
Annotations can be edited and deleted via the Annotations Panel. Any drawings are part of the annotations in the Annotations Panel.
Tip: Toggle the annotations button to hide or show drawings.
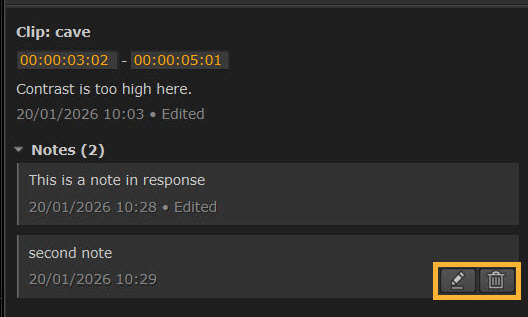
• Use the Edit button ![]() on any comment in the Annotations Panel. This allows you to edit the text in the Annotations Panel. Once edited, your comment will show with an ‘Edited’ state.
on any comment in the Annotations Panel. This allows you to edit the text in the Annotations Panel. Once edited, your comment will show with an ‘Edited’ state.
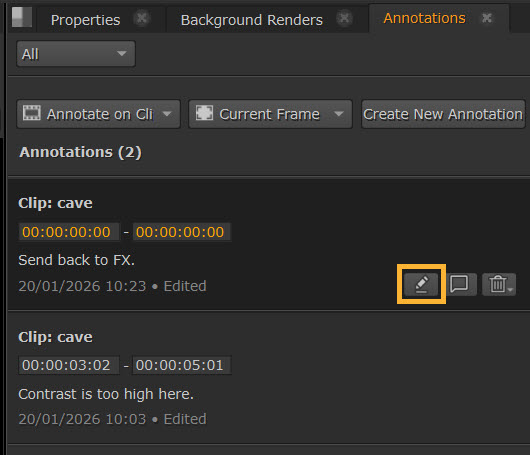
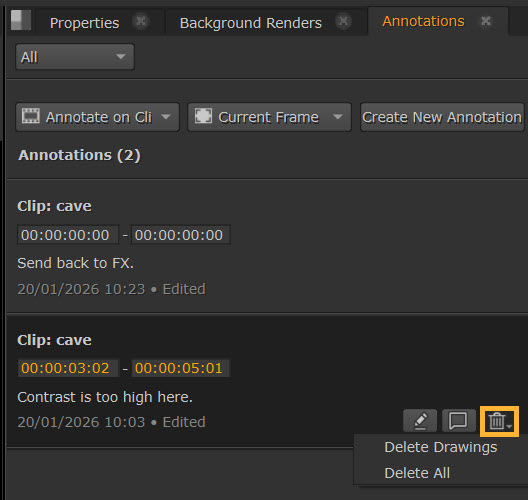
• You can delete comments via the trash can button. This brings up a Delete menu where you can select what to delete from Delete Drawings (removes drawings only) or Delete All (removes the comment and any drawings).
Tip: You can also edit the timestamp by typing in the orange fields in the Annotations Panel, or by dragging the blue markers to a new position on the timeslider.
Adding Notes
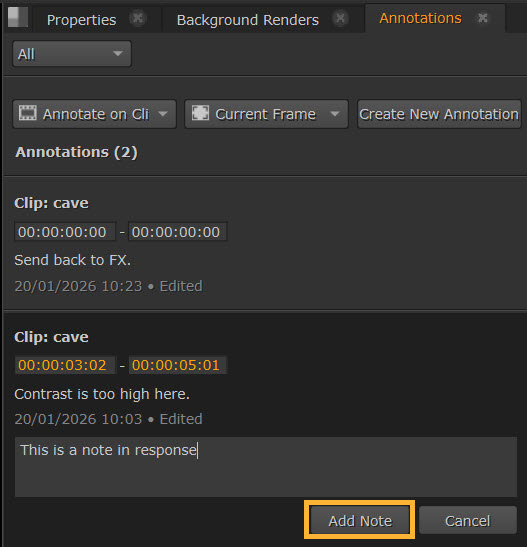
Select the notes icon ![]() to add notes to any comment to leave further thoughts or replies.
to add notes to any comment to leave further thoughts or replies.
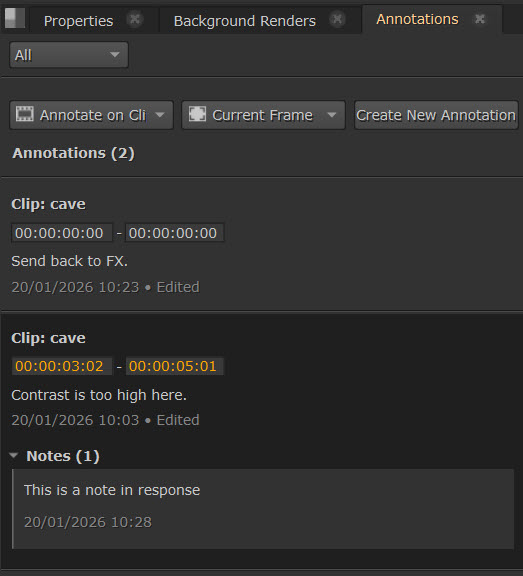
Write in the text field and select Add Note to save it. It will then appear beneath the original comment under Notes.
Follow the same process again to add further notes and replies.
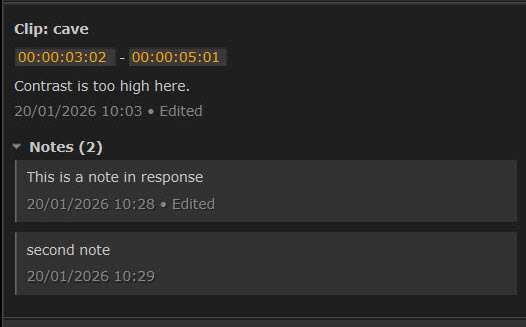
Notes can be edited and deleted using the Edit and Delete buttons, which are found when hovering over your note.
Rendering Out Annotations
You can burn the drawn annotations into your images or sequences via Quick Export.
To do this, go to File > Export, or use Ctrl + Shift + E to open the Export Dialog.
In the Quick tab, check to enable Include Annotations.

Note: See more about Quick Export at Exporting Sequences with Quick Export.
Export to PNG or JPEG
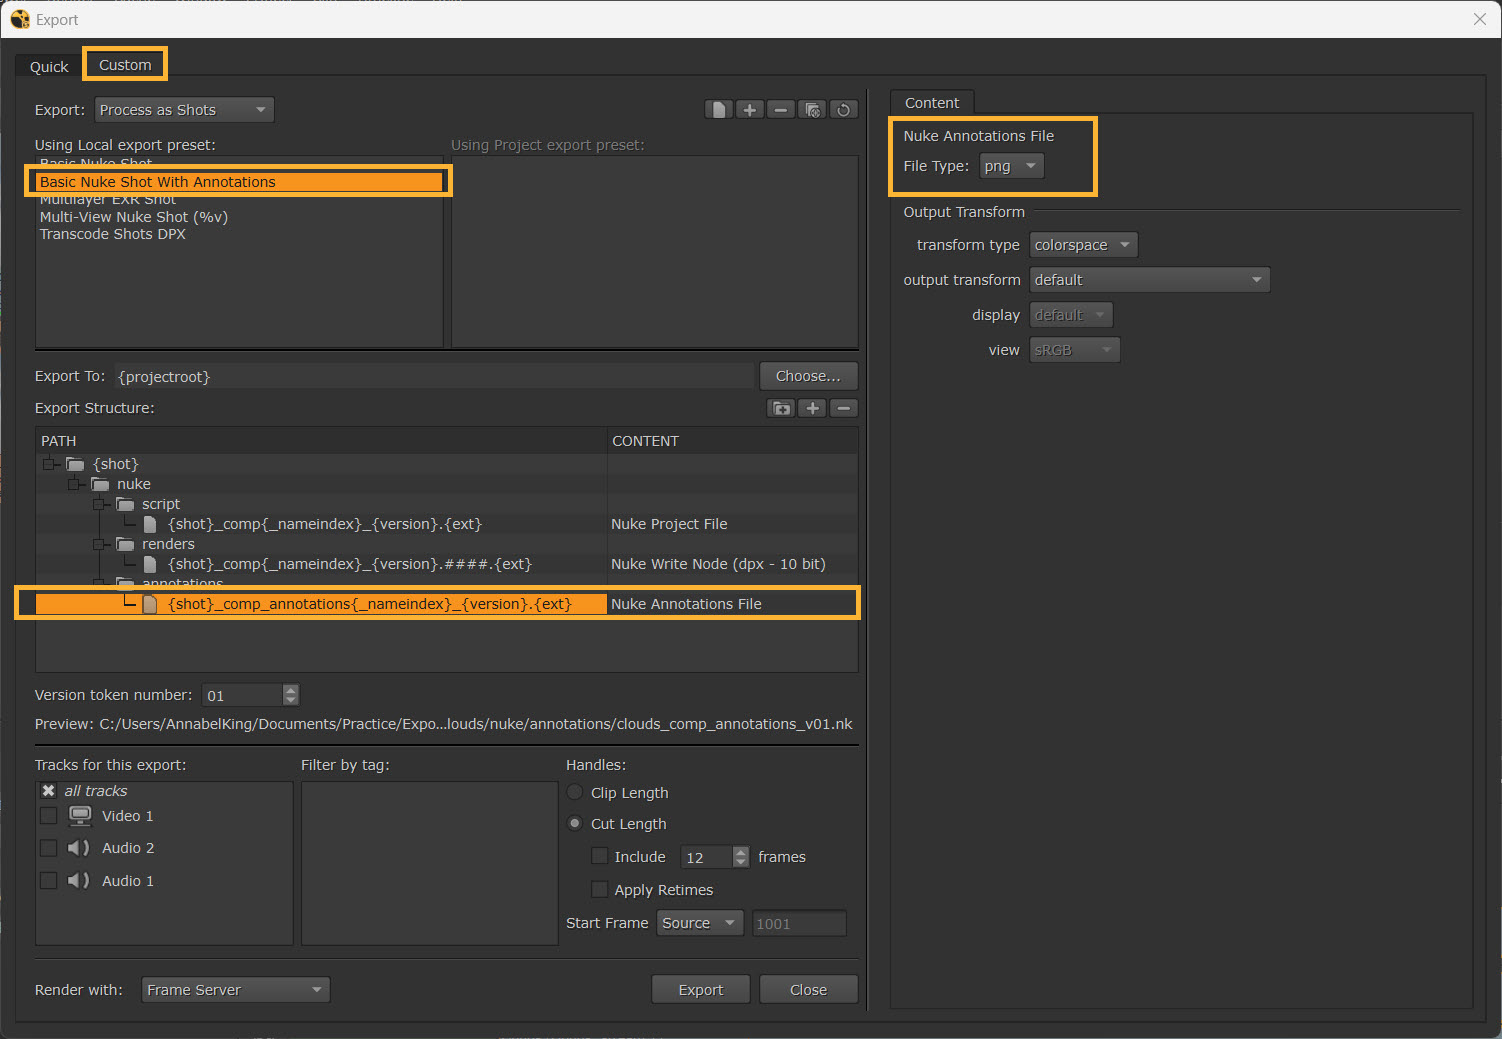
You can also export to .png or .jpeg by using the Custom Export options.
To do this, go to File > Export, or use Ctrl + Shift + E to open the Export Dialog.
In the Custom tab, select Basic Nuke Shot with Annotations. Choose your Annotation File under the Export Structure, and then select a File Type on the right-hand side (either png or jpeg).
Selecting Export will then write the annotation images using the selected file format. The frames .png or .jpg files will be saved in your /annotations folder.
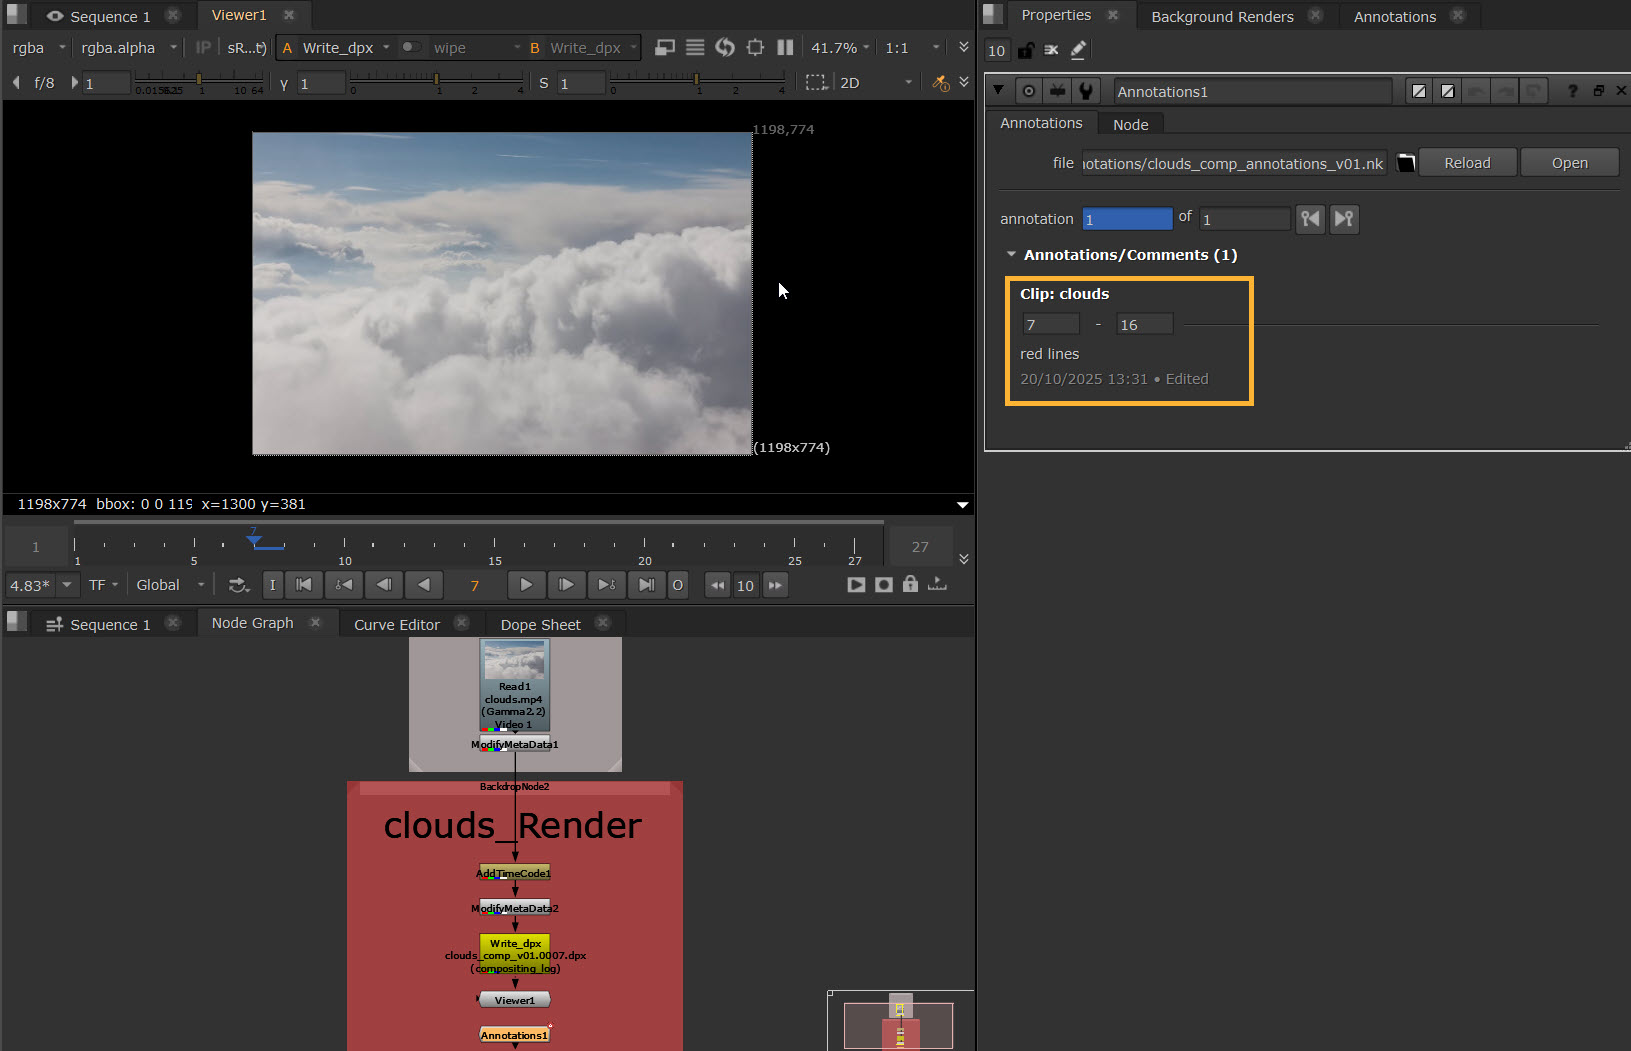
Create Comp with Annotations
To view your annotation comments in a Compositing environment, you can use Create Comp.
| 1. | Right click on clip in timeline and select Create Comp >Create Comp. |
| 2. | The Comp track will be added to your timeline. |
| 3. | Double click the Comp track to open it in the Compositing environment. |
| 4. | Here you will find the Node Graph populated with the relevant nodes for the Comp. The Annotations node stores your annotation comments. |
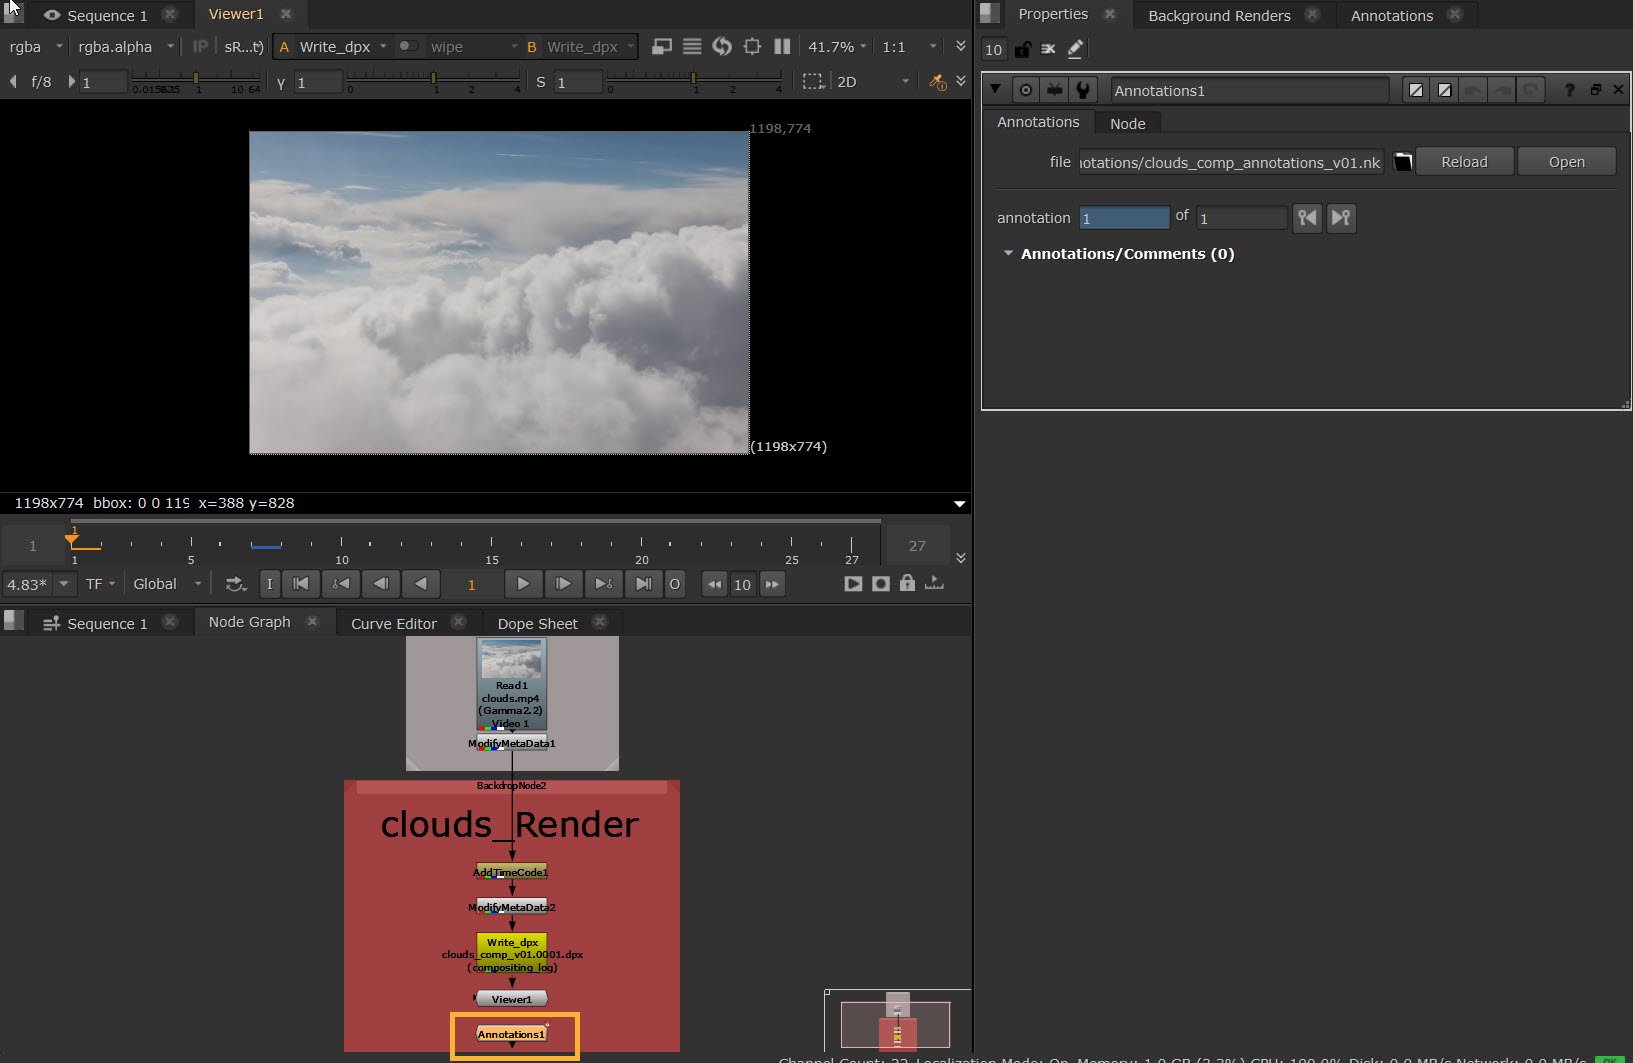
| 5. | The Annotations node contains controls to jump between where annotations are in the Comp (if you have more than one). |
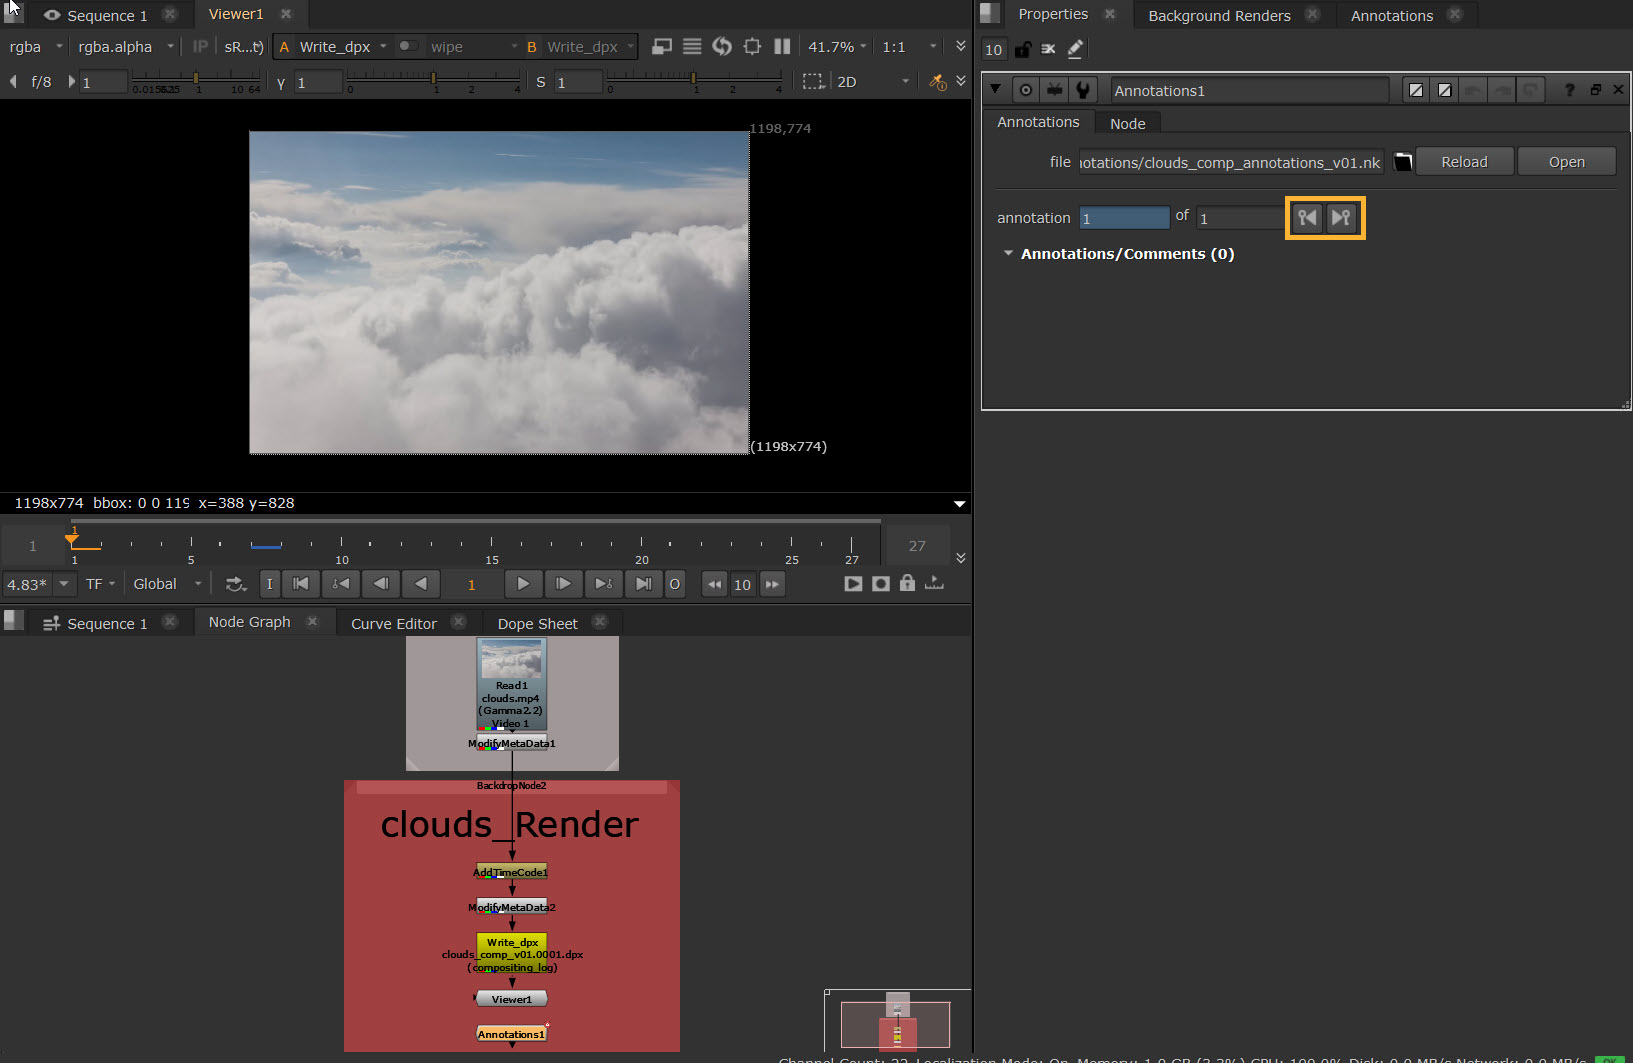
| 6. | In the Annotations/Comments section you can also see the annotations that are active on that frame. |
Note: See more details about Create Comp workflows at Create Comp.