Using Axis Node in Your Scene
The Axis node allows you to add input pipes, enabling more options to transform and constrain cameras.
This node allows you to pass data through from USD or Alembic files, or an existing prim in your scene.
Tip: To learn more about the different types of constraint in Nuke, see Constraining Prims.
Note: You can find more information on the controls in the Node Reference Guide - Axis.
Axis Data
When configuring an Axis in your scene you may wish to use imported or existing data.
• You can use Import From File or Source Prim knobs to import data either from an external file or pick a prim from your scene.
• If you have the Live Read knob enabled, any updates you make will be updated live. The Axis node is then able to be connected to other nodes where you want to use that data via an axis input, such as a camera.
Tip: See how the Axis node's Source Prim knob works in a constraint workflow in our Projections in 3D Video.
• You can push an Axis created in Nuke to your USD stage using the Output Prim Path. This happens by default when connected to the GeoScene node. If this path is left blank, it will create one for you when the camera is connected via GeoScene, and will be named [AxisName]_Inject by default.
• The Axis node’s Xform syncing controls work the same way as the Camera node.
See Xform Syncing Options to learn more.
Using Live Read
When Live Read is enabled, data can be pulled live from a USD or Alembic file allowing you to simply pass the data through the node, or to go in and start editing the data. This allows you to connect that Axis to any node in Nuke with an axis input.
If you are using an imported or referenced Axis, and have enabled Live Read, you'll notice that the knobs have a green outline. This helps you to see which data is being read from elsewhere in their script and which data has been changed directly on the node itself.
• The green outline means the data has not changed from the source.
• The yellow outline means there are local changes on this node which are different from the source.
Video: See how the data pass through works in a constraint workflow in our Projections in 3D Video.
The authoring mode icons to the left of each knob allow you to control this. Set Value when there are local changes, and you can always revert back to No Change if you wish to reset to default (from source). Learn more about Authoring Modes
When Live Read is enabled, there is also an option to Snapshot Frame and Snapshot Range while using the Axis. This will essentially take any Axis that is being live read into the node and bake the values as a local copy to that node, allowing you to have a permanent snapshot of the data at the moment in time.
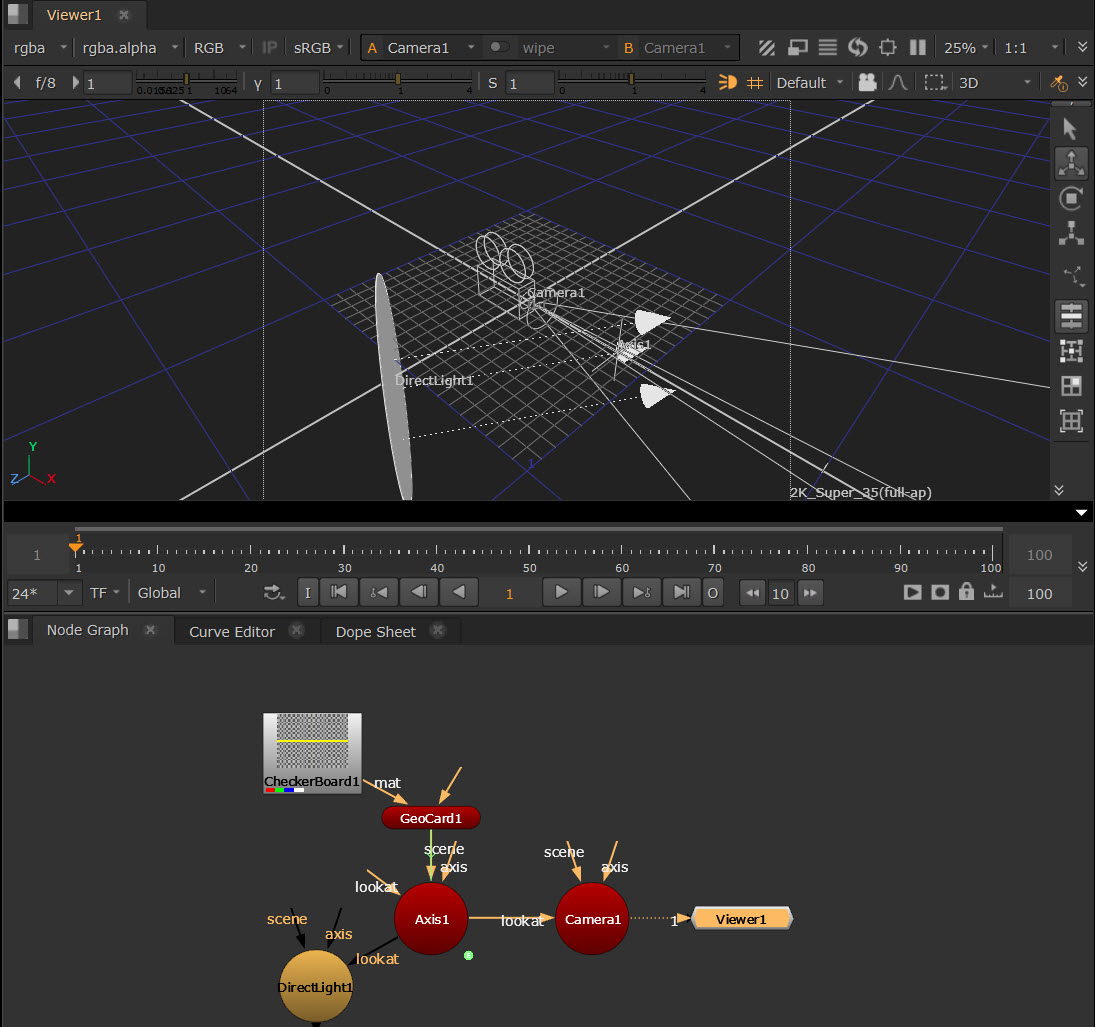
Using the Look At Input - Example
You can also use more traditional constraint workflows using Axis. For example, you can connect an Axis node to a Camera’s look at input so that the camera rotates to face the Axis, wherever it is moved.
If you animate a card to move along the x axis, you can attach a camera and a light node with the look at inputs so that they automatically rotate and face the card as it moves. To do this, complete the following steps:
| 1. | After animating your GeoCard, insert an Axis node. |
| 2. | Expression link the Axis node to the GeoCard node by holding Ctrl, clicking on the translate animation button in the GeoCard node's properties, and dragging it to the translate animation button in the Axis node's properties. The expression link is displayed as a green line with an arrow denoting the direction of the expression. See Linking Expressions for more information. |
| 3. | Insert a Camera node and either drag the camera to the required position in the Viewer, or use the Camera node properties to adjust the position of the camera. |
| 4. | Connect the Camera's look at input to the Axis node. |
Note: If you amend the Type in the Constrain section, the input pipe switches label depending on which constrain type is selected. Learn more about constraint at Constraining Prims.
| 5. | Insert a light node, such as DirectLight, and drag the light to the required position in the Viewer, or use the light node properties to adjust the position of the camera. |
| 6. | Connect the light node's look at input to the Axis node. |
| 7. | Playback your animated card and notice that the camera and light follow the animated card. |