Working with Animated Splats
The GeoSequencer node allows you to quickly process a sequence of PLY, SPLAT, or USD files and output them as time-sampled USDC files to be manipulated by Nuke's existing splat toolset.
|
1.
|
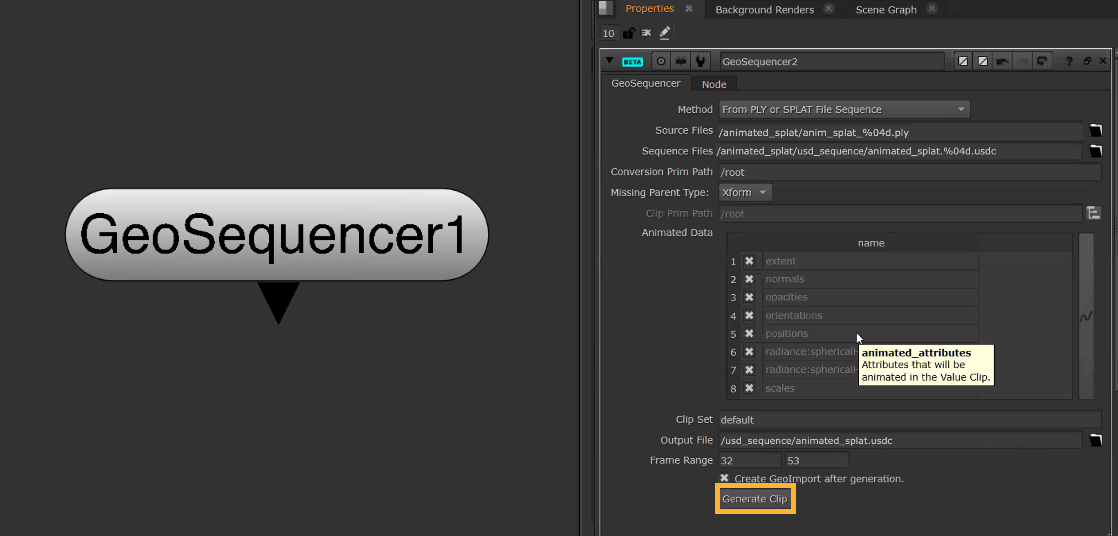
Insert a GeoSequencer node. You'll notice that there are no inputs as this is a converter node. |
|
2.
|
On the Method knob, if you are converting from PLY or SPLAT files, select From PLY or SPLAT File Sequence. Or if you have USD files, select From Time-sampled USD File Sequence or From USD File Sequence without Time-samples. |
|
3.
|
In the Source Files knob, select the .ply, .splat, .usd, or .usdc sequence files from your file browser. These are files you want to convert to a USD Value Clip. |
Note: You also have to option to use a prim path already in your stage. To use this option, check you have From Time-sampled USD File Sequence in the Method, and then you can use the Clip Prim Path knob to select your existing prim.
|
4.
|
In the Sequence Files knob, select a path as the location to save the converted .usdc sequence files. These should be numbered by frame in the format "name.###.usdc".
Note that the dot on each side of the
### is required. |
|
5.
|
This node also creates a USD prim in the stage for the converted sequence. Use the Conversion Prim Path knob to enter a prim path as a location for the new prim. |
|
6.
|
Before going ahead with the conversion, you may wish to enable or disable attributes in the Animated Data section, adjust the Output File path for the cache files, and the Frame Range of the source file sequence. Frame Range can be edited to provide a different frame range in the generated USDC sequence. |
|
7.
|
By default, the Create GeoImport after generation option will be enabled. This automatically creates a GeoImport node in your node graph, importing in the animated splat for you to use in your scene. |
|
8.
|
Once ready to convert, select the Generate Clip button to execute the conversion and generate the USD Value Clip. The .usdc file can now be found on disk in the location specified. |
|
9.
|
A new GeoImport node will be added to your node graph. In the GeoImport node properties panel, you can view the Scene Graph tab. This allows you to view and manage the imported prims and adjust their payloads, activation, and visibility. For more details about the GeoImport node, see Importing with GeoImport. |
 Search Tips