Stabilization is the process of removing motion - camera-shake, for example - and locking down the element for your composite. A one-point track provides enough information to stabilize horizontal and vertical motion along the image plane. A two-point track lets you stabilize horizontal and vertical motion, and remove rotation in the image, as well.
NOTE: This example uses auto-tracking, but the stabilizing principle is the same for keyframe tracking.
| 1. | Locate the node tree labeled Stabilizing Elements. |
| 2. | You’ll see a copy of the same LondonEye Read node that we’ve been using for the other examples. Click on it to select it. |
| 3. | Choose Transform > Tracker and then attach a Viewer to the new Tracker3 node. Double-click the node to open up the Properties panel. |
| 4. | In the Properties panel, click add track twice to create two tracking anchors. |
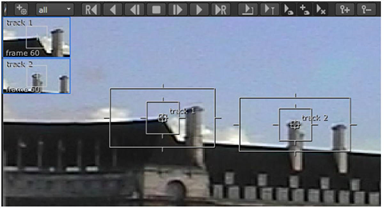
| 5. | For each track in the Tracks list, check the boxes for T (translate), R (rotate) and S (scale). |
| 6. | In the Viewer, scrub to the end of the sequence and adjust the size and position of each tracking marker for the features shown in the image below. |
| 7. | Select both tracks in the Tracks list. |
| 8. | At the top of the Viewer, click the track backward button to generate the tracks. |

Now you have positional data for two tracks, and you can use this information to remove the unwanted movement in the image.

| 9. | In the Tracker3 Properties panel, click the Settings tab and open up the Auto-Tracking sub-menu. |
| 10. | Set the warp type to Translate/Rotate/Scale so that Tracker expects all three transforms. |
NOTE: If you’re using keyframe tracks, there’s no need to set the warp type.
| 11. | Click the Transform tab and choose stabilize from the transform list. |
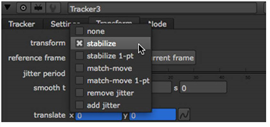
NOTE: When you’re tracking simple translation using a single track, you can use stabilize 1-pt for faster calculation.
| 12. | In the Viewer, click play to see the results. |
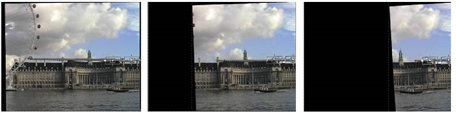
As the clip plays, you’ll see the features remain locked to the same position within the compositing frame.
TIP: After you track and stabilize footage, you can add a Transform > Transform node after the Tracker3 node to adjust the position and the rotation of the stabilized image for a final composite.