Open topic with navigation
Tracking a Single Feature
In this first example you’ll learn how to set up a tracking anchor and then track a single feature, which is the most basic 2D tracking operation. After you achieve a solid track for one feature, you can build on that and track other features as needed.
Setting a Tracking Anchor
|
1.
|
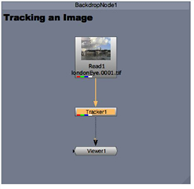
In the project workspace for the tracking_tutor.nk file, locate the node tree labeled Tracking an Image. |
|
2.
|
Click on the LondonEye Read node to select it. |
|
3.
|
Play through the sequence several times, using RAM cache or a Flipbook of your choosing, to review the footage. |
|
4.
|
Look at the features in the image and notice the amount and direction of movement as the clip plays. |
|
5.
|
Choose Transform > Tracker from the Toolbar to attach a new Tracker node to the LondonEye Read node. |

|
6.
|
Connect the Viewer node to the Tracker node, as shown. |
|
7.
|
In the Viewer, scrub the time slider to frame 1, to make sure you’re at the beginning of the shot. |
|
8.
|
Double-click the Tracker node to display its Properties panel. |
|
9.
|
Click add track to create a tracking anchor in the Viewer. |
|
10.
|
Drag the tracking anchor over the tower spire, as shown. Use the zoom window in the Viewer to help you with positioning. |

|
11.
|
Click on the pattern box (inner box) of the tracking anchor, and adjust its size to contain the feature. |
|
12.
|
Click the search area (outer box) of the tracking anchor, and adjust its size to enclose the amount of space you think the feature may move between frames. |
Large search areas require more calculation time, so keep it as small as possible. However, when the search area is too small, the feature may move outside the box and you’ll lose the track. If you aren’t sure how large to make the search area, go back and review the flipbook of your image.
Auto-Tracking vs. Keyframe Tracking
After placing a tracking anchor, you’re ready to calculate your track. Nuke’s Tracker provides two calculation methods:
• Automatic tracking - ideal for simple tracks, there are no extra preparation steps once you’ve set your tracking anchors.
• Keyframe tracking - a more involved method, requiring you to set keyframes on the sequence in order to calculate tracks. Keyframe tracking may be the better option for more complicated patterns and movement.
Using Auto-Tracking
|
1.
|
Enable show error on track paths by clicking the traffic light icon in the Viewer tools. |
This color codes tracks showing their pattern matching error values, green for a good match through to red for a poor match.
|
2.
|
In the Tracker Properties panel, select the track you wish to calculate in the Tracks list. |
|
3.
|
Select the type of movement the track is intended to output: translation, rotation, or scaling. In this simple example, you only need to select Translation. |
|
4.
|
At the top of the Viewer, click the track forward button to generate the track. |

If you only need a certain frame range, use the  button and enter the required range.
When Tracker has finished, you’ll see the track curve with color-coded points along the curve.
NOTE: If tracking fails, try resizing the pattern or search boxes, as described in Setting a Tracking Anchor and retracking.

|
5.
|
Use the next frame and previous frame buttons on the timeline to step through the track to verify its accuracy. |

The track is fairly solid in this example. However, some images don’t track as easily as this one. What are your options? You could retrack Using Keyframe Tracking as described below, or you could edit your existing track in the Curve Editor, see Editing Track Data.
NOTE: Bear in mind that a red keyframe doesn’t necessarily mean that the tracking result is poor, only that Tracker couldn’t reliably match the pattern from one keyframe to the next.
Using Keyframe Tracking
|
1.
|
In the Tracker Properties panel, select the track you wish to calculate in the Tracks list. |
|
2.
|
Select the type of movement the track is intended to output: translation, rotation, or scaling. In this simple example, you only need to select Translation. |
|
3.
|
Scrub through the sequence a few frames and adjust the position of the tracking anchor by dragging the anchor to the location of the pattern. You can use the zoom window to fine-tune your positioning. Continue on through the sequence as required. |

At each frame, a new keyframe window is added to the right of the zoom window. The keyframe closest to the current playhead frame is highlighted in orange.
It’s a good idea to place more keyframes around areas of complexity or greater movement and fewer on straight forward translation. Generally speaking, a greater number of keyframes produces a better track, but at the expense of processing time.
|
4.
|
When you’re satisfied with your keyframes, make sure your track is selected in the Tracks list and then click  to track all keyframes. to track all keyframes. |
You can also force the selected tracks to recalculate between the two nearest keyframes by clicking  in the Viewer toolbar.
|
5.
|
Use the next frame and previous frame buttons on the timeline to step through the track to verify its accuracy. |
NOTE: Bear in mind that a red keyframe doesn’t necessarily mean that the tracking result is poor, only that Tracker couldn’t reliably match the pattern from one keyframe to the next.
Editing Track Data
|
1.
|
In the Tracker Properties panel, select the tracks you want to view. |
|
2.
|
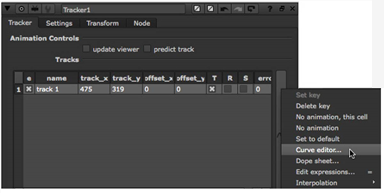
Click the animation button next to the Tracks list, and choose Curve editor. |

|
3.
|
Click the track_x and track_y items in the Curve Editor tree and you’ll see values recorded for each of the parameters during the tracking process. |

|
4.
|
Select both curves by holding down the Shift key and clicking the track_x and track_y curves, under tracks.1. |
|
5.
|
Press the F key to “frame” the curves in the Curve Editor. |
• To adjust a value, select a point and drag it up or down.
• To change the frame for a particular point, select it, hold down the Ctrl key and drag the point left or right.
|
6.
|
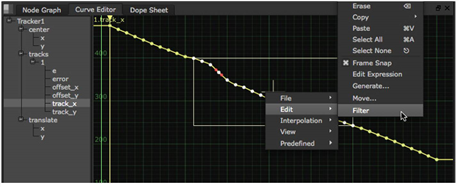
Let’s assume you want to smooth a curve by applying a filter to the values. Draw a marquee - drag while pressing the left mouse button - around a section of the curve to select multiple points. |

|
7.
|
Click the right mouse button to display a menu of Curve Editor options. Choose Edit > Filter and enter 2 as the number of times to filter the key frames. |

Nuke averages the location of each point based on the values of the surrounding points, smoothing the curve.
|
8.
|
Close the Curve Editor window and then play the result in the Viewer. |
Those are the basics for tracking and editing the results for a single feature. In the next example, we’ll make it a little harder - tracking a feature that moves out of view.
![]()


![]() button and enter the required range.
button and enter the required range.

![]()
![]() in the Viewer toolbar.
in the Viewer toolbar.


