Some sequences are inevitably going to cause problems. There are a number of pre-tracking checks and post-tracking refinement controls to assist CameraTracker.
• Play through the sequence before tracking and mask out any problem areas in the scene. Large moving objects can confuse the tracking and solving process as can appear to be fixed areas of the scene.
See Masking Out Regions of the Image for more information.
TIP: If you're compositing on moving elements, such as faces, try tracking and solving on just the moving element using masks. You'll then get a camera that moves around the element as if it was fixed in a single position.
• Textureless areas of the sequence, such as greenscreens, can cause features to cluster together in other areas, affecting the track and solve.
Turn on Preview Features and use the distribution and separation controls to even out the features. See Tracking in Sequence Mode
• Regular edges, such as striped patterns, in the scene can confuse CameraTracker.
Again, turn on Preview Features and use the Detection Threshold to force CameraTracker to use corner-like images textures. See Tracking in Sequence Mode
• You can improve tracking data by adding User Tracks manually, see Working with User Tracksfor more information.
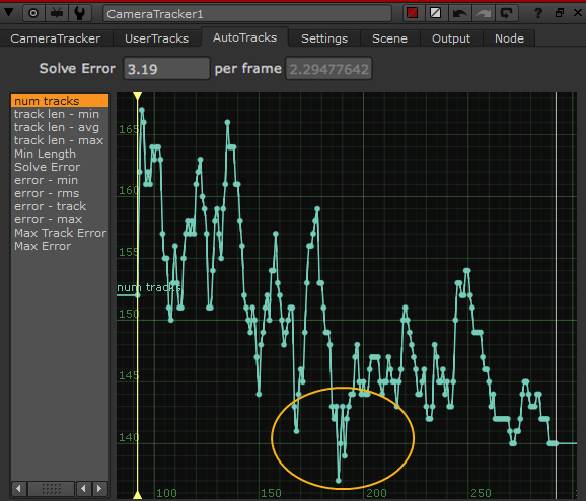
You can use the threshold controls on the AutoTracks tab to dynamically reject tracks and remove them, before solving, to improve accuracy. Using the num tracks curve as an example:
| 1. | Click the AutoTracks tab in the properties and select the num tracks curve. |
TIP: Press F in the curve display to fit the selected track(s) to the available screen space.

In the example, you can see that the number of tracks has dropped significantly around frames 180-200.
| 2. | Move the Viewer playhead to the affected area and examine the tracked features in the Viewer. |
| 3. | If you increase the Min Length control in the properties panel, you'll start to see tracks turn red as they fall below the threshold. |
|
|
|
| Min Length set at the default value, 3 frames. | Min Length set to 50 frames. |
| 4. | Click Delete Rejected to remove all the tracks that fall below the specified threshold. |
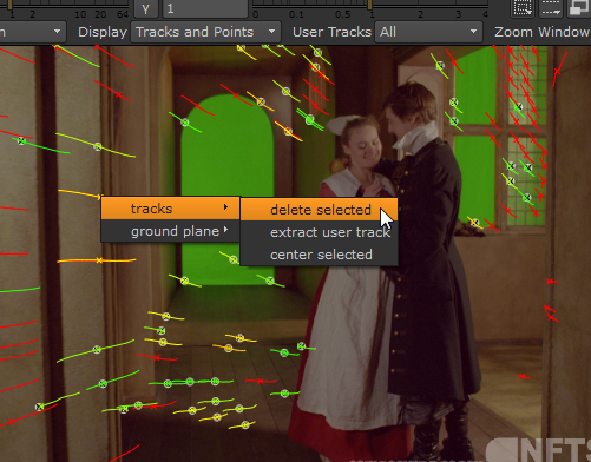
TIP: You can also remove tracks manually, by selecting them in the Viewer, right-clicking, and choosing tracks > delete selected.
| 5. | You can then retrack the affected frame range by clicking Update Track. See Retracking Partial Frame Ranges for more information. |
Once you have refined the tracking data, review the sequence by scrubbing the playhead to make sure you have tracks across the image on the rigid fixed background. If you see lots of tracks that drift or jump, select them manually, right-click, and go to tracks > delete selected.

You can also add User Tracks to improve tracking data before solving, see Working with User Tracks.
You can improve a set of feature tracks using the following controls and then retrack to improve your chances of getting a good solve:
• Minimum Length - sets a threshold value for the minimum acceptable track length. Tracks that fail to stick to the associated feature for this amount of frames are rejected.
In long slow camera moves, it is best to solve from long tracks generated in the shot. If there are lots of short tracks, this can lead to noise on the calculated camera. Try removing the short tracks before solving.
• Track Threshold - CameraTracker’s tolerance to change along the track is determined by this control.
Reducing this threshold makes tracking more tolerant to image changes, potentially producing longer tracks.
• Track Smoothness - sets the threshold for smooth track generation. Adjusting this value can be useful in preventing poor tracks in complex sequences.
Increasing the smoothness value removes tracks that fail over time.
• Track Consistency - sets the threshold for how inconsistent a feature track can be before CameraTracker discards it and reseeds in a different location.
Higher values allow for less inconsistency and vice versa.
Click Delete Rejected to remove all the tracks that fall below the specified thresholds.
|
|