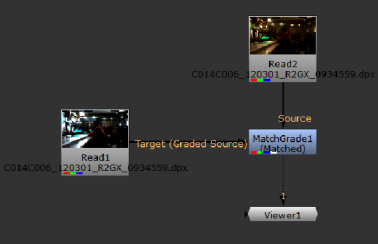
| 1. | Select Color > MatchGrade to insert a MatchGrade node into your script. |
| 2. | Do the following: |
• Connect MatchGrade's Source input to the clip to which you want to apply the color transform.
• Connect the Target input to the clip you want to match. This should be a graded version of the Source.
• Connect a Viewer to the output of MatchGrade.

| 3. | In the MatchGrade properties, make sure Task is set to Match Graded Source. |
| 4. | To extract a baked-in grade, MatchGrade requires pixel-to-pixel correspondence between the Source and Target clips. If the clips are not aligned in time and space, such as when the target clip has been reformatted, click Align Target to Source to add a Transform node and a Reformat node upstream of the MatchGrade node. |
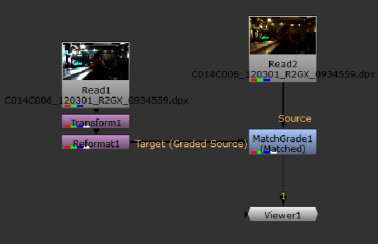
TIP: If the target contains a region that isn't present in the source, for example a black border, you can enable Crop Target. Clicking Align Target to Source when Crop Target is enabled generates a rectangular crop for the Target input.
| 5. | If you want MatchGrade to calculate a single, global grade from selected reference frames that cover the characteristic colors in the sequence and apply that grade to every frame of the Source sequence, proceed to Analyzing Reference Frames. In this mode, you can export the grade to an OCIOFileTransform or OCIOCDLTransform node to re-use it elsewhere in the script. |
If you'd rather have MatchGrade calculate a local grade frame-by-frame, so that the color transform updates according to the current frame, proceed to Auto-Analyzing Per Frame. In this mode, you cannot export the grade to re-use it elsewhere.
| 1. | In the MatchGrade properties, make sure Analysis is set to Analyze Reference Frames. |
| 2. | If you only want to color match certain areas of the image, make sure there is a mask in the Source input's alpha channel. Then, set Mask to either: |
• Alpha - to use the alpha channel as a mask. The grade is limited to the non-black areas of the alpha channel.
• Inverted Alpha - to invert the alpha channel and use that as a mask. The grade is limited to the non-white areas of the alpha channel.
NOTE: When the Mask control is set to anything other than None, an additional Apply Grade to Masked Region control is displayed.
This control is enabled by default, but you can disable it to apply the grade to the whole image instead, allowing you to compute the grade from a selected region and apply it to the whole image without having to export the LUT.
| 3. | Set Output to Target. |
MatchGrade displays the Target footage in the Viewer.
| 4. | To select reference frames for MatchGrade to use in the analysis, play through the sequence. When you find frames that cover the characteristic colors in the sequence, click on the |
Typically, the more reference frames you set, the better MatchGrade is able to match the colors.
TIP: You can also set Target to Matched and Analysis to Auto-analyze Per Frame to preview where to set reference frames.
| 5. | When you're done setting reference frames, use the Transform dropdown menu to choose how to calculate the grade: |
• 3D LUT - Calculate the grade as a 3D look-up table (LUT). This allows you to export the grade to a .csp format, which you can use with the OCIOFileTransform node.
• CDL - Calculate the grade as a color decision list (CDL). This allows you to export the grade to an OCIOCDLTransform node.
NOTE: The CDL transform is limited and cannot model all types of color transformation. In most cases, selecting 3D LUT gives the best results.
| 6. | Set Output back to Matched and click Analyze Reference Frames. |
MatchGrade calculates the transform needed to match the Source image to the Target image.
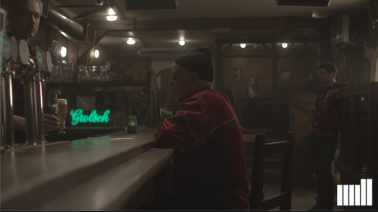
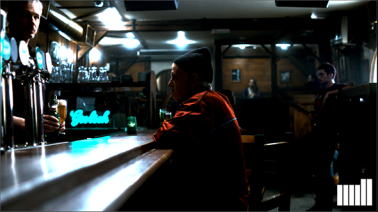
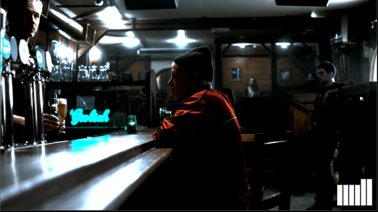
| 7. | To evaluate the results, select the MatchGrade node and press D repeatedly to toggle between the original Source image and the graded output. |
|
|
| The Source image. | The Target image. |
|
| The color-matched result. |
| 8. | If you're not happy with the results, try one or more of the following: |
• Set more reference frames.
• Use the Pre LUT dropdown menu to specify a 1D shaper LUT to use for the analysis: Linear or Logarithmic.
• Increase the LUT Resolution value. This is the resolution of the look-up table (LUT) in which MatchGrade stores the color transformation. Higher values can improve the results, but also increase processing time. The maximum value is 64.
To update the results, click Analyze Reference Frames again.
| 9. | If you set Transform to CDL in step 5, you can fine-tune the grade manually by adjusting slope, offset, power, and saturation. The lock controls on the right prevent the values from being recalculated when you click Recalculate CDL, allowing you to set some values manually and estimate others automatically. For example, you can adjust and lock slope and offset and then click Recalculate CDL to automatically recalculate power and saturation. |
| 10. | If necessary, you can export the calculated grade and apply it to other nodes in your script. How you do this depends on whether you chose to calculate the grade as a 3D LUT or a CDL: |
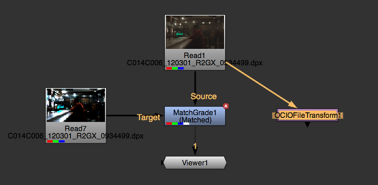
• If you set Transform to 3D LUT, you can write the LUT into a .csp file and create an OCIOFileTransform node that you can use elsewhere in the script to apply the same grade. To do so, enter a file path and name for the .csp file in the LUT output file field and click Write to export the LUT. Then, click Create OCIOFileTransform to create an OCIOFileTransform node that applies the color transform from the .csp file.
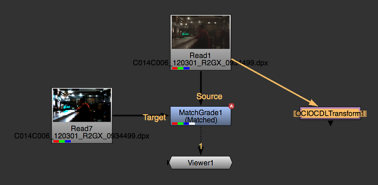
• If you set Transform to CDL, you can click Create OCIOCDLTransform to create an OCIOCDLTransform node that uses the values in the CDL Output section of the MatchGrade properties.
| 1. | In the MatchGrade properties, set Analysis to Auto-analyze Per Frame. |
MatchGrade calculates the transform needed to match the Source image to the Target image.
| 2. | If you only want to color match certain areas of the image, make sure there is a mask in the Source input's alpha channel. Then, set Mask to either: |
• Alpha - to use the alpha channel as a mask. The grade is limited to the non-black areas of the alpha channel.
• Inverted Alpha - to invert the alpha channel and use that as a mask. The grade is limited to the non-white areas of the alpha channel.
| 3. | To evaluate the results, select the MatchGrade node and press D repeatedly to toggle between the original Source image and the graded output. |
Alternatively, you can use the Output dropdown menu in the MatchGrade properties to choose what to display in the Viewer:
• Matched - View the color matched result.
• Source - View the Source input.
• Target - View the Target input.

|

|
| The Source image. | The Target image. |

|
| The color-matched result. |
| 4. | If you're not happy with the results, try increasing the LUT Resolution value. This is the resolution of the look-up table (LUT) in which MatchGrade stores the color transformation. |
Higher values can improve the results, but also increase processing time. The maximum value is 64.
| 5. | If necessary, you can also use the Pre LUT dropdown menu to specify a 1D shaper LUT to use for the analysis: |
• Auto Detect - Automatically detect the best pre-LUT to use.
• Linear - Use a linear pre-LUT.
• Logarithmic - Use a logarithmic pre-LUT.
|
|