Initially, sequences have an Output Resolution applied across all video tracks on a timeline. You can apply this resolution project-wide through Project > Edit Settings > Sequence or to individual sequences using the timeline Sequence > Output Resolution control.
In the real world, however, clips are often of different formats so Nuke Studio provides clip-by-clip formatting options to help you standardize sequences more easily.
Reformatting applied to track items on a timeline carries over into any export, including Create Comp. The reformat options in the Export dialog are applied after the transforms applied here. See Exporting from Nuke Studio for more information.
NOTE: Track items default to Resize Type > Width when you change the format of the sequence.
To apply format changes:
| 1. | Select the track item(s) to reformat on the timeline. |
| 2. | Click the Properties tab on the timeline pane to display the reformat options. |
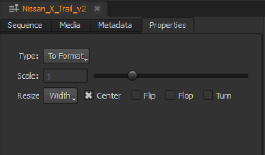
| 3. | Select the reformat Type from the dropdown: |
• Disabled - no reformatting is applied.
• To Format - enables the Resize Type and orientation controls. To Format controls how a clip is resized and its orientation. The following Resize Types are supported:
• None - no resize is applied.
• Width - scale the original until its width matches the format’s width. Height is then scaled to preserve the original aspect ratio.
• Height - scale the original until its height matches the format’s height. Width is then scaled to preserve the original aspect ratio.
• Fit - scale the original until its smallest side matches the format’s smallest side. The original’s longer side is then scaled to preserve original aspect ratio.
• Fill - scale the original until its longest side matches the format’s longest side. The input’s shorter side is then scaled to preserve original aspect ratio.
• Distort - to scale the original until all its sides match the lengths specified by the format. This option does not preserve the original aspect ratio, so distortions may occur.
You can also change the clip orientation:
• Center - centers the clip within the format dimensions.
• Flip - flips the clip the X axis.
• Flop - flops the clip on the Y axis.
• Turn - rotates the clip 90 degrees clockwise.
• Scale - enables the Scale controls. Scale allows you to directly control the size of the clip without changing its aspect ratio. Use the slider or enter a value in the field provided to scale the clip.
TIP: You can enable the Format guide in the Viewer controls to overlay the current format as a red box.
| 4. | You can crop the clip outside the format by enabling Crop to Format in the Viewer controls. |
|
|