OCIO Color Management
Nuke uses OpenColorIO for color management. All of the color transforms in Nuke, whether those shipped with the application or custom colorspaces, are defined in OCIO config files.
Note: There are a number of NDK examples covering OCIO workflows that ship with the Nuke developer documentation, which can be found here:
<install_directory>/Documentation/NDKExamples/Plugins/00b_8source.html
Depending on the OCIO config file that you are working with, there are a number of color transform options and roles (aliases to transforms) that you can set in Nuke. There are also default options, which change depending on what file type you are working with. When the default option is selected, the color transform that Nuke has set for it is listed in brackets.
Tip: Use the options in Preferences > Project Defaults > Color Management to apply them to all new projects.
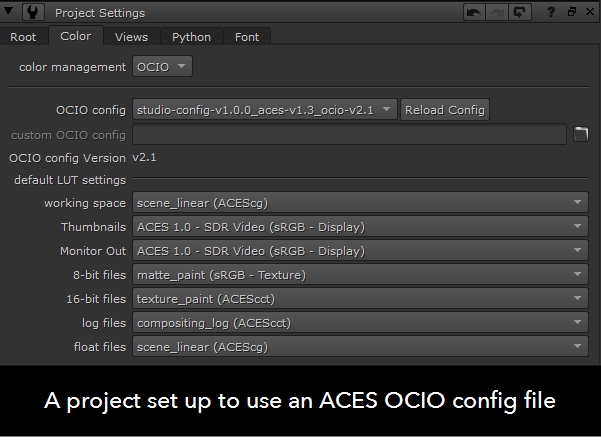
The color management dropdown determines whether Nuke uses the color transforms read from the configuration specified or the Nuke native transforms. Selecting OCIO makes the relevant OCIO transforms available to the Read and Write nodes in scripts on a per project basis.
All OCIO configurations except nuke-default automatically switch this control to OCIO.
- Set the OpenColorIO Config you want to use for this project.
- Changing the configuration updates the default LUT settings accordingly. If the selected configuration is invalid for certain transforms, a warning displays.
- You can use default LUT settings dropdown menus to override how clips in the Viewer, thumbnails, and so on are converted to and from the working space.
Nuke ships with a number of default configurations, but you can use a custom OCIO config file by selecting custom from the OCIO config dropdown and then entering the file path.
The working space transform determines what colorspace files should be converted to (Read) and from (Write) - it's the colorspace used by Nuke under the hood.
Note: In earlier releases of Nuke, this colorspace was hidden because linear was always chosen as the working space. You may find that some operations work better in colorspaces other than linear. For example, some transforms work better in the CLog colorspace.
When nuke-default is selected, Reads and Writes work the same as in legacy versions of Nuke, with no integrated OCIO transforms. When OCIO is selected:
• Reads and Writes use OCIO transforms, with no Nuke built-in transforms applied to the image.
• Read and Write colorspace controls are populated with the list of colorspaces defined in your currently selected OCIO config.
• The default LUT settings dropdowns are also populated with the list of colorspaces or display transforms defined in your OCIO config. The default value for each menu match the defaults in a project with the same config. These defaults can be overridden using Python callbacks. See the following path for the default implementation that ships with Nuke:
<install_dir>/plugins/nuke/colorspaces.py
• The working space dropdown sets the colorspace that Nuke uses internally for its image processing. This automatically sets the output transform colorspace of Write nodes, and the Input Transform colorspace for Read nodes. This defaults to the scene linear role defined in your OCIO config. For example, selecting an ACES config sets the working space to scene_linear (ACEScg).
• Nuke Studio-created comps no longer contain automatically injected OCIOColorspace nodes. Instead, OCIO Color Management is automatically set in the comp’s Project Settings, and the correct OCIO colorspace is set directly into the Read and Write nodes.
Adding OCIO Roles
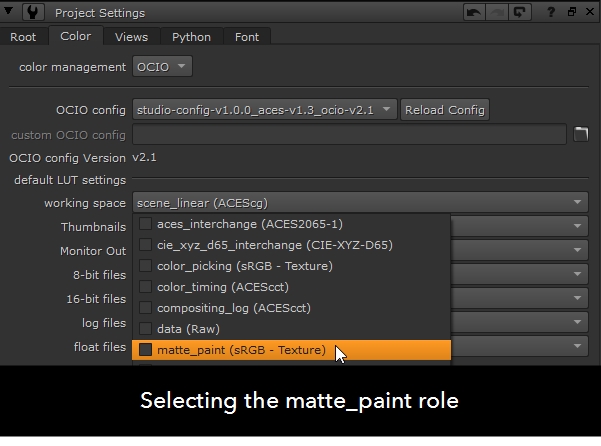
OCIO roles allow you to set custom role names for different colorspaces to make it easier for artists to instinctively know which transform to use for any shot. For instance, if an element is coming from your matte painting department and should always be brought into Nuke as sRGB, you can create a matte painting role, which is associated with the sRGB colorspace for your artist to select.
OCIO roles are the primary method for selecting colorspaces. All of the colorspaces in the OCIO config file are still accessible, but they have been grouped together into a Colorspaces menu under the roles.
OCIO roles are stored in config files, some of which ship with Nuke in the following directory:
<install_dir>/plugins/OCIOConfigs/configs/
For example, the aces-v1.3 config file includes the following roles:
roles:
aces_interchange: ACES2065-1
cie_xyz_d65_interchange: CIE-XYZ-D65
color_picking: sRGB - Texture
color_timing: ACEScct
compositing_log: ACEScct
data: Raw
matte_paint: sRGB - Texture
scene_linear: ACEScg
texture_paint: ACEScct
The !<Colorspace> describes colorspace name and family. The name and family define which colorspace is associated with the role. For example, the scene_linear role uses the ACEScg colorspace:
- !<ColorSpace>
name: ACEScg
aliases: [ACES - ACEScg, lin_ap1]
family: ACES
equalitygroup: ""
bitdepth: 32f
description: |
Convert ACEScg to ACES2065-1
ACEStransformID: urn:ampas:aces:transformId:v1.5:ACEScsc.Academy.ACEScg_to_ACES.a1.0.3
isdata: false
categories: [file-io, working-space]
encoding: scene-linear
allocation: uniform
to_scene_reference: !<BuiltinTransform> {style: ACEScg_to_ACES2065-1}
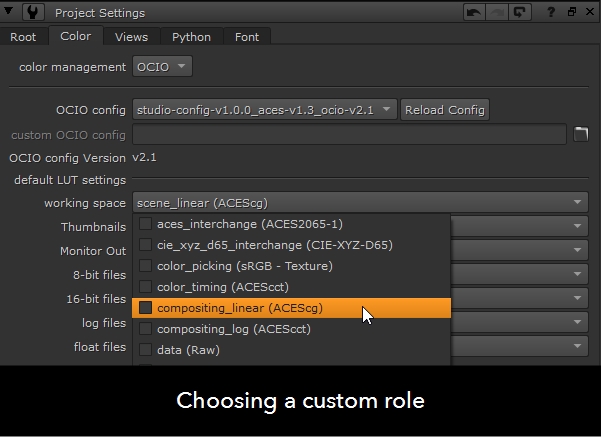
You can edit these files to add roles or create your own custom config and then point Nuke to the file using the Project Settings > Color > custom OCIO config control.
To add a role to a config file:
- Open the required config file or create a custom config.
- Enter the role, name, and family of the role under the roles: line. For example:
- Save the file and open Nuke.
- Open the Project Settings and click the Color tab.
- You can now pick your role from the default LUT settings. For example, you can set the working space to compositing_linear if you want to work in the ACEScg colorspace.
compositing_linear: ACES - ACEScg
Define Color Space Mappings Using OCIO Aliases
Nuke supports the use of aliases in an OCIO config and checks these when attempting to set the input transform for a given image or sequence. The aliases feature in OCIO allows config authors to define a set of alternate names for a color space, which can then be used in place of the primary color space name. For example, it may be useful to define a more suitable name for file paths, or a color space name might have changed between versions of a config, so it may be necessary to add an alias for the older version of the name for backwards compatibility. Additionally if an application tries to set defaults based on a specific name then aliases can be used to ensure a suitable color space is found.
Below is part of a ColorSpace definition from an ACES 1.3 OCIO config.
- !<ColorSpace>
name: ARRI LogC3 (EI800)
aliases: [arri_logc3_ei800, Input - ARRI - V3 LogC (EI800) - Wide Gamut, logc3ei800_alexawide]
family: Input/ARRI
equalitygroup: ""
bitdepth: 32f
description: |
Convert ARRI LogC3 (EI800) to ACES2065-1
Here you can see the name: attribute is defined as ARRI LogC3 (EI800). This is the primary name for the color space.
Directly below is the aliases: attribute. This is where the alternate names are defined, in this case:
-
arri_logc3_ei800
-
Input - ARRI - V3 LogC (EI800) - Wide Gamut
-
Logc3ei800_alexawide
The first and third aliases (arri_logc3_ei800 and logc3ei800_alexawide) could be an example of a suitable name for including in a file path.
The second alias (Input - ARRI - V3 LogC (EI800) - Wide Gamut) is the name that was used for this color space in ACES 1.2. This is useful when switching from an ACES 1.2 config to ACES 1.3. The Nuke script will likely reference the older name but the alias means the input transform should be set correctly without any user intervention required.
Adding an alias to a color space in an OCIO config can be as simple as appending it to the end of the comma separated list. For example:
- !<ColorSpace>
name: ARRI LogC3 (EI800)
aliases: [arri_logc3_ei800, Input - ARRI - V3 LogC (EI800) - Wide Gamut, logc3ei800_alexawide, AlexaV3LogC]
...
Here we’ve added the alias AlexaV3LogC. This is the color space name that Nuke looks for in the first instance when it detects an ARRI V3 LogC file.
Note: In versions of Nuke prior to 14.1 the example above would typically result in an error, because there isn’t a matching color space name in the ACES config.
From Nuke 14.1, the following aliases are included in our ACES 1.3 configs:
- Aliases (Nuke > ACES):
AlexaV3LogC > ARRI LogC3 (EI800)
ARRILogC4 > ARRI LogC4
Blackmagic Film Generation 5 > BMDFilm WideGamut Gen5
Log3G10 > Log3G10 REDWideGamutRGB
SLog3 > S-Log3 S-Gamut3
Gamma1.8 > Gamma 1.8 Rec.709 - Texture
Gamma2.2 > Gamma 2.2 Rec.709 - Texture
Gamma2.4 > Gamma 2.4 Rec.709 - Texture
The color space names that Nuke currently looks for can be seen in the nuke-default OCIO config.
For more information on aliases and authoring configs please see the official OCIO documentation.
Correcting Out of Gamut Errors Using the ACES Gamut Compression Look
A common side effect of using ACES is artifacts that result from out of gamut values in source images. This typically affects blue light, such as that found in police car sirens and other light sources. The ACES 1.3 OCIO config files that ship with Nuke contain a look designed to correct this error.
To apply the ACES 1.3 Reference Gamut Compression look:
- Go to Edit > Project Settings or press S in the Node Graph to display the Project Settings.
- Click the Color tab and then select OCIO from the color management dropdown.
- Select an ACES 1.3 config in the OCIO config dropdown.
- Select the Read node in the Node Graph to which you want to apply the look.
- Press Tab and start typing OCIO to display a list of available OCIO nodes.
- Select OCIOLookTransform from the list to add the node to the graph.
The ACES 1.3 Reference Gamut Compression look is applied by default, because it is the only look defined in the configs that ship with Nuke.
Tip: If you're using a custom config or you've added more looks to the ACES config yourself, you can select the ACES 1.3 Reference Gamut Compression manually using the look dropdown.
|
|
|