Importing UDIM Patches
When applying textures to models that use regions of UV space outside the standard (0,0) - (1,1) range, it’s common to use one texture for each 1x1 square. These textures can be numbered in a variety of ways. UDIM is a numbering scheme that identifies the first texture that’s applied to the (0,0) - (1,1) region as 1001, with numbers increasing by one for each texture in the U direction, and by ten for each texture in the V direction.
For example, the texture for the region (1,0) - (2,1) would have UDIM 1002, and the texture for (0,1) - (1,2) would have UDIM 1011. A set of patches following the UDIM scheme might look like this:
• color.1001.tif
• color.1002.tif
• color.1003.tif
• color.1004.tif
• color.1005.tif
Where color is the channel name and 1001, 1002, ... is the UDIM value for each patch in UDIM space. In Nuke, you can import a set of patches following the UDIM scheme and quickly apply them to the surface of a 3D object. To do this:
| 1. | Select Image > UDIM Import from the Toolbar. |
| 2. | Select the UDIM image or sequence to import and click Open. |
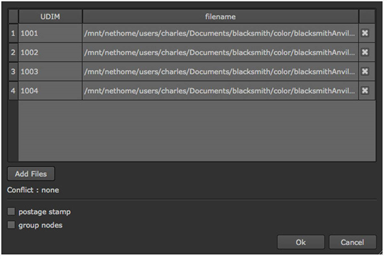
| 3. | To ignore an individual patch, disable the checkbox next to it. |
| 4. | To add additional patches, click Add Files. |
Note: If there’s a conflict between the patches that you’ve added, a notification appears underneath the Add Files button describing the conflict.
A typical conflict would be if you attempted to import multiple files sharing the same UDIM value.
| 5. | Check the postage stamp checkbox to enable a thumbnail view of the patch on the Read node. |
| 6. | Check the group nodes checkbox to place the Read nodes for each individual patch into a Group node. The name of the Group node is based on the name of the image or sequence. |
| 7. | Click Ok to import the files. |
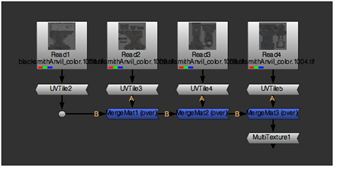
This creates a Read node for every patch in the sequence and appends a UVTile node (which allows you to modify a patch’s coordinates in UV space) to each one.
Note: If you checked group nodes in the UDIM import dialog, highlight the Group node and press Ctrl+Return (Cmd+Return on a Mac) to view the contents.
The UDIM value for each patch is inserted into the udim field in the UVTile node. This value is important as it offsets every Read node (and therefore, patch) to the correct UDIM space. A number of MergeMat nodes are used to combine the Read/UVTile node combinations.
Note: The MultiTexture node at the end of the tree optimizes rendering when multiple MergeMat nodes are chained together. It uses the default Iop vertex shader and only handles multi-texturing. This node has no fields or knobs and is intended for use only with the UDIM Import operation.
To apply these patches to a 3D object in your scene, simply connect the output of the last node in the tree to the img input of a ReadGeo node.
To move a patch to a different point in UV space, in the UVTile control panel enter a different UDIM value or disable the udim field and enter values in the u and v fields.
Note: By default the UDIM Import operation parses the file name based on the UDIM number. It is possible, however, to create a custom parsing function to work with your own naming conventions. Please refer to the Python Developers Guide for details on how to do this.