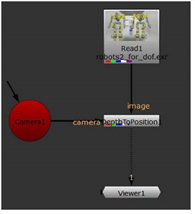
Creating a Position Pass Using the DepthToPosition Node
DepthToPosition takes depth data contained in an image file and the camera data to create a 2D position (xyz) pass. This pass is created by projecting the depth through the camera and recording the xyz positions of each projected point. The DepthToPosition node can be used together with the PositionToPoints node to create a point cloud, similar to the effect achieved with the DepthToPoints node.
To Create a Position Pass using DepthToPosition
|
1.
|
From the 3D > Geometry menu, select DepthToPosition to add the node to your script. |
|
2.
|
Read in an image with a depth pass and connect it to the image input of the node. |
|
3.
|
From the 3D menu, select a Camera and connect it to the camera input of the DepthToPosition node. |
|
4.
|
In the DepthToPosition tab of the DepthToPosition node, select the depth channel from the depth dropdown menu. You should now see a position pass in the Viewer. |
|
5.
|
If you want to change the output channel, select the channel you would like, or create your own, from the output dropdown menu. |
|
6.
|
Set the far control value to specify at what distance from the camera the depth values are ignored. This prevents large depth values from creating unwanted banding caused by the precision of the floating math calculations. |
The DepthToPosition node allows you to create a position pass from an image’s depth pass, and feed that into PositionToPoints to ultimately create a point cloud. In fact the three nodes, DepthToPosition, PositionToPoints, and DepthToPoints can be used together, as DepthToPoints is a gizmo that contains the DepthToPosition and PositionToPoints nodes.
To learn more about generating depth maps, please refer to Generating Depth Maps.