Background Reflections on Foreground Elements
You can use the LightWrap node to create background reflections on foreground elements. The node creates a reflection of light around the edges of your foreground element by blending in whatever is in the background.
|
|
|
|
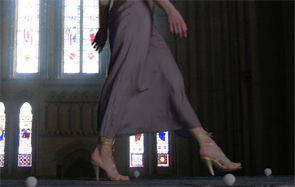
The composite without the LightWrap effect. |
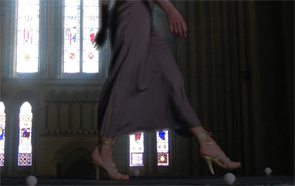
The composite with the LightWrap effect. |


You may have noticed that objects filmed in front of very bright backgrounds have the appearance of softened edges as the light spills round from the background. When adding foreground layers onto a background plate, using the LightWrap node can dramatically improve the quality of your composite.
|
|
|
|
The composite without the LightWrap effect. |
The composite with the LightWrap effect. |
If you want to use LightWrap, you should apply it on your foreground element before you composite the foreground over the background with the Merge node.
Using the LightWrap Node
To use the LightWrap node:
| 1. | Select Draw > LightWrap to add a LightWrap node after your foreground and background images. |
| 2. | Connect your foreground element to input A of the LightWrap node, and the background image to input B. |
| 3. | Connect a Viewer to the output of the LightWrap node so you can see the effect of your changes. |
| 4. | Adjust the Diffuse and Intensity sliders to control both the spread and brightness of the reflections on the foreground element. These sliders need to be balanced out together. You may want to start by bringing Diffuse all the way down to better see what you are blending in from the background. Then, adjust Intensity before going back to the Diffuse slider and, if necessary, Intensity again until you are happy with the result. |
|
|
|
|
Low Diffuse. |
High Diffuse. |


|

|
|
Low Intensity. |
High Intensity. |
| 5. | If you want to create a uniform effect around the edges of the foreground rather than have the effect adjust itself according to the background, check Disable luminance based wrap on the LightWrap tab. |
| 6. | In case you don’t want to merge the LightWrap effect with the foreground element in order to keep the LightWrap effect as a separate element, check Generate wrap only on the LightWrap tab. |

| 7. | By default, the LightWrap effect is only applied inside the foreground element’s alpha. If you want to extend the effect outside it, making the element seem to glow, check Enable Glow. |

| 8. | On the Tweaks tab, you can also adjust the following controls: |
• FGBlur to determine how much the foreground matte is blurred. The more blur, the more of the background is added to the foreground.
• BGBlur to control how much the background is blurred before it is merged with the foreground element.
• Saturation to adjust the saturation of the effect.
• Luma Tolerance to increase or decrease the luminance values of the effect.
• Highlight Merge to control how the foreground element is merged with the background. The default merge operation, called plus, adds the elements together, producing a glow effect.
• Check Use constant highlight to use a constant color of your choice rather than the background in the LightWrap effect. Select the color using the controls next to Constant Highlights Color.
| 9. | On the CCorrect tab, you can color correct the LightWrap effect produced. |