Filtering and Spatial Effects
This chapter explains how to create custom filter effects using the Convolve node (see Applying Convolves) and how to simulate depth-of-field (DOF) blurring using the ZDefocus node (see Simulating Depth-of-Field Blurring).
Applying Convolves
The Convolve node lets you create custom filter effects by supplying your own filter image. This image is used as the convolution matrix. In other words, the new value of a pixel is calculated by centering the filter image on the pixel, examining its neighbors, multiplying each pixel value by the corresponding pixel values in the filter image, and then adding the results together. This allows you to defocus a clip and create lens blur effects (bokeh) in the shape of the filter image (also see Simulating Depth-of-Field Blurring).
|
|
|
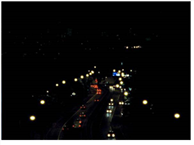
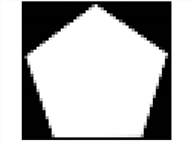
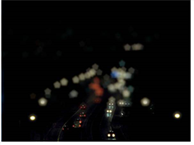
| The image input. | The filter input. |
|
|
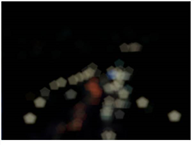
| The result. |
Using the Convolve Node
To use the Convolve node:
| 1. | Click Filter > Convolve to insert a Convolve node after the image you want to receive the convolution filter effect (the image input). |
| 2. | Attach a Viewer to the output of the Convolve node. |
An error appears in the Viewer because we haven’t connected the filter input yet.
| 3. | Connect a filter image to the filter input. This image represents the shape and size of the camera aperture used to shoot the image input. It can be any shape you like, for example, a pentagon or a hexagon. |
If you don’t have a filter image, you can create one using the Roto node (Draw > Roto) or the Flare node (Draw > Flare).
|
|
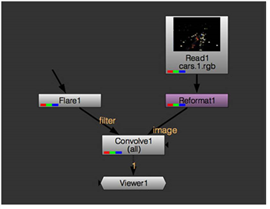
| A simple Convolve setup. |
Note that you don’t necessarily need to crop the filter image to a smaller size, as fast Fourier transforms are used to speed up convolutions with large filter images.
| 4. | In the Convolve node controls, set channels to the channels of the Source image that you want to affect. By default, the convolve effect is applied to all channels. |
| 5. | To select what channel to use from the filter input, do one of the following: |
• Set the filter channel dropdown menu to the channel you want to use. By default, this menu is set to rgba.alpha.
• To use the same channels from the filter input as the image input (that is, whatever channels is set to), check use input channels.
| 6. | In most cases, you can leave normalize checked. This means the filter input is divided by the sum of all the pixels in it before using it, and ensures that the convolution doesn’t change the overall brightness of the image. |
| 7. | Use the filter bounds dropdown menu in the Convolve controls to select whether you want to limit the filter image to: |
• shape - the filter input’s bounding box. In this case, Convolve only uses the bounding box area, and the center of the filter is the center of the bounding box. This is the default value. You may want to use it, for example, if your filter input is a roto shape with a small bounding box that doesn’t fill the entire format area.
• format - the filter input’s format. In this case, Convolve uses the entire format area, allowing you to offset the filter image within the format.
| 8. | If you want to mask the convolve effect, check mask and select a mask channel using the controls on the right. For example, you can select a depth channel as a mask to simulate depth-of-field blurring. |
|
|
|
| A simple Ramp node used as the mask. |
The result. |

Note that you can also use the ZDefocus node for more accurate depth-of-field blurring. For more information, see Simulating Depth-of-Field Blurring.
| 9. | To dissolve between the original image input and the full convolve effect, adjust the mix slider. |
Tip: You can check Use GPU if available to have the node run on the graphics processing unit (GPU) rather than the central processing unit (CPU).
For more information on GPU support, see the Release Notes for your version of Nuke.
You can select the GPU to use in the Preferences. Press Shift+S to open the Preferences dialog, make sure you’re viewing the Preferences > Performance > Hardware tab, and set default blink device to the device you want to use. You must restart Nuke for the change to take effect.
If you are using a render license of Nuke, you need to add --gpu on the command line.