Explanation of How Primatte Works
The Primatte chromakey algorithm is a sophisticated method of color space segmentation that can be easily explained to help a user achieve maximum effectiveness with the tool. Basically, Primatte segments all the colors in the foreground image into one of four separate categories. The result is a spill suppressed foreground image and a matte which is used to apply the modified foreground to a suitable background.
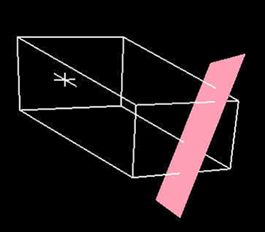
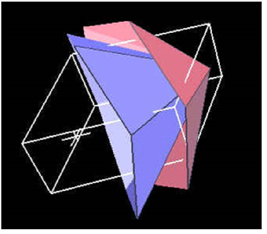
Primatte works in 3D RGB color space. Here is a visual representation of the Primatte algorithm after an image has been processed.
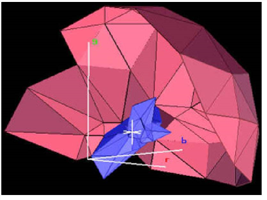
By operating the Primatte interface, you essentially create three concentric, multi-faceted polyhedrons. These can be pictured as three globes (or polyhedrons or polys), one within the other, which share a common center point. The creation of these polyhedrons separates all possible foreground colors into one of four regions; inside the small polyhedron (1), between the small and medium polyhedrons (2), between the medium and the large polyhedrons (3) and outside the large polyhedron (4).
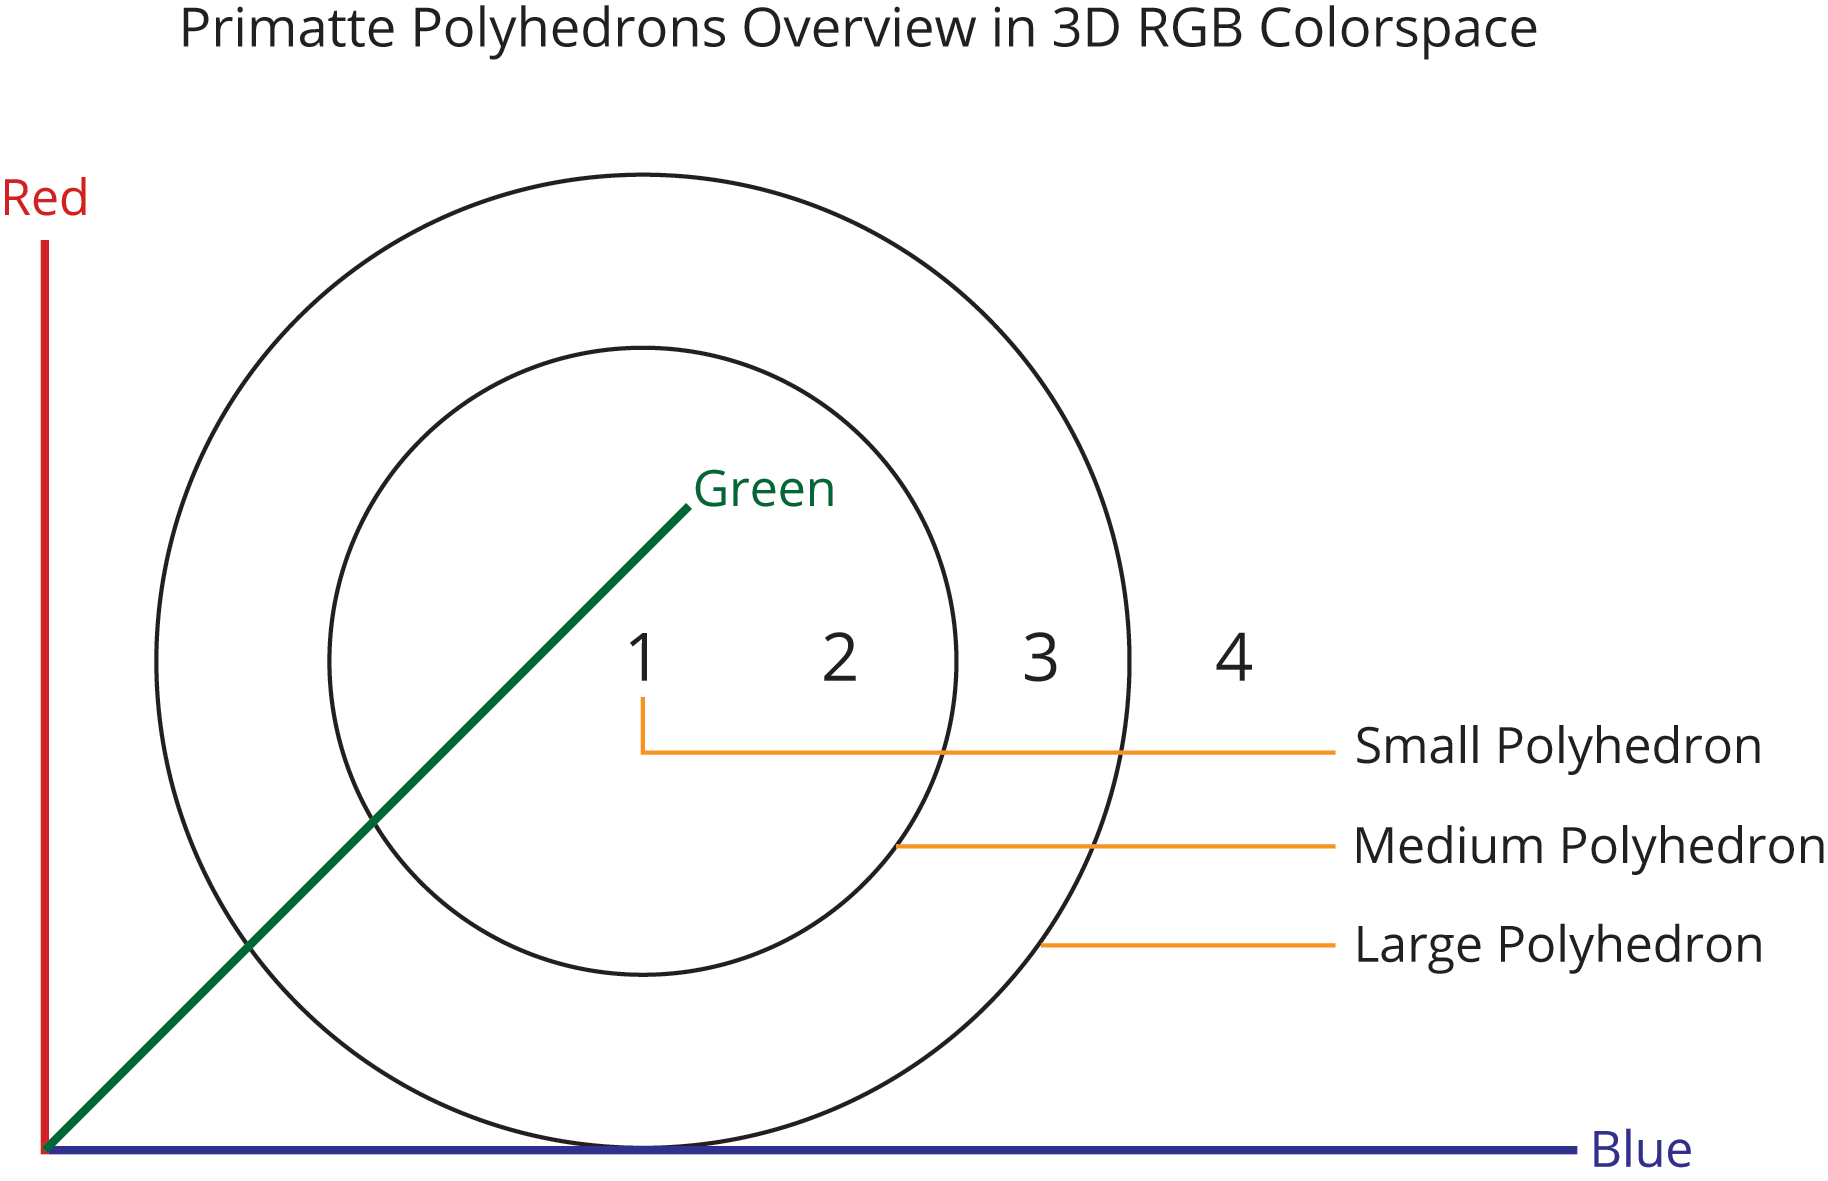
The four regions created are described as follows:
Region 1 (inside the small polyhedron) - This region contains all of the foreground image colors that are considered 100% background. These are the green or blue or whatever colors that were used as the backing color of the foreground image.
Region 2 (between the small and medium polyhedrons) - This region contains all the foreground colors that are at the edges of the foreground object(s), in glass, glass reflections, shadows, sheets of water and other transparent and semi-transparent color regions. These color regions also have spill suppression applied to them to remove color spill from the backing screen.
Region 3 (between the medium and large polyhedrons) - This region contains all the foreground image colors that are 100% foreground but have spill suppression applied to them to remove color spill from the backing screen. Otherwise they are 100% solid foreground colors.

Region 4 (outside the large polyhedron) - This region contains all the 100% foreground image colors that are not modified from the original foreground image. There is no spill suppression applied to these colors.
In the first step in using Primatte (Smart Select BG Color), you are asked to indicate the backing color on the original foreground image. The sample should usually be taken from a medium shaded area near the foreground object. By medium shaded area, it is meant that if green is the backing color and the green area of the foreground image has many shades of green ranging from very pale green to almost black, a shade of green in-between these extreme ranges should be chosen. If you’re not getting good results using this sample, you should reset Primatte and take another sample using a slightly darker or lighter shade of green. The first sample of Primatte often determines the final result as the center point of all three polyhedrons is created based on this first sample.
A single pixel may be selected or a range of pixels (snail trail or rectangular sample). If a range of pixels is taken, the sample is averaged to get a single color sample. This single pixel or averaged color sample then becomes the center of the small polyhedron. A few other shades around that color are included in the original small polyhedron.
Note: It is recommended that a single pixel be selected as the first sample as you then have some idea where the center point of the polyhedrons is located. If a box sample or a long snail trail sample is made, you can only guess at the average color that ends up being the center point. You can get an idea how this sample affects the algorithm by resetting the Primatte node, viewing the alpha channel, and clicking around on the green or blue screen area while in the Smart Select BG Color operation mode. You can immediately see the results of the initial settings of the polyhedrons in this way.
The second step in using Primatte is to clean up the backing color area by adding additional shades of green or blue to the small poly. This second step (Clean BG Noise) is usually executed while viewing the black and white alpha channel.
|
|
|
| Before background noise removal. |
After background noise removal. |
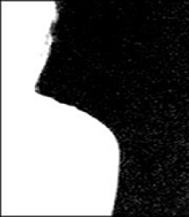
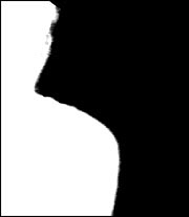
While in the Clean Bg Noise sampling mode, you sample the white milky regions as shown in the left-hand image above. As you sample these regions, they turn to black as shown in the right-hand image above.
What is happening in the Primatte algorithm is that these new shades of green (the white milky areas) are added to the small poly where all the shades of green or blue are moved. The advantage of this technique is that the polyhedron distorts to enclose only the shades of green that are in the backing screen. Other shades of green around these colors are left undisturbed in the foreground.
Now that you have created a small polyhedron, you need to shape the medium and large polys. A default medium and large poly are both automatically created and are then modified based on the next couple of Primatte operations. The third Primatte step (Clean FG Noise) is to sample and eliminate gray areas in the 100% foreground area of the image.
|
|
|
| Before foreground noise removal. |
After foreground noise removal. |
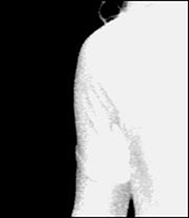
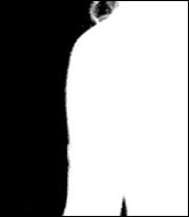
Again, you make several samples on the dark, grayish areas on the foreground object until it is solid white in color. Primatte is shaping the large polyhedron with each color region that is sampled. Care should be taken in both this and the previous steps to not sample too close to the edges of the foreground object. Getting too close to the foreground object's edges results in hard edges around the foreground object. Primatte uses these samples to modify and shape the medium and large polys to the desired shape. At this point, the matte or key has been created and would allow the foreground objects to be composited into a new background image.
If you now view the RGB channels, there is usually color spill on the edges (and sometimes the center) of the foreground objects. When on the edges of the foreground object, this spill comes from where the edges of the foreground object blended into the backing color. If it is on the center of the foreground object, it usually results from reflected color from the backing screen. The next Primatte step, either Spill Sponge, Fine Tuning or Spill(-), can now be used to eliminate this spill color.
Let's take a look at what is happening in the Primatte algorithm while this next step is performed. Here is what the various tools in Primatte do to the Polyhedrons when they are used:
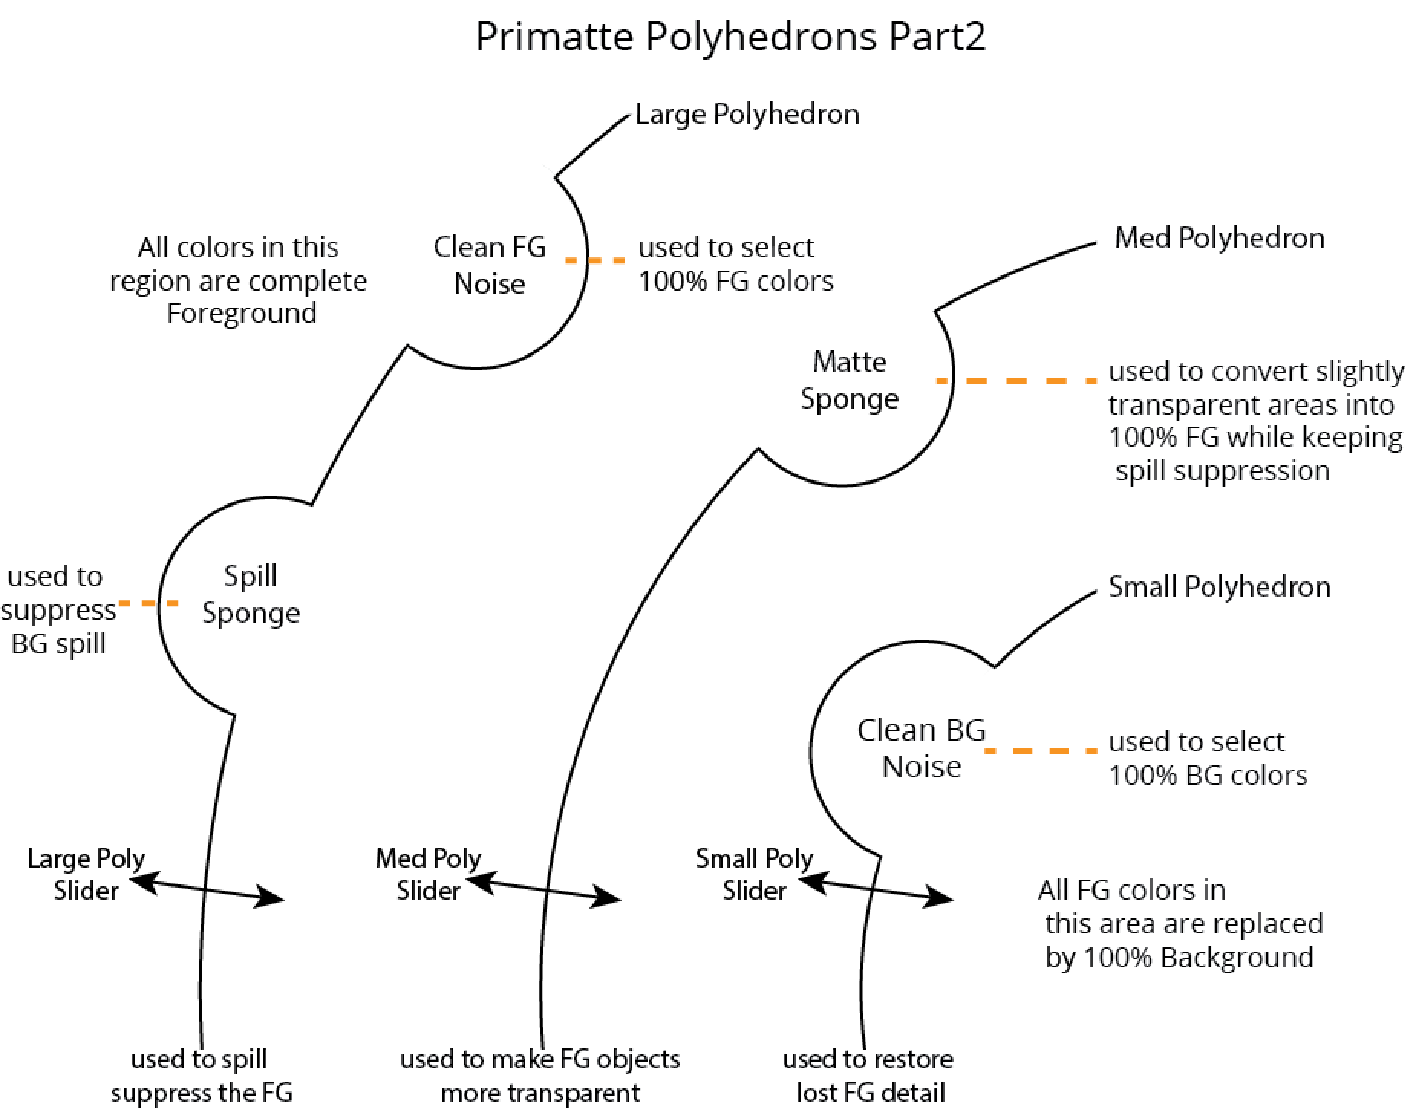
As you can see above, the Spill Sponge bulges the large polyhedron in the color region specified. A color region is specified by clicking on the image in a particular area with spill present. For example, if you click on some spill on the cheek of a foreground person, Primatte goes to the section of the large polyhedron closest to that particular flesh tone and bulges the polyhedron there. As a result, the flesh tones move from outside the large poly to in-between the medium and large polys. This is Region 3 and, if you remember, is 100% foreground with spill suppression. As a result of the suppression, the spill is removed from that cheek color and all other shades of that color on the foreground. You would then continue to sample areas of the image where spill exists and each sample would remove spill from another color region.
When all spill has been removed, you should have a final composite. As a last step, you should view the alpha channel and make sure that gray, transparent areas have not appeared in the foreground area. If there are any, you should select the Matte Sponge operation mode and sample those gray pixels until they have all turned white again.
The Matte Sponge and Spill Sponge tools bulge or dent the polyhedrons a pre-selected amount. If the desired results are not achieved or the results are too extreme for the image, a manual method can be applied. You should select the Fine Tuning sliders, select a color region of interest and then move the appropriate slider to get the desired results.
For example, to remove spill, select a region of the composite image with spill on it. Move the spill or large poly slider to the right a little bit, the large poly bulges and the spill should disappear. Move it a little more, if necessary. Moving this slider to the right removes spill (moves the colors from outside the large poly to between the medium and large polyhedrons) and moving it to the left, dents the large poly and moves that color region to outside the large poly.
If you sample a foreground object shadow and then move the M-poly (trans) slider to the right, the shadow becomes more transparent. This is useful for matching composited shadows to shadows on the plate photography. It can also be used to make clouds or smoke more transparent.
If some foreground detail disappears during the composite, you can select where the detail should be and then move the S-poly (detail) slider to the left. This dents the small poly in that color region and releases the detail pixels from the small poly into the visible region between the small and medium polyhedrons.
The Spill Sponge and Matte Sponge tools are shortcut tools that automatically move the sliders a pre-selected amount as a timesaving step for you. Other shortcut tools include the Make FG Trans. tool and the Restore Detail tool.
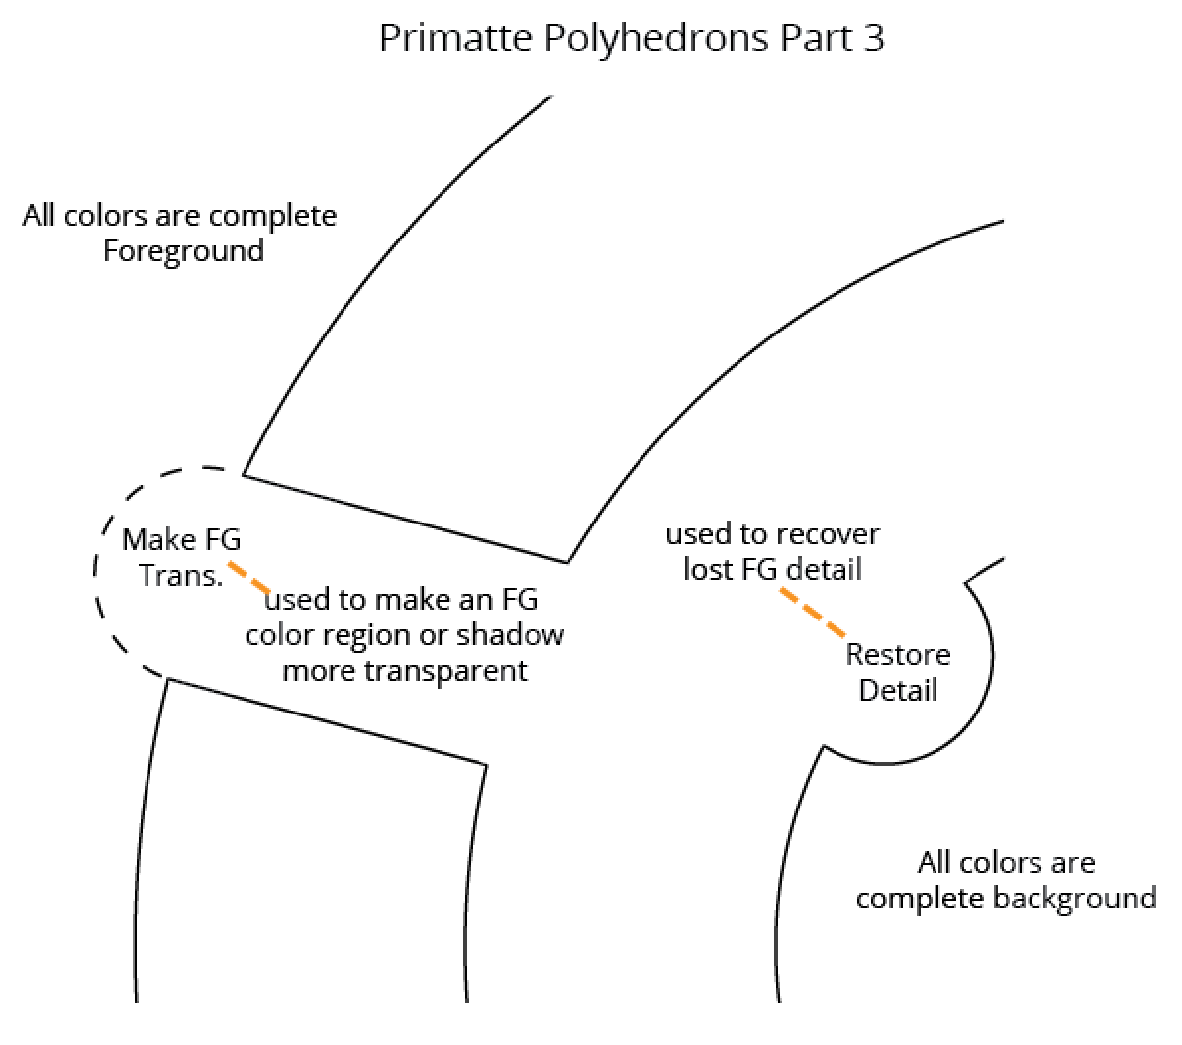
These shortcut tools are one-step operations where you click on a color region of interest and Primatte performs a pre-calculated operation. Hopefully, most operations using Primatte would only require these tools, but the manual operation of the sliders is always an option.
The Spill(-) tool bulges the large poly a small amount incrementally in the color region that is clicked on and the Spill(+) tool dents it a small amount with each click. The Matte(-) and Matte(+) tools do the same to the medium poly and the Detail(-) and Detail(+) do it to the small poly.
Explanation of How Primatte RT+ works
The Primatte RT+ algorithm differs from the Primatte algorithm in that it has a six surface color separator instead of the 128-faceted polyhedrons. This makes the Primatte RT+ algorithm much simpler and, therefore, faster to calculate. The results and performance of Primatte RT+ falls in between the Primatte and Primatte RT options. Where the Primatte RT+ algorithm might not work well is with less saturated backing screen colors and it also does not support the complement color spill suppression method (which is the spill suppression method that delivers the best detail). For a well-lit and photographed image or clip, this algorithm produces good results and render quickly.
Here is what a visual representation of the Primatte RT algorithm looks like after an image has been processed:
Explanation of How Primatte RT works
Primatte RT is the simplest algorithm and, therefore, the fastest. It uses only a single planar surface to separate the 3D RGB colorspace and, as a result, does not have the ability to separate out the foreground from the backing screen as carefully as the above Primatte algorithm. Like the Primatte RT+ algorithm, Primatte RT might not work well with less saturated backing screen colors and it too does not support the complement color spill suppression method (which is the spill suppression method that delivers the best detail). For a well-lit and photographed image or clip, this algorithm produces good results and render very quickly.
Here is what a visual representation of the Primatte RT algorithm looks like after an image has been processed: