OFlow
Lets you generate high-quality retiming operations, such as slowing down or speeding up the input footage. OFlow analyzes the movement of all pixels in the frames, generates motion vectors based on the analysis, and then renders new “in-between” images by interpolating along the direction of the motion. You can also use OFlow to add motion blur or enhance the existing motion blur in the image.
Inputs and Controls
|
Connection Type |
Connection Name |
Function |
|---|---|---|
|
Input |
Source |
The sequence to retime. |
|
Control (UI) |
Knob (Scripting) |
Default Value |
Function |
|
OFlow Tab |
|||
|
Local GPU |
gpuName |
N/A |
Displays the GPU used for rendering when Use GPU if available is enabled. Local GPU displays Not available when: • Use CPU is selected as the default blink device in the Preferences. • no suitable GPU was found on your system. • it was not possible to create a context for processing on the selected GPU, such as when there is not enough free memory available on the GPU. You can select a different GPU, if available, by navigating to the Preferences and selecting an alternative from the default blink device dropdown. Note: Selecting a different GPU requires you to restart Nuke before the change takes effect. |
|
Use GPU if available |
useGPUIfAvailable |
enabled |
When enabled, rendering occurs on the Local GPU specified, if available, rather than the CPU. Note: Enabling this option with no local GPU allows the script to run on the GPU whenever the script is opened on a machine that does have a GPU available.
|
|
Input Range |
input.first |
N/A |
The first frame of input to use. When you first create the node, this is automatically set to the first frame of the Source clip. After that, it is only updated if you click Reset. |
|
input.last |
N/A |
The last frame of input to use. When you first create the node, this is automatically set to the last frame of the Source clip. After that, it is only updated if you click Reset. |
|
|
Reset |
resetInputRange |
N/A |
Resets Input Range to the frame range of the current Source input. This can be useful if the clip in the Source input has changed. |
|
Channels |
retimedChannels |
all |
Sets the channels affected by the retime. |
|
Method |
method |
Motion |
Sets the interpolation algorithm: • Frame - the nearest original frame is displayed. • Blend - a mix between two frames is used for the in-between frame. This is quick to render and is useful when tweaking the timing on a curve before setting the method to motion. • Motion - vector interpolation is used to calculate the in-between frame. |
|
Timing |
timing2 |
Output Speed |
Sets how to control the new timing of the clip: • Output/Input Speed - describes the retiming in terms of overall output duration. For example, double speed halves the duration of the clip and half speed doubles the duration of the clip. • Frame - describes the retiming in relative terms, for example, ’at frame 100 in the output clip, display frame 50 of the source clip‘. You’ll need to set at least 2 key frames for this to retime the clip. |
|
Output Speed |
timingOutputSpeed |
0.5 |
This control is only active if Timing is set to Output Speed. Values below 1 slow down the clip and vice versa. For example, to slow down the clip by a factor of two (half speed), set this value to 0.5. Note: Retimes can be difficult to control using Output Speed, because you're retiming output frames. Altering a keyframe alters the relative position of all later frames. However, Output Speed keyframes do allow you to use negative speed values, unlike Input Speed retimes. |
|
Input Speed |
timingInputSpeed |
0.5 |
This control is only active if Timing is set to Input Speed. Values below 1 slow down the clip and vice versa. For example, to slow down the clip by a factor of two (half speed), set this value to 0.5. Note: Retimes can be easier to control using Input Speed, because keyframes are set against the source frames, rather than the output frames. However, Input Speed keyframes do not allow you to use negative speed values, unlike Output Speed retimes. |
|
Frame |
timingFrame2 |
1 |
This control is active only if Timing is set to Frame. Use this to specify the source frame at the current frame in the timeline. For example, to slow down a 50 frame clip by half, key the Frame to 1 at frame 1 and the Frame to 50 at frame 100. |
|
Vector Detail |
vectorDetail |
0.2 |
Adjust this to vary the density of the vector field. A value of 1 generates a vector at each pixel, whereas a value of 0.5 generates a vector at every other pixel. Higher values pick up finer movement, but also increase processing time. |
|
Smoothness |
smoothness |
0.5 |
A high smoothness can miss lots of local detail, but is less likely to provide you with the odd spurious vector, whereas a low smoothness concentrates on detail matching, even if the resulting field is jagged. Note: The default value should work well for most sequences. |
|
Resampling |
resampleType |
Bilinear |
Sets the type of resampling applied when retiming: • Bilinear - the default filter. Faster to process, but can produce poor results at higher zoom levels. You can use Bilinear to preview a retime before using one of the other resampling types to produce your output. • Lanczos4 and Lanczos6 - these filters are good for scaling down, and provide some image sharpening, but take longer to process. |
|
Shutter |
|||
|
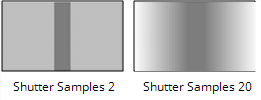
Shutter Samples |
shutterSamples |
1 |
Sets the number of in-between images used to create an output image during the shutter time. Increase this value for smoother motion blur, but note that it takes much longer to render.
|
|
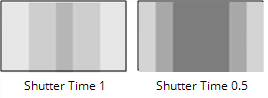
Shutter Time |
shutterTime |
0 |
Sets the equivalent shutter time of the retimed sequence. For example, a shutter time of 0.5 is equivalent to a 180 degree mechanical shutter, so at 24 frames per second the exposure time will be 1/48th of a second. Imagine a gray rectangle moving left to right horizontally across the screen. The figures below show how Shutter Time affects the retimed rectangle.
|
|
Automatic Shutter Time |
autoShutterTime |
disabled |
When enabled, OFlow automatically calculates the shutter time throughout the sequence. Note that this only produces motion blur when the retimed speed is greater than the original speed. |
|
Advanced |
|||
|
Flicker Compensation |
flickerCompensation |
disabled |
When enabled, OFlow takes into account variations in luminance and overall flickering, which can cause problems with your output. Examples of variable luminance include highlights on metal surfaces, like vehicle bodies, or bodies of water within a layer that reflect light in unpredictable ways. Note: Using Flicker Compensation increases rendering time. |
|
Advanced > Tolerances |
|||
|
Weight Red |
weightRed |
0.3 |
For efficiency, much of the motion estimation is done on luminance only - that is, using monochrome images. The tolerances allow you to tune the weight of each color channel when calculating the image luminance. These parameters rarely need tuning. However, you may, for example, wish to increase the red weighting Weight Red to allow the algorithm to concentrate on getting the motion of a primarily red object correct, at the cost of the rest of the items in a shot. |
|
Weight Green |
weightGreen |
0.6 |
|
|
Weight Blue |
weightBlue |
0.1 |
|
|
Vector Spacing |
vectorSpacing |
20 |
Sets the spacing between motion vectors displayed on the Viewer when Overlay Vectors is enabled. The default value of 20 means every 20th vector is drawn. |
|
Overlay Vectors |
showVectors |
disabled |
When enabled, the motion vectors are displayed in the Viewer. Forward motion vectors are drawn in red, and backward motion vectors in blue. Note: Motion vectors displayed in the Viewer are added to your output if you don’t turn off the overlay before rendering. |