Image-Based Keying
Many keying tools, like Primatte, use a color-pick as the baseline for the matte extraction process and then require the artist to tweak the matte from that baseline. Nuke’s image-based keyer (IBK) uses the pixel values of the compositing images, instead of a color-pick, to generate the best matte for the image you want to extract. It works by generating a processed screen image that preserves the color variations of the blue- or greenscreen and using this - rather than a single color - to pull the key. This generally gives good results and speeds up the keying process when working with uneven blue- or greenscreens.

Image-based keying requires two nodes in Nuke. First, you insert an IBKColour node to process the screen image, which is preset to work with either greenscreen or bluescreen. This node generates the processed screen image that preserves the color variations in your blue- or greenscreen. Then, you insert an IBKGizmo node to generate the matte using the processed screen image, the original image, and also the background image for the composite.
To Pull a Key with IBK
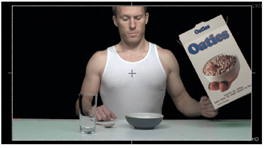
| 1. | In the keying_tutor.nk project file, locate the node tree labeled, “Image-based Keying”. |
| 2. | Right-click over the Reformat3 node and choose Keyer > IBKColour. Drag the IBKColourV3_1 node to the right. |
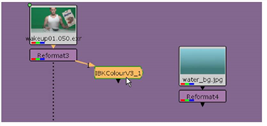
| 3. | Click an empty spot in the Node Graph to deselect all nodes. Then, right-click and choose Keyer > IBKGizmo. |
| 4. | From IBKGizmoV3_01 node, connect fg (foreground) to the Reformat3 node. Connect c (color screen) to the IBKColourV3_1 node. |
| 5. | Connect bg from IBKGizmoV3_1 to the Reformat4 node, which supplies the background for the comp. |
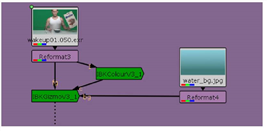
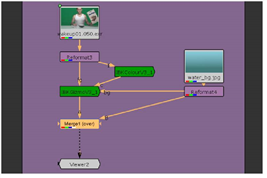
| 6. | Connect the Viewer to the IBKGizmoV3_1 node, and your node tree should look similar to this: |
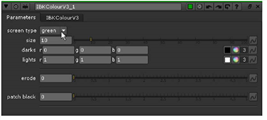
| 7. | Open the control panel for IBKColourV3_1 and change the screen type to green. |
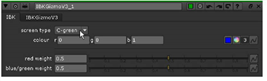
| 8. | Open the control panel for IBKGizmoV3_1, and change its screen type to C-green. |
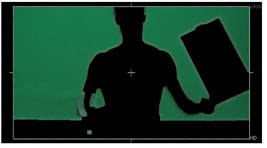
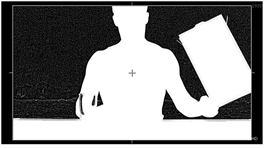
You should see an acceptable matte, shown in the screen capture below, on frame 50.
This is a very good start for this image.
| 9. | Connect the Viewer to the IBKColourV3_1 node. You’ll see the processed screen image, which is essentially a Gaussian-filtered high-contrast key. |
| 10. | Choose Merge > Merge (or press M over the Node Graph) to insert a Merge (over) node. |
| 11. | Connect IBKGizmoV3_1 to the A input of the Merge (over) node. Then connect the B input to the Reformat4 node. |

The color of this greenscreen is completely out of the region of the acceptable industry standard, but IBK does a good job anyway, by smoothing the screen and using the result to essentially create a difference matte with the foreground.
Tip: IBK has presets for green and blue screens, but you can also do a color-pick for any screen color inside the IBKGizmo node.
If you zoom-in on the image, you’ll see small areas near the subject’s hair, where the matte is compromised.

| 12. | Connect the Viewer to IBKColourV3_1 and you’ll see color artifacts around the edges of the matte. |
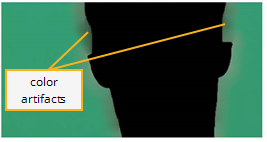
When you look at the smoothed screen produced by IBKColour, you should see only values of your screen color and black.
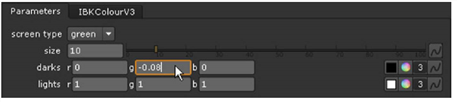
| 13. | In the IBKColourV3_1 control panel, lower the darks, g (green) setting to -0.08. (If you were keying a bluescreen image, you would lower the “b” value for “darks.”). |
This fixes most of the problems at the hairline, but destroys the good key for the lower portion of the image.
Tip: The artifacts in the IBKColour image appear as specific color shades: light green, dark green, light red, dark red, light blue, and dark blue. To remove these, simply adjust the appropriate controls for the artifacts you want to remove: lights/g, darks/g, lights/r, darks/r, lights/b, and darks/b.

| 14. | In IBKColourV3_1, raise the darks, g value to -0.03. Then change the lights, g value to 0.75. This corrects the artifacts of the screen image. |
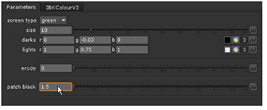
| 15. | Now, change the patch black setting to 1.5 to restore the edge detail of the hairline. |

| 16. | Connect the Viewer to the IBKGizmoV3_1 node. Press A and you’ll see the current alpha channel produced by the IBK system. |
The displayed alpha image shown is correct for the IBK. If the intensity of the noise in your alpha channel is greater than the example show above, you may need to adjust - in very small increments - the dark and light values for the color channels in the IBKColour node.
| 17. | Press A again over the Viewer to toggle back to display all color channels, and scrub through the timeline to check the matte at various points in the clip. |

| 18. | If you haven’t already done so, save your project under a new file name to save the changes you’ve made to project. |