Putting it all Together: Example 1
Now that we have discussed the topics that you should bear in mind when writing a model and converting it from PyTorch to a .cat file, let’s update our simple Cifar10ResNet model to a more advanced version.
TorchScript
Let’s define our Cifar10ResNet model as follows:
import torch
import torch.nn as nn
import torch.nn.functional as F
from resnetSmall import ResNet, ResidualBlock

class Cifar10ResNet(torch.nn.Module):
    """
    This is a wrapper class for our custom ResNet model. Its purpose is to
    preprocess the input tensors and ensure that all tensors are created on
    the correct device with the correct dtype. It also defines the variable
    userLabel as an attribute that can be controlled by a custom knob in Nuke.
    """
    def __init__(self, userLabel = 0):
        """
        :param userLabel: This int controls which object is detected by the
                          Cifar10ResNet model and can be linked to an enumeration
                          knob in Nuke.
        """
        super(Cifar10ResNet, self).__init__()
        self.model = ResNet(pretrained=True)
        self.model.eval()
        self.userLabel = userLabel
Note that this class defines the attribute userLabel which can be controlled by a custom knob in Nuke.
Let’s define our model’s normalize() and forward() functions as follows:
def normalize(self, input, mean, std):
      """
      This method normalizes the values in input based on mean and std.
      :param input: a torch.Tensor of the size [batch x 3 x H x W]
      :param mean: A tuple of float values that represent the mean of the
                           r,g,b chans e.g. [0.5, 0.5, 0.5]
      :param std: A tuple of float values that represent the std of the
                        r,g,b chans e.g. [0.5, 0.5, 0.5]
      :return: a torch.Tensor that has been normalised
      """
      # type: (Tensor, Tuple[float, float, float], Tuple[float, float, float]) -> Tensor
      input[:, 0, :, :] = (input[:, 0, :, :] - mean[0]) / std[0]
      input[:, 1, :, :] = (input[:, 1, :, :] - mean[1]) / std[1]
      input[:, 2, :, :] = (input[:, 2, :, :] - mean[2]) / std[2]
      return input

def forward(self, input):
      """
      The forward function for this model will normalize the input and then pass it
      to the Resnet forward function. It will compare the returned label to userLabel label and
      return either an all ones or all zeros tensor.
      :param input: A torch.Tensor of size 1 x 3 x H x W representing the input image
      :return: A torch.Tensor of size 1 x 1 x H x W of zeros or ones
      """
      # Determine which device all tensors should be created on
      if(input.is_cuda):
         device = torch.device('cuda')
      else:
         device = torch.device('cpu')

      # Normalise the input tensor
      mean = (0.5, 0.5, 0.5)
      std = (0.5, 0.5, 0.5)
      input = self.normalize(input, mean, std)

      modelOutput = self.model.forward(input)
      modelLabel = int(torch.argmax(modelOutput[0]))

      # Check if the detected object is the same as userLabel
      if modelLabel == self.userLabel:
         # Ensure output is created on the correct device with the correct dtype
         output = torch.ones((1, 1, input.shape[2], input.shape[3]), dtype = input.dtype, device=device)
      else:
         # Ensure output is created on the correct device with the correct dtype
         output = torch.zeros((1, 1, input.shape[2], input.shape[3]), dtype = input.dtype, device=device)
      return output
Note that the normalize() function is applied to the input tensor to ensure tensor values are in the range expected by the model. When defining the normalize() function, we use annotations to clarify what the input and output parameter types are. The forward function accepts an input tensor of size 1 x 3 x H x W, and outputs a tensor of size 1 x 1 x H x W. In the forward function, we also ensure that all tensors are created on the correct device, with the correct dtype.
We can convert this model to a TorchScript file using the following code
resnet = Cifar10ResNet()
module = torch.jit.script(resnet)
module.save('cifar10_resnet.pt')
CatFileCreator
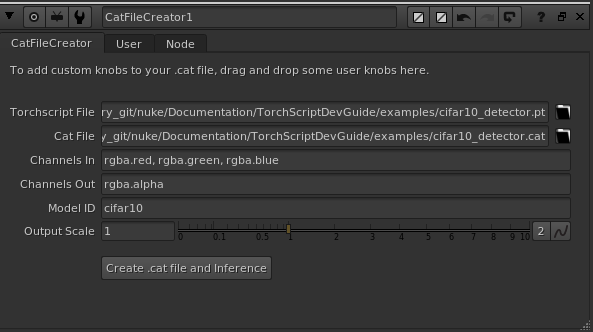
In the CatFileCreator node in Nuke, set the default knobs as follows:

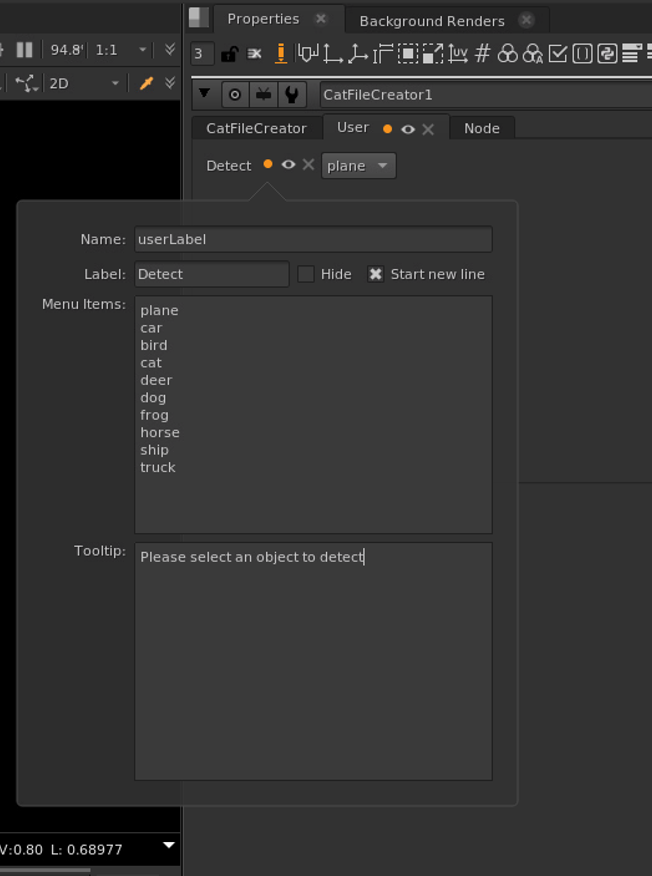
Next, add an enumeration knob by dragging and dropping it to the top of the CatFileCreator properties panel. Fill in the enumeration knob values as follows:

This will create an enumeration knob in your CatFileCreator node. Next, click the Create .cat file and Inference to create your .cat file and prepopulated Inference node.
Inference
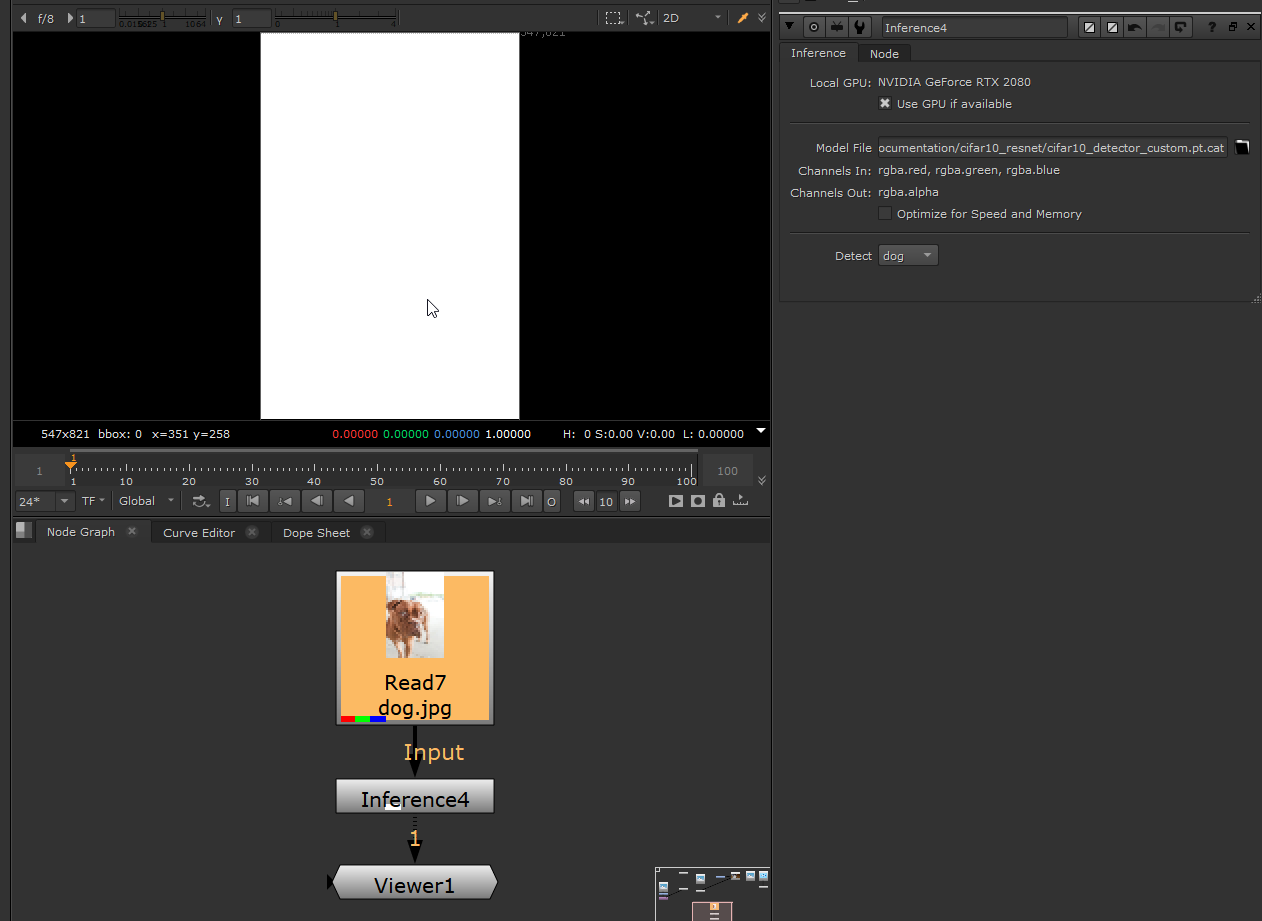
Opening the new Inference node’s properties panel, you will see the knob values have been prepopulated and the Detect enumeration knob has been created. The Inference node can be connected to an image with red, green and blue channels to get the output result:

Note that the Cifar10ResNet model was trained in sRGB space. Therefore, to ensure our input image is in the correct colour space, we have checked the Raw Data knob in the Read node since this image was originally rendered in the sRGB space. Alternatively, a colour space node can be added before the Inference node to convert the image from Nuke linear to sRGB colour space.
Now that the input image is connected, change the object selected in the enumeration knob to see the effect it has on the output image. If the input image contains the selected object, the alpha channel of the output image will contain all ones, otherwise it will contain all zeros. Toggle the Use GPU if available and Optimise for speed and Memory knobs to confirm that they are also working as expected.