Custom Panels
There are a few different ways to create custom panels in NUKE:
- Simple Panel Commands - for frequent tasks such as asking the user to confirm something or to get a file name.
- Simple Panel Object - customizable to some extent and very easy to create. You can add a limited amount of knobs if you need a simple, but customizable panel.
- Python Panels - more complex to create, but offer all knobs that are available in nodes as well as callbacks and some limited layout control. They can also be docked as non-modal panels and saved/restored with custom layouts.
Simple Panel Commands
NUKE has a variety of simple panel commands ready to be used for common tasks without having to jump through too many hoops - see below for a few examples. You can watch a video tutorial about simple panels at Nukepedia
Simple message:
nuke.message('Just saying hi')
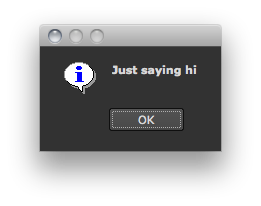
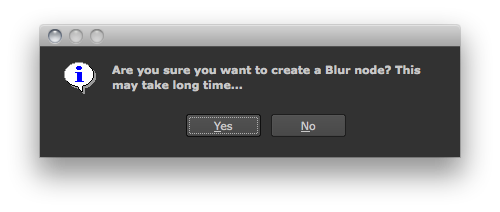
User query - give the user a “yes/no” choice:
if nuke.ask('Are you sure you want to create a Blur node? This may take long time...'):
    nuke.createNode('Blur')
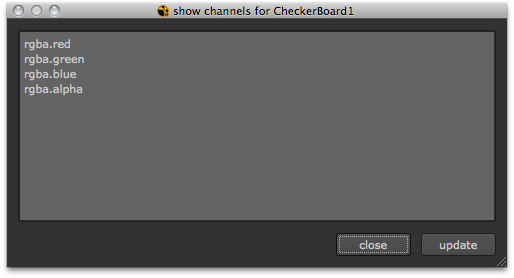
Display window:
def showChannels():
    return '\n'.join(nuke.thisNode().channels())

node = nuke.selectedNode()
nuke.display('showChannels()', node, 'show channels for %s' % node.name())
This is a non-modal panel that runs the showChannels function and uses its return value to populate the window. The node passed in as the second argument is the context node and is accessible in the function as nuke.thisNode(), which enables the update button to re-run the script without having to close the panel.
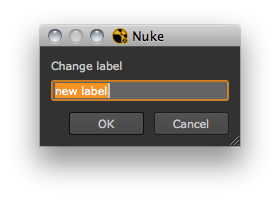
Getting user input - this gets a string from the user and assigns it to all selected nodes’ labels:
txt = nuke.getInput('Change label', 'new label')
if txt:
    for n in nuke.selectedNodes():
        n['label'].setValue(txt)
Color picker - this assigns a color picked by the user to all selected nodes’ tile and Viewer colors:
col = nuke.getColor()

if col:
    for n in nuke.selectedNodes():
        n['tile_color'].setValue(col)
        n['gl_color'].setValue(col)
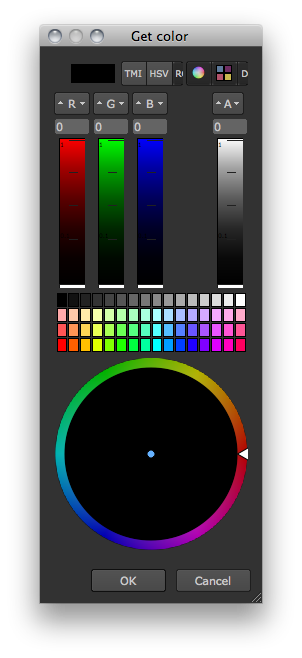
File browser - a file browser that returns the full file path:
filePath = nuke.getFilename('Get File Contents', '*.txt *.xml')
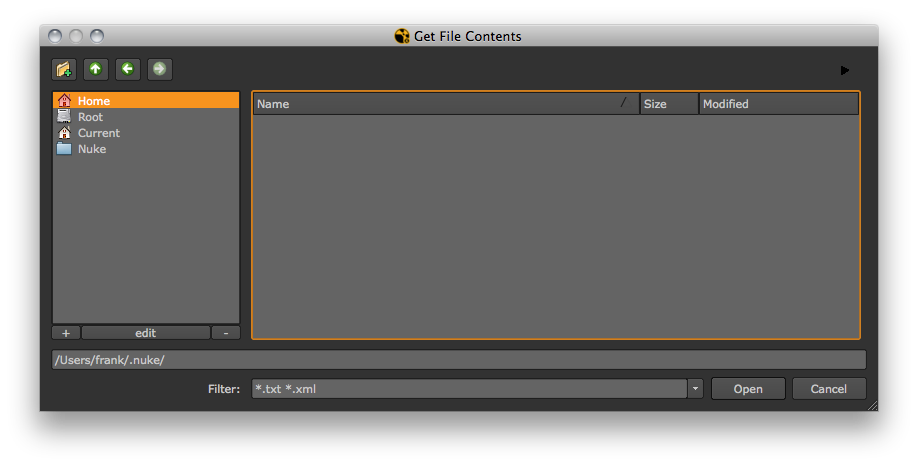
Sequence browser - a file browser that lists image sequences:
seqPath = nuke.getClipname('Get Sequence')
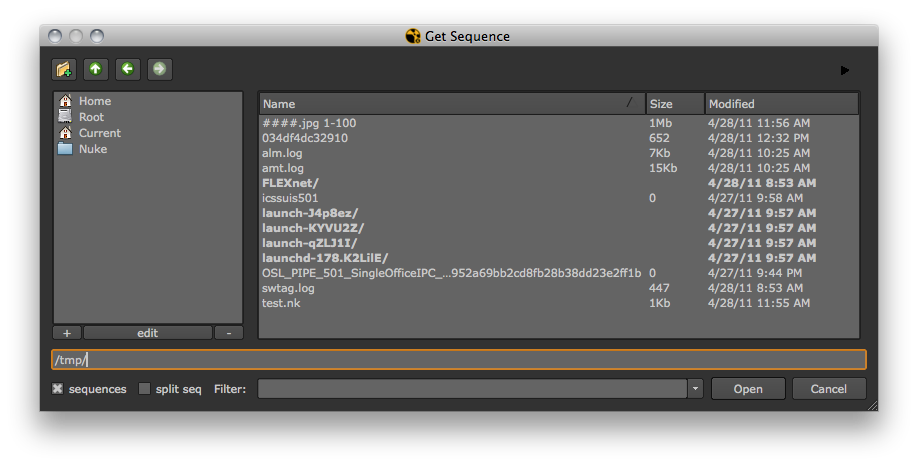
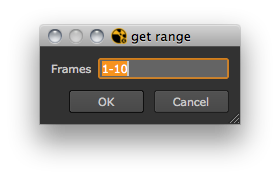
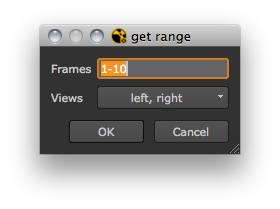
Get frame range and views - this is handy to ask the user for a frame range and, if in a stereo setup, for the views to operate on:
ret = nuke.getFramesAndViews('get range', '1-10')
The return value is a list of the string entered into the field and the requested views:
ret = nuke.getFramesAndViews('get range', '1-10')
range = ret[0]
views = ret[1]
print 'range is', range
print 'views are', views
Single view script:
Multi view script:
Simple Panel Object
See also:
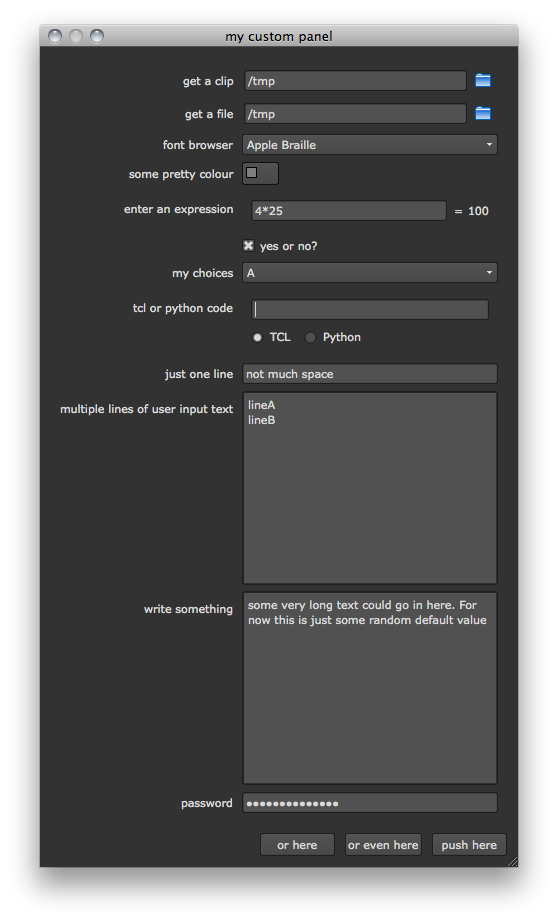
To create a simple panel object:
p = nuke.Panel('my custom panel')
It’s a good idea to check out which knobs are available for this:
dir(p)
# Result:
['__class__', '__delattr__', '__doc__', '__format__', '__getattribute__', '__hash__', '__init__', '__new__', '__reduce__', '__reduce_ex__', '__repr__', '__setattr__', '__sizeof__', '__str__', '__subclasshook__', 'addBooleanCheckBox', 'addButton', 'addClipnameSearch', 'addEnumerationPulldown', 'addExpressionInput', 'addFilenameSearch', 'addMultilineTextInput', 'addNotepad', 'addPasswordInput', 'addRGBColorChip', 'addScriptCommand', 'addSingleLineInput', 'addTextFontPulldown', 'clear', 'execute', 'setTitle', 'setWidth', 'show', 'title', 'value', 'width']
Add some knobs:
p.addClipnameSearch('clip path', '/tmp')
p.addFilenameSearch('file path', '/tmp')
p.addTextFontPulldown('font browser', '/myFonts/')
p.addRGBColorChip('some pretty color', '')
p.addExpressionInput('enter an expression', '4*25')
p.addBooleanCheckBox('yes or no?', True)
p.addEnumerationPulldown('my choices', 'A B C')
p.addScriptCommand('tcl or python code', '')
p.addSingleLineInput('just one line', 'not much space')
p.addMultilineTextInput('multiple lines of user input text', 'lineA\nlineB')
p.addNotepad('write something', 'some very long text could go in here. For now this is just some random default value')
p.addPasswordInput('password', 'donttellanyone')
p.addButton('push here')
p.addButton('or here')
p.addButton('or even here')
Open the panel:
ret = p.show()
To retrieve a value after the panel is closed:
print p.value('clip path')
print p.value('file path')
Python Panels
ShapePanel
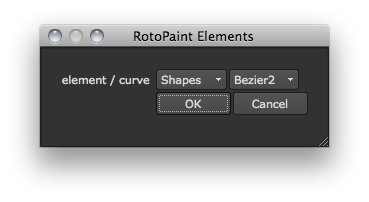
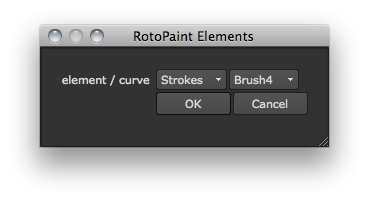
This is a small panel with two dropdown menus. The first knob controls the type of shapes displayed in the second knob.
To get started, create a class and inherit nukescripts.PythonPanels. Then run its constructor and assign a title for the panel:
class ShapePanel(nukescripts.PythonPanel):
    def __init__(self):
        nukescripts.PythonPanel.__init__(self, 'RotoPaint Elements')
Use an argument to provide the node we want to parse - assign it in the __init__ argument list and store it in the class’ global scope as self.rpNode:
class ShapePanel(nukescripts.PythonPanel):
    def __init__(self, node):
        nukescripts.PythonPanel.__init__(self, 'RotoPaint Elements')
        self.rpNode = node
To create a dropdown list use nuke.Enumeration_Knob:
self.typeKnob = nuke.Enumeration_Knob('element', 'element', ['Shapes', 'Strokes'])
Once again, we reference this knob in the class’ global name space so it’s easy to access later. The three arguments provided to the knob are:
- element - The knob object’s name.
- element - The knob’s label.
- [‘Shapes’, ‘Strokes’] - The list of items displayed in the dropdown menu.
Create a second enumeration knob, but leave its items empty. Set them dynamically:
self.elementKnob = nuke.Enumeration_Knob('curve', 'curve', [])
Now add both knobs:
for k in (self.typeKnob, self.elementKnob):
    self.addKnob(k)
This is the code so far:
class ShapePanel(nukescripts.PythonPanel):
    def __init__(self, node):
        nukescripts.PythonPanel.__init__(self, 'RotoPaint Elements')
        self.rpNode = node
        self.typeKnob = nuke.Enumeration_Knob('element', 'element', ['Shapes', 'Strokes'])
        self.elementKnob = nuke.Enumeration_Knob('curve', 'curve', [])
        for k in (self.typeKnob, self.elementKnob):
            self.addKnob(k)
If you now create an instance of this class, you can open it as a modal panel with the showModalDialog() method. Make sure to create a RotoPaint node called “RotoPaint1” with a few shapes and strokes in it:
node = nuke.toNode('RotoPaint1')
p = ShapePanel(node)
p.showModalDialog()
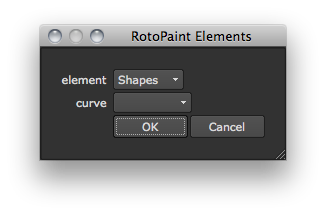
Note how the showModalDialog method gave us Ok and Cancel buttons for free. Let’s do some cosmetics:
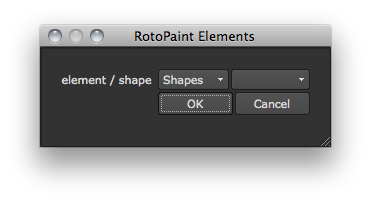
By default, enumeration knobs start a new line but, if we clear that flag, we can get both knobs on the same row:
class ShapePanel(nukescripts.PythonPanel):
    def __init__(self, node):
                nukescripts.PythonPanel.__init__(self, 'RotoPaint Elements')
                self.rpNode = node

                self.typeKnob = nuke.Enumeration_Knob('element', 'element / shape', ['Shapes', 'Strokes'])
                self.elementKnob = nuke.Enumeration_Knob('curve', '', [])
                self.elementKnob.clearFlag(nuke.STARTLINE)

                for k in (self.typeKnob, self.elementKnob):
                        self.addKnob(k)
This also changes the label on the first knob and removes the label from the second one to make things look a little more compact:
One last thing we want to do in the constructor is to initialize a dictionary that holds the elements per type. Add this line at the bottom of the __init__ function:
self.curveDict = {}
This is not really required, though you can initialize variables in the global scope inside the __init__ function for transparency.
Now on to writing a function that fills this dictionary with the node’s shapes and strokes:
def getData(self):
    self.curveDict={ 'Shapes':[], 'Strokes':[] }
    rootLayer = self.rpNode['curves'].rootLayer
- Give the dictionary the same keys as we used for the first enumeration knob’s values (“Shapes” and “Strokes”).
- Grab the node’s curve knob, which is the knob that lists all elements in a Roto or RotoPaint node) and get its rootLayer.
The rootLayer is an iterable object that yields all elements as listed in the curve knob, so we can just loop over it to get all its child elements. As we go, check for the respective element’s type and sort it into our dictionary accordingly:
for e in rootLayer:
    if isinstance(e, nuke.rotopaint.Shape):
        self.curveDict[ 'Shapes' ].append(e.name)
    elif isinstance(e, nuke.rotopaint.Stroke):
        self.curveDict[ 'Strokes' ].append(e.name)
This fills the dictionary with all elements of interest, neatly sorted by “Shape” and “Stroke”. Run this in the last line of the __init__ function to parse the node and make the info available the moment the panel is created:
class ShapePanel(nukescripts.PythonPanel):
    def __init__(self, node):
        '''List all roto paint nodes and the name of their respective shapes and strokes'''
        nukescripts.PythonPanel.__init__(self, 'RotoPaint Elements')
        self.rpNode = node
        # CREATE KNOBS
        self.typeKnob = nuke.Enumeration_Knob('element', 'element / curve', ['Shapes', 'Strokes'])
        self.elementKnob = nuke.Enumeration_Knob('curve', '', [])
        self.elementKnob.clearFlag(nuke.STARTLINE)
        # ADD KNOBS
        for k in (self.typeKnob, self.elementKnob):
            self.addKnob(k)

        # STORE DICTIONARY OF ELEMENTS PER TYPE
        self.curveDict = {}
        # FILL DICTIONARY
        self.getData()
Finally, add a knobChanged method to our new class which is automatically triggered every time a knob within the panel changes. The knobChanged method takes an extra argument which passes the knob into the function that is currently being changed. To see what’s going on and for debugging, it’s a good idea to just print out the knob’s name as you change stuff in the panel and keep an eye out on the script editor’s output panel:
def knobChanged(self, knob):
        print knob.name()
If you run the panel code at this stage, notice that even opening the panel triggers the knobChanged callback with the knob showPanel:
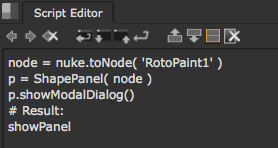
If you now change the first enumeration knob you’ll see its name being printed to the output panel as well.
Now let’s do something useful with this. We already have a dictionary that holds all the shapes and strokes, so all we need to do is read it and assign the respective values (based on the first knob’s current value):
def knobChanged(self, knob):
        self.elementKnob.setValues(self.curveDict[ self.typeKnob.value() ])
This sets the values for self.elementKnob by reading the dictionary with the current value found in typeKnob. However, we only want to do this when the panel opens or when typeKnob changes:
def knobChanged(self, knob):
    if knob is self.typeKnob or knob.name()=='showPanel':
        self.elementKnob.setValues(self.curveDict[ self.typeKnob.value() ])
You can now switch the first enumeration knob from Shapes to Strokes and see the second knob update its contents accordingly.
The final code:
import nuke
import nukescripts

class ShapePanel( nukescripts.PythonPanel ):
    def __init__( self, node ):
        '''List all roto paint nodes and the name of their respective shapes and strokes'''
        nukescripts.PythonPanel.__init__( self, 'RotoPaint Elements' )
        self.rpNode = node
        # CREATE KNOBS
        self.typeKnob = nuke.Enumeration_Knob( 'element', 'element / curve', ['Shapes', 'Strokes'] )
        self.elementKnob = nuke.Enumeration_Knob( 'curve', '', [] )
        self.elementKnob.clearFlag( nuke.STARTLINE )
        # ADD KNOBS
        for k in ( self.typeKnob, self.elementKnob ):
            self.addKnob( k )

        # STORE DICTIONARY OF ELEMENTS PER TYPE
        self.curveDict = {}
        # FILL DICTIONARY
        self.getData()

    def getData( self ):
        '''return a nested dictionary of all shapes and strokes per node'''
        self.curveDict={ 'Shapes':[], 'Strokes':[] }
        rootLayer = self.rpNode['curves'].rootLayer
        for e in rootLayer:
            if isinstance( e, nuke.rotopaint.Shape ):
                self.curveDict[ 'Shapes' ].append( e.name )
            elif isinstance( e, nuke.rotopaint.Stroke ):
                self.curveDict[ 'Strokes' ].append( e.name )


    def knobChanged( self, knob ):
        if knob is self.typeKnob or knob.name()=='showPanel':
            self.elementKnob.setValues( self.curveDict[ self.typeKnob.value() ] )
By calling the panel with the showModalDialog method, we make sure the user makes a choice and either confirms or cancels the panel before anything else can happen. This method returns True when the user hits the OK button and False otherwise. By referencing the knobs in the panel’s global scope (self.elementKnob = ...) we can access the knob’s value after the panel was closed. Here is an example:
node = nuke.toNode('RotoPaint1')
p = ShapePanel(node)
if p.showModalDialog():
    print p.elementKnob.value()
This prints the value of the element knob only when the panel was closed with the OK button, otherwise nothing happens.
ShapeAndCVPanel
This simple panel scans a Roto or RotoPaint node for shapes and populates a dropdown list with any names found. It also let’s the use specify a frame range and a CV number. It is used for the trackCV
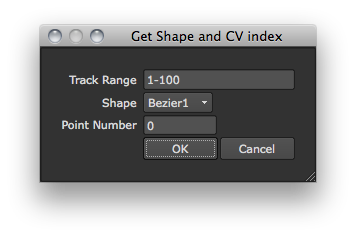
Start by importing the required modules and packages:
import nuke
import nukescripts
import nuke.rotopaint as rp
Then create a class that takes one argument called node and inherits the PythonPanel class from the nukescripts package. Run the parent class’ constructor to provide a title for the panel:
class ShapeAndCVPanel(nukescripts.PythonPanel):
def __init__(self, node):
        nukescripts.PythonPanel.__init__(self, 'Get Shape and CV index')
Reference the node provided to the panel in it’s global name space so we can access it from other functions inside the panel class:
self.rpNode = node
Get the root layer from the given node’s curves knob:
root = node['curves'].rootLayer
Then use list comprehension to extract a list of all shape names in the given node:
shapeNames = [ c.name for c in root if isinstance(c, rp.Shape) ]
Add a quick check to see if we found anything to work with:
if not shapeNames:
    nuke.message('No Shapes found in %s' % node.name())
    return
Now start adding knobs to the panel. First a string knob to input the frame range:
self.fRange = nuke.String_Knob('fRange', 'Track Range')
Note
We’re referencing the knob in the panel’s global name space (“self.”) so it is accessible later from outside the panel.
The string knob can take an optional third argument to provide a default value. Let’s use that to assign the script range as the default value:
self.fRange = nuke.String_Knob('fRange', 'Track Range', '%s-%s' % (nuke.root().firstFrame(), nuke.root().lastFrame()))
Next, add the dropdown list and an associated enumeration knob and use the list of shape names we found above as the values:
self.shape = nuke.Enumeration_Knob('shape', 'Shape', shapeNames)
Now add a simple integer knob to let the user input a point number:
self.cv = nuke.Int_Knob('pointNumber', 'Point Number')
This panel checks if the given point number is valid. If not, we want to display some static text so let’s prepare that:
self.warning = nuke.Text_Knob('warning', 'invalid index')
To give the warning a bit more emphasis we can use simple html code to turn the font red:
self.warning = nuke.Text_Knob('warning', '<span style="color:red">invalid index</span>')
This static text knob appears next to the previous (“pointNumber”) knob, so we need to clear the flag that puts it into a new line by default:
self.warning.clearFlag(nuke.STARTLINE)
And lastly, when the panel opens, we don’t want to see the warning so let’s hide it initially:
self.warning.setVisible(False)
Now add all four knobs in the order you want them to show up in the panel:
self.addKnob(self.fRange)
self.addKnob(self.shape)
self.addKnob(self.cv)
self.addKnob(self.warning)
Or if you want to avoid repeating yourself:
for k in (self.fRange, self.shape, self.cv, self.warning):
        self.addKnob(k)
The code up to this point:
import nuke
import nukescripts
import nuke.rotopaint as rp

class ShapeAndCVPanel(nukescripts.PythonPanel):
    def __init__(self, node):
        nukescripts.PythonPanel.__init__(self, 'Get Shape and CV index')
        self.rpNode  = node
        # GET THE NODES ROOT LAYER AND COLLECT ALL SHAPES IN IT
        root = node['curves'].rootLayer
        shapeNames = [ c.name for c in root if isinstance(c, rp.Shape) ]
        if not shapeNames:
            nuke.message('No Shapes found in %s' % node.name())
            return
        # CREATE KNOBS
        self.fRange = nuke.String_Knob('fRange', 'Track Range', '%s-%s' % (nuke.root().firstFrame(), nuke.root().lastFrame()))
        self.shape = nuke.Enumeration_Knob('shape', 'Shape', shapeNames)
        self.cv = nuke.Int_Knob('pointNumber', 'Point Number')
        self.warning = nuke.Text_Knob('warning', 'invalid index')
        self.warning.clearFlag(nuke.STARTLINE)
        self.warning.setVisible(False)

        # ADD KNOBS
        for k in (self.fRange, self.shape, self.cv, self.warning):
            self.addKnob(k)
In order to make the panel check whether the given point number is valid or not, we need to add the knobChanged method which is automatically run when a knob changes in the panel. This method requires the knob argument which provides the function and the knob that triggered this callback:
def knobChanged(self, knob):
We only want to run the check when either the knob is referenced by self.cv or self.shape is changed by the user:
def knobChanged(self, knob):
    if knob in(self.cv, self.shape):
If so, we need to grab the shape that the shape knob (referenced by self.shape) is set to:
currentShape = self.rpNode['curves'].toElement(self.shape.value())
We just want to know how many points are in this shape:
size = len([pt for pt in currentShape])
Now check if the current value of the pointNumber knob is within the range of the found size:
validNumber = -1 < knob.value() < size
The above returns True if the number is within the available range of points and False otherwise, so we use its inverse value to drive the visibility of the warning knob:
self.warning.setVisible(not validNumber)
The final code:
import nuke
import nukescripts
import nuke.rotopaint as rp

class ShapeAndCVPanel( nukescripts.PythonPanel ):
    def __init__( self, node ):
        nukescripts.PythonPanel.__init__( self, 'Get Shape and CV index' )
        self.rpNode  = node
        # GET THE NODES ROOT LAYER AND COLLECT ALL SHAPES IN IT
        root = node['curves'].rootLayer
        shapeNames = [ c.name for c in root if isinstance( c, rp.Shape ) ]
        if not shapeNames:
            nuke.message( 'No Shapes found in %s' % node.name() )
            return
        # CREATE KOBS
        self.fRange = nuke.String_Knob( 'fRange', 'Track Range', '%s-%s' % ( nuke.root().firstFrame(), nuke.root().lastFrame() ) )
        self.shape = nuke.Enumeration_Knob( 'shape', 'Shape', shapeNames )
        self.cv = nuke.Int_Knob( 'pointNumber', 'Point Number' )
        self.warning = nuke.Text_Knob( 'warning', '<span style="color:red">invalid index</span>' )
        self.warning.clearFlag( nuke.STARTLINE )
        self.warning.setVisible( False )

        # ADD KOBS
        for k in ( self.fRange, self.shape, self.cv, self.warning ):
            self.addKnob( k )

    def knobChanged( self, knob ):
        # IF AN INVALID INDEX IS SHOWN DISPLAY THE WARNING TEXT
        if knob in( self.cv, self.shape ):
            currentShape = self.rpNode['curves'].toElement( self.shape.value() )
            size = len( [pt for pt in currentShape] )
            validNumber = -1 < knob.value() < size
            self.warning.setVisible( not validNumber )
To test the panel, create a Roto or RotoPaint node and a few shapes, then run:
ShapeAndCVPanel(nuke.selectedNode()).showModalDialog()
This shows the panel with the warning hidden:
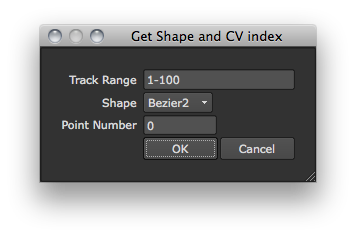
If the point number is smaller or larger than the amount of points in the currently selected shape, the warning is visible:
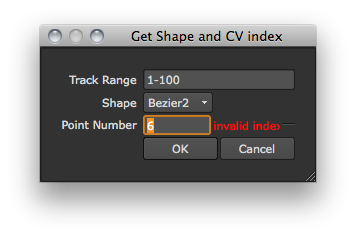
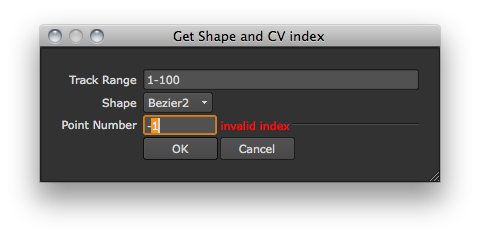
Let’s make the panel wider to make space for the warning:
p = ShapeAndCVPanel(nuke.selectedNode())
p.setMinimumSize(400, 50)
p.showModalDialog()
Search and Replace Panel
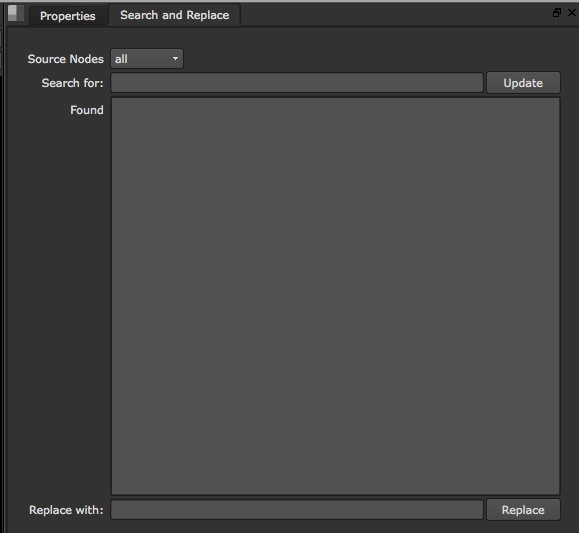
Below is a script that creates a panel to perform a search and replace across the current NUKE script. It uses the helper function search to do the work and keep the panel code simple. The tutorial video for this can be found at Nukepedia
def search(searchstr, nodes):
    """ Search in nodes with file knobs. """
    fileKnobNodes = [i for i in nodes if __NodeHasKnobWithName(i, 'file')]
    proxyKnobNodes = [i for i in nodes if __NodeHasKnobWithName(i, 'proxy')]
    if not fileKnobNodes and not proxyKnobNodes: raise ValueError, "No file nodes selected"
    nodeMatches = []
    knobMatches = []
    for i in fileKnobNodes:
        if __FindNode(searchstr, i['file']):
            nodeMatches.append(i)
            knobMatches.append(i['file'])
    for i in proxyKnobNodes:
        if __FindNode(searchstr, i['proxy']):
            nodeMatches.append(i)
            knobMatches.append(i['proxy'])
    return nodeMatches, knobMatches
Note the reverse URL as the second argument to the constructor which enables this panel to be saved and recalled as part of custom layouts:
class SearchReplacePanel(nukescripts.PythonPanel):
    def __init__(self):
        nukescripts.PythonPanel.__init__(self, 'Search and Replace', 'com.ohufx.SearchReplace')
        # CREATE KNOBS
        self.nodesChoice = nuke.Enumeration_Knob('nodes', 'Source Nodes', ['all', 'selected'])
        self.searchStr = nuke.String_Knob('searchStr', 'Search for:')
        self.update = nuke.PyScript_Knob('update', 'Update')
        self.info = nuke.Multiline_Eval_String_Knob('info', 'Found')
        self.info.setEnabled(False)
        self.replaceStr = nuke.String_Knob('replaceStr', 'Replace with:')
        self.replace = nuke.PyScript_Knob('replace', 'Replace')
        # ADD KNOBS
        self.addKnob(self.nodesChoice)
        self.addKnob(self.searchStr)
        self.addKnob(self.update)
        self.addKnob(self.info)
        self.addKnob(self.replaceStr)
        self.addKnob(self.replace)

        self.matches = None

    def search(self, nodes):
        nodeMatches, knobMatches = search(self.searchStr.value(), nodes)
        nodes = [n.name() for n in nodeMatches]
        infoStr = '%s node(s) found:\n\t%s' % (len(nodes), ', '.join(nodes))
        self.info.setValue(infoStr)
        return knobMatches

    def knobChanged(self, knob):
        if knob in (self.searchStr, self.update, self.nodesChoice):
            srcNodes = { 'all': nuke.allNodes(), 'selected': nuke.selectedNodes() }
            self.matches = self.search(srcNodes[self.nodesChoice.value()])
        elif knob is self.replace and self.matches is not None:
            for k in self.matches:
                newStr = re.sub(self.searchStr.value(), self.replaceStr.value(), k.value())
                k.setValue(newStr)
Here is how to add the panel to the Pane menu by default (this code should go into the menu.py):
def addSRPanel():
    global srPanel
    srPanel = SearchReplacePanel()
    return srPanel.addToPane()

paneMenu = nuke.menu('Pane')
paneMenu.addCommand('SearchReplace', addSRPanel)
nukescripts.registerPanel('com.ohufx.SearchReplace', addSRPanel)
Extending NUKE with PySide
NUKE’s UI is extendable through python and Qt with PySide. PySide is shipped with NUKE 6.3v5 and higher.
My First PySide Window
Launch NUKE, open the script editor, and type the following:
from PySide import QtGui
label = QtGui.QLabel("Hello World")
label.show()
A window displays with ‘Hello World’ in it, yeah!
Dockable PySide Widgets
To make a dockable PySide widget there is a helper function in the nukescripts.panels module to create dockable widgets.
The definition looks like this:
registerWidgetAsPanel(widget, name, id, create=False)

    registerWidgetAsPanel(widget, name, id, create) -> PythonPanel

    Wraps and registers a widget to be used in a NUKE panel.

    widget - should be a string of the class for the widget
    name - is is the name as it will appear on the Pane menu
    id - should the the unique ID for this widget panel
    create - if this is set to true a new NukePanel will be returned that wraps this widget
Here’s a simple example that creates a new dockable table widget:
import nuke
import PySide.QtCore as QtCore
import PySide.QtGui as QtGui
from nukescripts import panels

class NukeTestWindow(QtGui.QWidget):
    def __init__(self, parent=None):
        QtGui.QWidget.__init__(self, parent)
        self.setLayout(QtGui.QVBoxLayout())
        self.myTable    = QtGui.QTableWidget()
        self.myTable.header = ['Date', 'Files', 'Size', 'Path' ]
        self.myTable.size = [ 75, 375, 85, 600 ]
        self.myTable.setColumnCount(len(self.myTable.header))
        self.myTable.setHorizontalHeaderLabels(self.myTable.header)
        self.myTable.setSelectionMode(QtGui.QTableView.ExtendedSelection)
        self.myTable.setSelectionBehavior(QtGui.QTableView.SelectRows)
        self.myTable.setSortingEnabled(1)
        self.myTable.sortByColumn(1, QtCore.Qt.DescendingOrder)
        self.myTable.setAlternatingRowColors(True)
        self.myTable.setHorizontalScrollBarPolicy(QtCore.Qt.ScrollBarAlwaysOff)
        self.myTable.setRowCount(50)
        self.layout().addWidget(self.myTable)
        self.myTable.setSizePolicy(QtGui.QSizePolicy(QtGui.QSizePolicy.Expanding, QtGui.QSizePolicy.Expanding))
        self.setSizePolicy(QtGui.QSizePolicy(QtGui.QSizePolicy.Expanding, QtGui.QSizePolicy.Expanding))

panels.registerWidgetAsPanel('NukeTestWindow', 'Test table panel', 'uk.co.thefoundry.NukeTestWindow')
This example adds the new dockable panel to the Pane menu.
To add the widget to the Pane menu and open the panel docked next to the Properties panel, you can run code like this:
pane = nuke.getPaneFor('Properties.1')
panels.registerWidgetAsPanel('NukeTestWindow', 'Test table panel', 'uk.co.thefoundry.NukeTestWindow', True).addToPane(pane)
A Web browser panel example
Below is a more complicated example which creates a docked web browser widget. In also shows the use of signals and slots.
To use, add the example to your NUKE path or copy and paste into the script editor and then select ‘Web Browser’ from the Pane menu.
## example PySide panel that implements a simple web browser in Nuke
## JW 12/10/11

import nuke
import nukescripts
from nukescripts import panels

from PySide.QtGui import *
from PySide.QtCore import *
from PySide.QtWebKit import *


class WebBrowserWidget(QWidget):
  def changeLocation(self):
    url = self.locationEdit.text()
    if not url.startswith( 'http://' ):
      url = 'http://' + url
    self.webView.load( QUrl(url) )

  def urlChanged(self, url):
    self.locationEdit.setText( url.toString() )

  def __init__(self):
    QWidget.__init__(self)
    self.webView = QWebView()

    self.setLayout( QVBoxLayout() )

    self.locationEdit = QLineEdit( 'http://www.google.com' )
    self.locationEdit.setSizePolicy( QSizePolicy.Expanding, self.locationEdit.sizePolicy().verticalPolicy() )

    QObject.connect( self.locationEdit, SIGNAL('returnPressed()'),  self.changeLocation )
    QObject.connect( self.webView,   SIGNAL('urlChanged(QUrl)'),     self.urlChanged )

    self.layout().addWidget( self.locationEdit )

    bar = QToolBar()
    bar.addAction( self.webView.pageAction(QWebPage.Back))
    bar.addAction( self.webView.pageAction(QWebPage.Forward))
    bar.addAction( self.webView.pageAction(QWebPage.Stop))
    bar.addAction( self.webView.pageAction(QWebPage.Reload))
    bar.addSeparator()

    self.layout().addWidget( bar )
    self.layout().addWidget( self.webView )

    url = 'http://www.thefoundry.co.uk/'
    self.webView.load( QUrl( url ) )
    self.locationEdit.setText( url )
    self.setSizePolicy( QSizePolicy( QSizePolicy.Expanding,  QSizePolicy.Expanding))

## make this work in a .py file and in 'copy and paste' into the script editor
moduleName = __name__
if moduleName == '__main__':
  moduleName = ''
else:
  moduleName = moduleName + '.'

panels.registerWidgetAsPanel( moduleName + 'WebBrowserWidget', 'Web Browser','uk.co.thefoundry.WebBrowserWidget')
Migrating from PyQt Applications
In general PySide and PyQt applications are compatible, it is just simply a matter of changing the import statement from PyQt4 to PySide.
For example in PyQt:
from PyQt4 import QtGui
label = QtGui.QLabel("Hello World")
label.show()
And in PySide:
from PySide import QtGui
label = QtGui.QLabel("Hello World")
label.show()
Extending NUKE with PyQt
Although as of NUKE 6.3v5 PySide is included with NUKE prebuilt and ready to go you can still use PyQt if preferred.
In order to achieve this, there are a few steps that need to be taken for each individual platform in order to be able to use it correctly and effectively from within NUKE - you’ll also need to have Python 2.6 installed.
To use PyQt with NUKE, download the NUKE specific Qt 4.6.2 source code from http://thefoundry.s3.amazonaws.com/products/nuke/developers/63/nuke-qt-4.6.2-src.tar.gz. Run the build.py script with the arguments “release 64” to build all of the binaries (shared libraries and executables) needed to link PyQt.
After the build is complete, make sure your path environment variable contains the file path to the built make executable (<qtbuilddir>/bin/).
After that, follow the appropriate instructions for your platform:
Finally, configure your environment according to these steps: Environment Setup
Mac OSX
Download the SIP source package for Mac OSX from the Riverbank website http://www.riverbankcomputing.co.uk/software/sip/download and unpack it.
Navigate to the unpacked directory and run the following commands:
configure.py
make
make install
Download PyQt4 source for Mac OSX from the Riverbank website http://www.riverbankcomputing.co.uk/software/pyqt/download and unpack it.
Navigate to the unpacked directory and run the following commands:
configure.py
make
make install
PyQt libraries now need to be fixed so that they internally point to NUKE’s Qt binaries. To achieve this run the soFileFixForMacPyQt.py that is bundled with the Qt 4.6.2 source code.
Finally, configure your environment according to these steps: Environment Setup
Linux
Download the SIP source package for Linux from the Riverbank website http://www.riverbankcomputing.co.uk/software/sip/download and unpack it.
Navigate to the unpacked directory and run the following commands:
configure.py
make
make install
Download PyQt4 source for Linux from the Riverbank website http://www.riverbankcomputing.co.uk/software/pyqt/download and unpack it.
Navigate to the unpacked directory and run the following commands:
configure.py
make
make install
Finally, configure your environment according to these steps: Environment Setup
Windows
Download the SIP source for windows from the Riverbank website http://www.riverbankcomputing.co.uk/software/sip/download.
Unpack the source files and open a Visual Studio command line console.
Navigate to the unpacked SIP directory and run the following commands:
configure.py
nmake
nmake install
Download PyQt4 source for Windows from the Riverbank website http://www.riverbankcomputing.co.uk/software/pyqt/download.
Unpack the source and open a Visual Studio command line console
Navigate to the unpacked PyQt directory and run the following commands:
configure.py
nmake
nmake install
Finally, configure your environment according to these steps: Environment Setup
Environment Setup
The compiled versions of SIP and PyQt should now be in your Python installation site-packages directory. We recommended that you copy SIP and PyQt out to a special directory for NUKE and then add this to your Python path as described below.
For example, create a directory for the NUKE PyQt files (<pyqtbuilddir>) and copy the files below into that directory:
## files and dirs to copy

PyQt4/
sip.so
sipconfig.py
sipdistutils.py

## final directory tree looks like

<pyqtbuilddir>/PyQt4/*
<pyqtbuilddir>/sip.so
<pyqtbuilddir>/sipconfig.py
<pyqtbuilddir>/sipdistutils.py
By adding the PyQt path to your Python, you should now be able to use PyQt from within NUKE:
export PYTHONPATH=<pyqtbuilddir>
Alternatively add the file to your menu.py:
sys.path.append ("<pyqtbuilddir>")
My First PyQt Window
Launch NUKE, open the script editor, and type the following:
from PyQt4 import QtGui
label = QtGui.QLabel("Hello World")
label.show()
A window displays with ‘Hello World’ in it.
PySide and PyQt Knobs
You can insert PyQt widgets into NUKE Python Panels and dock them just like any other NUKE panel.
In order to make a PyQt widget dockable, it must be created by a wrapper knob class which can be created by a PyCustom_Knob.
The wrapper knob must have a makeUI() function that returns the widget for the knob.
As an example, see webBrowser.py in the nukescripts/pyQtExamples directory.
To try out the example, in the script editor:
import nukescripts.pyQtExamples.webBrowser
You should now have a Web Browser option available in the Pane menu.
You can also use the panels.registerWidgetAsPanel wrapper function to wrap a PyQt widget rather that creating a custom python knob just has you can with PySide widgets. See Dockable PySide Widgets for more details.
Migrating from Qt Applications - NUKE 6.2
In previous versions of NUKE, it was necessary to run PyQt windows from a separate thread, and also call NUKE using the executeInMainThread function.
This is no longer required in NUKE 6.3 and greater.
For backwards compatibility, the pyQtAppUtils.py helper functions from previous versions can still be used, but it is recommended that you update your code to use standard Qt methods such as ‘show’.