Using O_Retimer
Note: O_Retimer requires upstream motion vectors to operate correctly.
Retiming Stereo Footage Using Speed
To perform a linear retime using the Speed method, do the following:
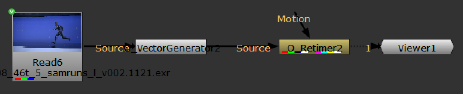
| 1. | If motion vectors don’t yet exist in the script, you can use the O_VectorGenerator node to calculate them. See VectorGenerator for information on how to do this. |
| 2. | Select Ocula > Ocula 4.0 > O_Retimer to insert O_Retimer either after the O_VectorGenerator node if you added one in the previous step, or after the stereo image sequence. |
| 3. | In the O_Retimer controls, select the two views you want to use for retiming under View to Use. The two views you select are mapped for the left and right eye. |
| 4. | Connect a Viewer to the O_Retimer node. Your node tree should now look something like this: |
| 5. | Select a new speed value by either entering it the Speed box or dragging the Speed slider to the required value. |
| 6. | Play through the clip to calculate the retiming for all the frames. |
Note: Constant retimes produce a number of frames equal to last frame - first frame / speed. For example, a 10 frame clip at half speed would produce 10-1/0.5 = 18 frames.
Retiming Stereo Footage Using Source Frame
Note: You need to set a minimum of two keyframes to retime footage using the Source Frame method.
To perform a linear retime using the Source Frame method, do the following:
| 1. | Repeat steps 1 to 4 in the Retiming Stereo Footage Using Speed section. |
| 2. | Select Source Frame from the Timing dropdown. |
| 3. | Move the playhead to the first frame you want to change the output for on the Viewer timeline. |
| 4. | Set the source frame number that you want to appear at the selected output position by either entering it in the Frame box, or dragging the Frame slider to the required frame. |
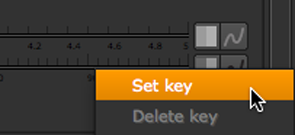
| 5. | Set a keyframe for this by selecting the animation menu next to the Frame parameter, and clicking Set key. A keyframe is indicated by a blue marker. |
| 6. | Move the playhead on the Viewer timeline to the next frame you want to change the output for. |
| 7. | Set the source frame number that you want to appear at the selected output position by either entering it in the Frame box, or dragging the Frame slider to the required frame. A keyframe is set automatically, identified with a blue marker. |
| 8. | Play through the clip to calculate the retiming for all the frames. |
Note: Constant retimes produce a number of frames equal to last frame - first frame / speed. For example, a 10 frame clip at half speed would produce 10-1/0.5 = 18 frames.
Varying the Retime Speed
To vary the speed in your sequence, you can use either of the Timing methods. As with the Source Frames method, you add keyframes at different points on the Viewer timeline and specify varying speeds. This means, the speed changes at every keyframe, varying the speed throughout the clip.
Note: When you are retiming footage using the Speed method, ensure that you set the keyframes on the input frames by using a FrameRange node, as setting keyframes on the input frames alters the number of output frames.
Varying Retimes Using Speed
To vary the speed throughout the footage using the Speed method, do the following:
| 1. | Repeat steps 1 to 4 in the Retiming Stereo Footage Using Speed section. |
| 2. | Add a FrameRange (Time > FrameRange) node between the O_VectorGenerator and O_Retimer. |
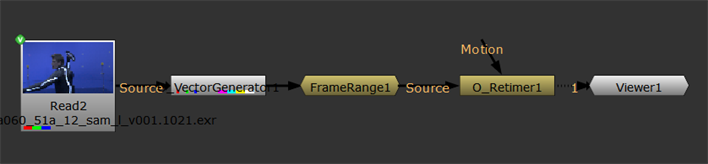
| 3. | Set the timeline range to Input using the dropdown under the Viewer. |
| 4. | In the FrameRange node's Properties, specify the first and last frames you want to retime. For example, 1021 - 1040. This sets the input frames and allows you to visualize the retime using the Curve Editor more easily. |

| 5. | Set a keyframe on the first frame specified by the FrameRange node and then set the required keyframes to retime the footage as required. |
| 6. | In the O_Retimer Properties, right-click the keyframed Speed control and select Curve editor. |
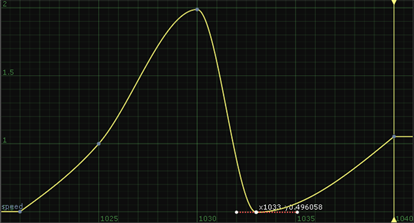
The Curve Editor tab displays the keyframes you added to retime the footage.
| 7. | If you move points on the curve, you can see the out point on the Viewer timeline updates to show you how many frames of output are created from the input frames. |
Tip: You can add points to a curve by holding Ctrl/Cmd+Alt and clicking on the curve. This also adds a corresponding keyframe to the Viewer timeline.
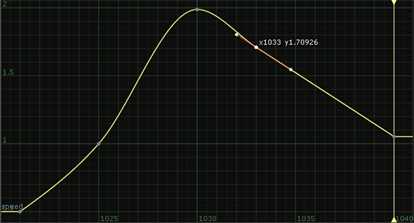
The left-hand curve creates 1042 output frames, whereas the shallower retime curve on the right produces fewer output frames - just 1035 frames. However, the input frames displayed on the x axis of the Curve Editor remain constant between 1021 and 1040.
|
|
|
|
Frames 1021 to 1040 with a steep slowdown curve |
Frames 1021 to 1040 with a shallow slowdown curve produces 1035 frames output in the Viewer. |
Varying Retimes Using Source Frames
To vary the speed throughout the footage using the Source Frames method, do the following:
| 1. | Repeat steps 1 to 4 in the Retiming Stereo Footage Using Speed section. |
| 2. | Select Source Frame from the Timing dropdown. |
| 3. | Move the playhead to the first frame you want to change the output for on the Viewer timeline. |
| 4. | Set the source frame number that you want to appear at the selected output position by either entering it in the Frame box, or dragging the Frame slider to the required frame. |
| 5. | Set a keyframe for this by selecting the animation menu next to the Frame parameter, and clicking Set key. A keyframe is indicated by a blue marker. |
| 6. | Move the playhead on the Viewer timeline to the next frame you want to change the output for. |
| 7. | Set the source frame number that you want to appear at the selected output position by either entering it in the Frame box, or dragging the Frame slider to the required frame. A keyframe is set automatically, identified with a blue marker. |
| 8. | Add as many keyframes as necessary to produce the required retime. For example, if you had a clip consisting of 15 frames, you could: |
• Set frame 1 to output frame 1, and frame 5 to output frame 2.5, resulting in a half-speed retime.
• Set frame 10 to output frame 15, resulting in a third speed up.
This creates a retime curve, which you can see if you right-click the Frame control and select Curve editor or Dope sheet from the animation menu. The graph would look something like this:
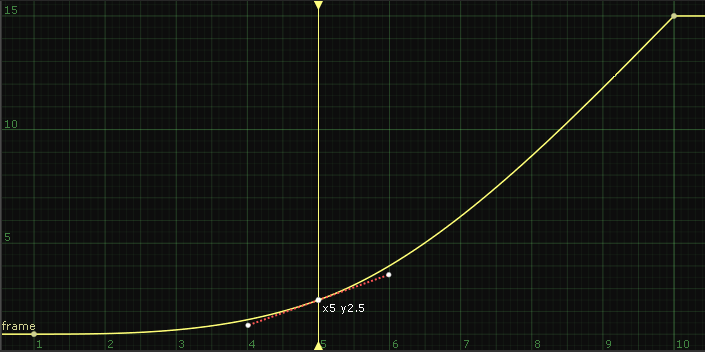
The y axis shows the source frames, and the x axis shows the output frames. By using the Curve Editor or Dope Sheet to adjust this curve, you can create an arbitrarily changing speed for the sequence.
Tip: You can add points to a curve by holding Ctrl/Cmd+Alt and clicking on the curve. This also adds a corresponding keyframe to the Viewer timeline.