O_Solver Controls
O_Solver Tab
Views to Use
From the views that exist in your project settings, select the two views you want to use to calculate the features and the camera relationship. These views will be mapped for the left and right eye.
Analysis
Mask
If an area in the Source clip is producing poor feature matches, you can use this control to select areas of the image to ignore during the feature detection and analysis.
Note: Masks should exist in both views, and O_DisparityGenerator expects alpha values of either 0 (for regions to use) or 1 (for regions to ignore).
|
None |
Use the entire image area. |
|
Source Alpha |
Use the alpha channel of the Source clip as an ignore mask. |
|
Source Inverted Alpha |
Use the inverted alpha channel of the Source clip as an ignore mask. |
|
Mask Luminance |
Use the luminance of the Ignore input as an ignore mask. |
|
Mask Inverted Luminance |
Use the inverted luminance of the Ignore input as an ignore mask. |
|
Mask Alpha |
Use the alpha channel of the Ignore input as an ignore mask. |
|
Mask Inverted Alpha |
Use the inverted alpha channel of the Ignore input as an ignore mask. |
Analysis Key
This shows the analysis keys that have been created. When you add an analysis key, O_Solver calculates feature matching and analysis and then sets an analysis key. The solves for all other frames are created by interpolating between the results on the analysis keys on either side. This field is for display only. To edit the keyframes, use Key Frame and Delete Key.
Note: Keyframe interpolation helps to ensure smooth changes in the calculated camera relationship between views. We recommend using Key Sequence to analyze the entire sequence, and then adding additional analysis keys where the offsets between matches occur. You can visualize how well the interpolated geometry matches the images by setting Display to Preview Alignment in the O_Solver controls. If you see a lot of yellow matches (matches that have a vertical error greater than the Error Threshold), you may need to add more keyframes.
Tip: Alternatively, you can quality check the interpolated geometry by using O_VerticalAligner followed by an Anaglyph node. Enable Global > Preset > Full to interpolate the calculated camera relationship and check whether there is any vertical displacement between the aligned views in the anaglyph view. See O_VerticalAligner Example for an example of how to use O_Solver, O_VerticalAligner, and Anaglyph.
|
Delete Key |
Delete an analysis key at the current frame. |
|
Delete All |
Delete all analysis keys. |
|
Key Frame |
Set an analysis key at the current frame. |
|
Key Sequence |
Analyze the whole sequence automatically and set analysis keys when a change in camera alignment is detected. Tip: Key Sequence detects changes in camera alignment automatically, but can be time-consuming on longer sequences. |
|
Key Nominated |
Set analysis keys at the frames specified in the Render dialog. You can specify frames using Nuke's regular frame expressions. For example, if you enter "1-5 8 10 15 22-25", only those 12 frames are keyed. |
|
Single Solve From All Keys |
When enabled, O_Solver calculates a single solve using all the keyframes you have set. Use this for rigs that don’t change over time to get more accurate results than when using a single keyframe or when the O_Solver analysis is performed on one clip and then re-used for another clip. Do not use this if there is jitter in the alignment or there is a change in separation, convergence, or zoom. Instead, use a separate solve for each keyframe and place keys where the alignment changes. |
Display
Display Dropdown
Change the display mode:
|
Nothing |
Only show the Source image. |
||
|
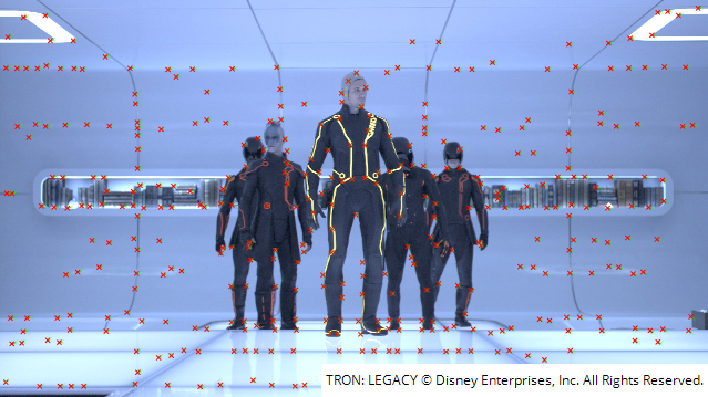
Keyframe Matches |
Show the features and matches for the camera relationship calculation in a Viewer overlay. Feature matches are only calculated for the keyframes.
You can use this mode to see where O_Solver has found features and matches, and evaluate how accurate they are. You can also edit the feature matches manually. To delete a poor match, right-click on it and select delete selected. To add matches manually, see Adding User Matches. You can also activate this mode by selecting display matches from the Viewer’s right-click menu. |
||
|
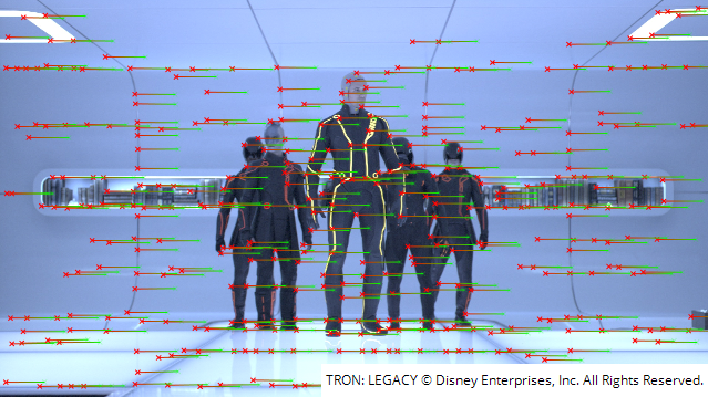
Preview Alignment |
Preview how well the calculated feature matches describe the alignment of the stereo camera. This shows the aligned matches at keyframes, but also calculates matches at non-keyframes, allowing you to review how well the interpolated solve works and whether additional keyframes are required. If the lines between feature matches are horizontal, they describe the alignment of the camera rig well. If any lines are skewed (and displayed in yellow), you may want to delete the feature matches in question. If necessary, you can also add manual feature matches to replace them and preview the effect of the manual matches in the overlay.
You can also activate this mode by selecting preview alignment from the Viewer’s right-click menu. |
Match Offset
The offset (in pixels) applied to the aligned feature matches. You can:
• increase this value to artificially increase the disparity, so it’s easier to see how horizontal the feature matches are.
• decrease this value to set the disparity of particular matches to zero and examine the vertical offset at each feature. The matches should sit on top of each other.
Note: If you find a lot of yellow matches, you can add user matches manually. See O_Solver Controls for more information.
The Match Offset control is only available when Display is set to Preview Alignment. You can also adjust it by selecting decrease offset or increase offset from the Viewer’s right-click menu.
Error Threshold
The threshold on the vertical alignment error in pixels. When Display is set to Preview Alignment, any matches with a vertical error greater than the threshold are highlighted in the Viewer. This allows you to easily delete poor matches with large errors when previewing alignment at keyframes - adjust the Error Threshold to highlight poor matches and press Backspace to remove them.
Current Frame
|
Re-analyse Frame |
Clear the automatic feature matches from the current frame and recalculate them. This can be useful if there have been changes in the node tree upstream from O_Solver, you have deleted too many automatic feature matches, or you want to calculate the automatic matches based on any user matches you have created. |
|
Delete Auto Matches |
Delete all automatically generated matches added to the current frame. |
|
Delete User Matches |
Delete all user matches you have manually added to the current frame. |
Python Tab
These controls are for Python callbacks and can be used to have Python functions automatically called when various events happen in Nuke.
|
before render |
These functions run prior to starting rendering in execute(). If they throw an exception, the render aborts. |
|
before each frame |
These functions run prior to starting rendering of each individual frame. If they throw an exception, the render aborts. |
|
after each frame |
These functions run after each frame is finished rendering. They are not called if the render aborts. If they throw an exception, the render aborts. |
|
after render |
These functions run after rendering of all frames is finished. If they throw an error, the render aborts. |
|
render progress |
These functions run during rendering to determine progress or failure. |