Importing Projects from Autopano Video
CaraVR's Autopano importer allows you to import projects directly from Autopano Video and Autopano Video Pro using the .kava file format.
CaraVR applies an offset to the Read nodes representing the cameras to match the synchronization from Autopano, connecting them in the right order automatically.
Note: You can import .pano files from Autopano Pro and Autopano Giga as normal using the rig Preset dropdown in the C_CameraSolver node's Properties. See Preparing Camera Rigs for more information.
To import a .kava file:
| 1. | Navigate to CaraVR 2.1 > Import > AutopanoVideo_Project. |
The import dialog displays.
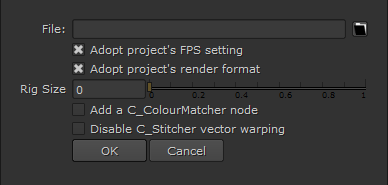
| 2. | Enter the location of the .kava file you want to import in the File control. |
Note: The importer adopts the Autopano project's frame rate and resolution by default, but you can disable this behavior using the checkboxes.
| 3. | Set the Rig Size to the physical size of the camera rig, in metres. The value entered here is automatically transferred to the C_CameraSolver's Rig Size control. |
Rig Size determines the size of the sphere on which the cameras sit on the rig. This value is used to convert Autopano's nodal rig setup to CaraVR's spherical setup.
| 4. | Enable Add a C_ColourMatcher node to include a C_ColourMatcher node in the script. |
Note: This option does not import color information from Autopano, it adds a C_ColourMatcher node and processes it as normal in CaraVR.
| 5. | The importer automatically warps the image using a C_Stitcher node, but you can click Disable C_Stitcher vector warping if this is not required. |
| 6. | Click OK to import the project. |
Working with Imported Projects
Once the import is complete, CaraVR applies an offset to the Read nodes to match the synchronization from Autopano and adds them to the Node Graph, connected in the right order automatically.
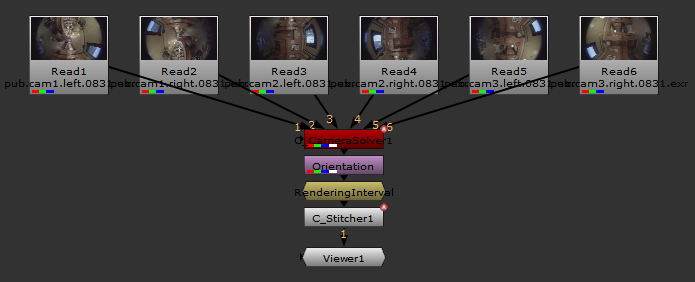
The C_CameraSolver and C_Stitcher nodes are added, including any horizon transforms and split States from the Stitch track in Autopano. Split state animation is represented by keyframes in the C_CameraSolver's Settings tab under Transform.
An Orientation node and RenderingInterval node are also added:
• Orientation matches the orientation state in Autopano's Authoring tab. This transform is applied after any horizon transforms that were applied in Autopano.
• RenderingInterval restricts the range passed to the C_Stitcher to the area covered by the red bar above the State tracks in Autopano.