Search is based on keyword.
Ex: "Procedures"
Do not search with natural language
Ex: "How do I write a new procedure?"
Contact Support
Dynamic Tables
You can display information about your assets in tables. One easy way to add content to tables is to link .csv files to your table item. For example, you can display a measurement chart on your sheet this way. Another way to use tables is to display dynamic information about the items on your sheet, such as parts of the item and the various swatches assigned to them. One table can reference one asset.
To add a table:
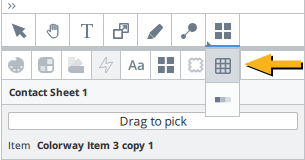
| 1. | In the left-side panel, select the sheet to which you want to add the table. |
| 2. | In the right menu, click the Table |

After adding a table to your sheet, you can fill it with content. You can add content by linking .csv files, or by making the table dynamic, and referencing selected properties of a Colorway asset.
Creating a Dynamic Table
This video presents how to create a dynamic table.
In the video:
• A dynamic table references a DCI item and the parts inside it. It also references an SVG item created in Adobe Illustrator.
• To create a dynamic table:
- In the right, docked menu, click the Dynamic Table icon and draw a table on the workspace.
- In the right, docked menu, click the Dynamic toggle.
- Click and hold the Drag to pick button and drag to the required item.
- At the top-right corner of the table, click and hold the Dynamic Table icon and drag to the required item.
OR
• To change the preferences of the text in the Dynamic table:
- In the right, docked menu, click the Text tab (Aa button).
- Edit the Font, Min and Max Sizes, Spacing, Wrap, LineLimit, and Ellipsis.
- In the right, docked menu, click the Dynamic Table tab.
- You can change the Layout to a flipped table or a grid.
- Select the columns you want to display in the Dynamic table.
- Resize and rotate the Dynamic table using its bounding box handles.
• To add metadata to the DCI item:
- In the Dynamic table, click on a part. The Metadata icon appears in the right, docked menu.
- Click the Metadata tab.
- Enter some information in the header; the first input field.
- Enter some information in the second input field. The information is added to the Dynamic table.
- Press Enter to save the information to the DCI item and the Dynamic table.
Working with Dynamic Tables
This video presents how to change the dynamic tables' display.
In the video:
• To apply color to items using the table:
- In the Palettes tab, drag a color directly on the dynamic table. The item part's color is updated instantly in the table and on the item.
• To change the table's border color:
- In the right, docked menu, in the Dynamic table, change the border color.
- In the Items tree, the border color is represented by a little colored dot.
- In the Palettes tab, you can also drag a color directly on the colored dot in the Items tree.
• To change the table's background color:
- In the right, docked menu, in the Dynamic table, change the background color.
- In the Items tree, the background color is represented by a little colored dot.
- In the Palettes tab, you can also drag a color directly on the colored dot in the Items tree.
Note: Changing the background color improves the visibility when there are items behind the table.
The order in which the items are displayed is the same in both the table and the Item tree. You can move the items up and down in the Item tree and the changes are reflected in the table.
Dynamic Icon
This video presents how to use the Dynamic icon.
In the video:
• In previous topics, you've read how to create dynamic items, see Dynamic Tables and Making Text Dynamic.
• At the top-right corner of the Dynamic item's bounding box, click the Dynamic icon and drag it to the item you want to reference.