Search is based on keyword.
Ex: "Procedures"
Do not search with natural language
Ex: "How do I write a new procedure?"
Contact Support
Working with Parts
To experiment with different colors, textures, and effects, you first need to select the specific parts you want to change.
Parts of a Colorway asset are visible are displayed in the Items List. Click the arrow in front of the name of an item to reveal the list of parts.
![]()
The menu lists the available parts of the project that you are able to select and change. These were defined with the original asset in a 3D application. If a part was not specified in the 3D application, it does not appear in the Items List.
Selecting Parts
You can either select a part in the Items List, or by clicking on it directly in the sheet. When you hover over a part in the sheet, it is highlighted in blue to make selection easier.
This video shows that hovering over parts of an asset makes it easier for you to navigate in your workspace and apply colors as it highlights the asset and its linked items.
You can select multiple parts by using Shift and/or Ctrl/Cmd+click.
Grouping Parts
Colorway allows you to group selected parts. You can then apply changes to a group, which updates all the parts within the group simultaneously.
| 1. | In the Items List, select multiple parts by either using Shift or Ctrl/Cmd and clicking on the parts. |
| 2. | Click the Group |
A group is created and is named New Group by default. There are also a few controls on the group name.
• Click the arrow on the left of the group name to expand or collapse the view of the group contents.
• Click the padlock on the right of the group name to lock or unlock the group of parts.
• Click the visibility icon on the right to hide/reveal the group.
• Double-click the default group name to rename it.
Ungrouping Parts
Selecting the group(s) you want to remove and then clicking the Ungroup ![]() button in the bottom-left of the Items List.
button in the bottom-left of the Items List.
Locking Parts and Groups
Colorway allows you to lock parts or whole groups of parts. This allows you to maintain control over what can be changed in your project to create different looks. To lock a part or group, click the padlock icon next to the part or group name. When a part or a group has been locked, the icon appears like a closed padlock and highlights dark gray.
Editing Part Metadata
You can add metadata to a part in its properties panel. The data added here can then be displayed using dynamic text or tables.
To add metadata:
| 1. | Select the part in the Items List or sheet. |
| 2. | Expand the Metadata properties. |
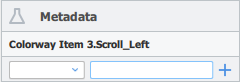
| 3. | Enter a title in the first field, then enter a description or value in the second field. To add additional data, click the + (plus) icon on the right. |
Tip: You can also access the metadata of parts of a Colorway asset through tables.