Search is based on keyword.
Ex: "Procedures"
Do not search with natural language
Ex: "How do I write a new procedure?"
Adding Textures and Decals to a Part
You can apply most image types as textures to individual parts of a 3D item. The textures will organically wrap around the 3D part to create photorealistic effects.
In the video:
• Textures and decals can wrap to a 3D surface.
• Select the part of the item to texture. Use the Configuring Texture Layers tab to add a new texture layer.
Note: You can have as many texture layers as you want per-part, however more layers may result in performance slowdowns.
Note: Textures can be adjusted using the Textures property panel. See Textures Properties.
Textures can also be adjusted by selecting the part with the texture applied on the sheet, and using the texture widget tool to rotate, scale, and position the texture. See the image below.
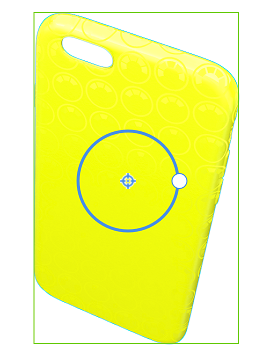
Using the Texture Widget Tool
The texture widget tool makes it easier to position, rotate, and scale your applied graphics by manipulating them directly on the part on the sheet.
Note: The texture widget tool works in the selected parts UV space. If you have 2D Screenspace selected as the Mapping for the texture, the widget will not appear, and a green bounding box can be used instead to move the texture.
| 1. | Select a part on the sheet with a graphic applied to the UVs, or select a texture in the Items List. |
The texture widget tool appears on the part on the sheet.
| 2. | Drag the texture widget tool to move the position of the graphic. |
| 3. | Drag the white circle on the widget to simultaneously scale and rotate the graphic. |
Note: The white handle turns red if it is moved outside the parts boundaries.
| 4. | Reposition the location of the widget by holding Alt/Option+Left Click. |
Copying and Pasting Colors and Textures
You can copy and paste colors and textures from one part of an item and paste them onto another part of the same item or a different item. The texture settings are also copied.
In the video:
• Click on the part, right-click and select Copy Colors and Textures.
• Click on the DCI target item, right-click and select Paste Colors and Textures.
Masking Using Textures and Decals
Masking Part Effects
You have more control over the transparency, blur, diffuse amount, and specularity assigned to your parts by assigning textures as part masks. The controls to do this can be found in the Textures sub-menu of the Materials & Textures tab. With a texture layer selected, use the Effects property to specify what effect the selected texture layer should mask. For example, enabling Transparency Mask from the Effects menu means only masked regions receive any transparency effects you have applied using the Opacity slider.
Tip: Instead of using the alpha channel on your texture layer for masking, you can use the red channel by selecting Mask blending mode from the Blending property.
To create a masked part effect:
| 1. | Assign a texture to a part on a .dci item. |
See the video at the top of this page to learn how to do this.
| 2. | Inside the Textures sub-menu of the Materials & Textures tab, click and drag the Part slider under Blur to apply a blur effect to the part. |
| 3. | Make sure your texture layer is selected in the layers panel, then in the Effects dropdown, enable Blur Part Mask. |
Only the non-transparent parts of the alpha channel on your texture have the blur effect applied.
Tip: If you want to blur only the diffuse color of a texture layer, you can click and drag the Layers slider under Blur to only blur the selected texture layer, and use the Blur Layer Mask option in the Effects dropdown to contain this effect within the texture.
Masking Items on the Sheet
You can mask any item on your sheets to create a clipping effect by assigning a texture to the Mask property inside the Display tab when an item is selected. This can allow you to create a variety of clipped shapes for designing different profiles for products and logos, for example.
To create a masked item on the sheet:
| 1. | Select an item on the sheet. |
This can be any item, including images, .dci files, text, and .svg files.
| 2. | Click the Display tab. |
| 3. | Next to Mask, click the |
The Colorway browser appears, allowing you to choose an image file to use as a mask.
| 4. | Choose an image file to use as a mask from the Colorway browser. |
Tip: If you want to use transparency to mask your item, make sure the texture file you select has an alpha channel.
| 5. | Click Select. |
| 6. | Click the channel dropdown to select which channel on the image you want to use for masking. |
| 7. | Enable or disabled the |
This can be useful for debugging purposes.
| 8. | Click the |
Textures Properties
|
Property |
Description |
Notes |
|
Mapping |
Specifies how the selected texture layer should be mapped onto the part. 2D (Screen Space) - Projects the texture onto the part from screen space. 3D (UV) - Projects the texture onto the part using the default UV map in UV space. |
If you have exported out several UV maps for your .dci item from Modo, the available UV maps are also listed here for you to select. |
|
Blending |
Specifies how the selected texture layer should be blended on the part with the layers below. Normal - No blending. Multiply - Multiples each component in the selected texture layer with the layers on the part below. This results in darker textures typically. Add - Adds the values of each component in the selected texture layer with the values in the layers below. This results in brighter textures typically. Mask - Specifies the selected texture layer to be used as a mask only. |
|
|
Opacity |
Specifies an opacity amount for the selected texture layer. An opacity of 0% makes the texture fully transparent. An opacity of 100% makes the texture fully visible. |
|
|
Scale relative to sheet size |
When enabled, it converts displayed values for the selected texture layer to be relative to the sheet size. For example, when a texture layer is projected onto a part using 2D (Screen Space) it shows the texture in its native resolution size when looking at the sheet with 100% zoom. |
When enabled, this option does not work reliably for UV mapped textures. |
|
Scale |
Scales the selected texture layer. |
|
|
Position |
Positions the selected texture layer along the X and Y axis. |
|
|
Rotate |
Rotates the selected texture layer. |
|
|
Flip |
Flips the selected texture layer horizontally or vertically. |
|
|
Tiling |
Specifies the tiling for the selected texture layer on the horizontal and vertical axis. N - No horizontal or vertical repeat. R - Horizontal or vertical repeat enabled. M - Mirrored horizontal or vertical repeat. |
|
|
Invert |
When enabled, inverts the colors in the selected texture layer. For example, black becomes white and white becomes black. |
|
|
Store settings per variation |
When disabled, the settings for the selected texture layer are shared across all the variations in your project for that texture layer. When enabled, you can specify different settings for the selected texture layer in individual variations. |
|
|
Effects |
A set of effects you can assign to your selected texture layer. Disabled - The texture is disabled. Diffuse Color - This option controls whether the selected texture layer should affect the diffuse colors of a part or not. When enabled, the diffuse colors of the texture are visible on the part. You might want to disable this effect if you only want the selected texture layer to be used as a mask only. Blur Layer Mask - When enabled, contains the blur applied to the selected texture layer using the Layers slider to the masked areas. Blur Part Mask - When enabled, contains the blur applied to the part using the Part slider to the masked areas. Specular Mask - When enabled, contains the specularity applied to the part using the Glow and Intensity sliders to the masked areas. Transparency Mask - When enabled, contains the transparency applied to the part using the Opacity slider to the masked areas. |
|
|
Diffuse |
A slider to control the diffuse amount of the part. | |
|
Opacity |
A slider to control the transparency of the part. | This option only appears if you have rendered transparency for your .dci file from Modo. |
Blur
|
Layers |
A slider to control the blur effect on the selected texture layer. |
|
|
Part |
A slider to control the blur effect on the whole part, including materials and textures on the part. |
|
Lustre
|
Glow |
Adjusts the roughness finish of the selected part or its masked region. |
Requires an Intensity of 0%> for adjustments to be visible. See Adjusting the Specularity of a Part for more information. |
|
Intensity |
Adjusts the intensity of the reflection on the selected part or its masked region. |
See Adjusting the Specularity of a Part for more information. |
Sorry you didn't find this helpful
Why wasn't this helpful? (check all that apply)
Thanks for your feedback.
If you can't find what you're looking for or you have a workflow question, please try Foundry Support.
If you have any thoughts on how we can improve our learning content, please email the Documentation team using the button below.
Thanks for taking time to give us feedback.