Timeline Playback Tools
There are many useful tools at the top of the Viewer, some of which allow you to select channels, adjust gain and gamma, and zoom and scale down the image in the Viewer.
For more information about the tools above the Viewer, see Viewer Tools.
The tools at the bottom of the Viewer allow you to adjust the playback settings, including setting the frame range, selecting the playback mode, and locking the Viewer playback range.
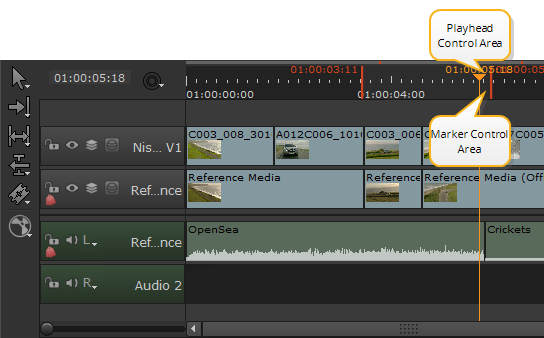
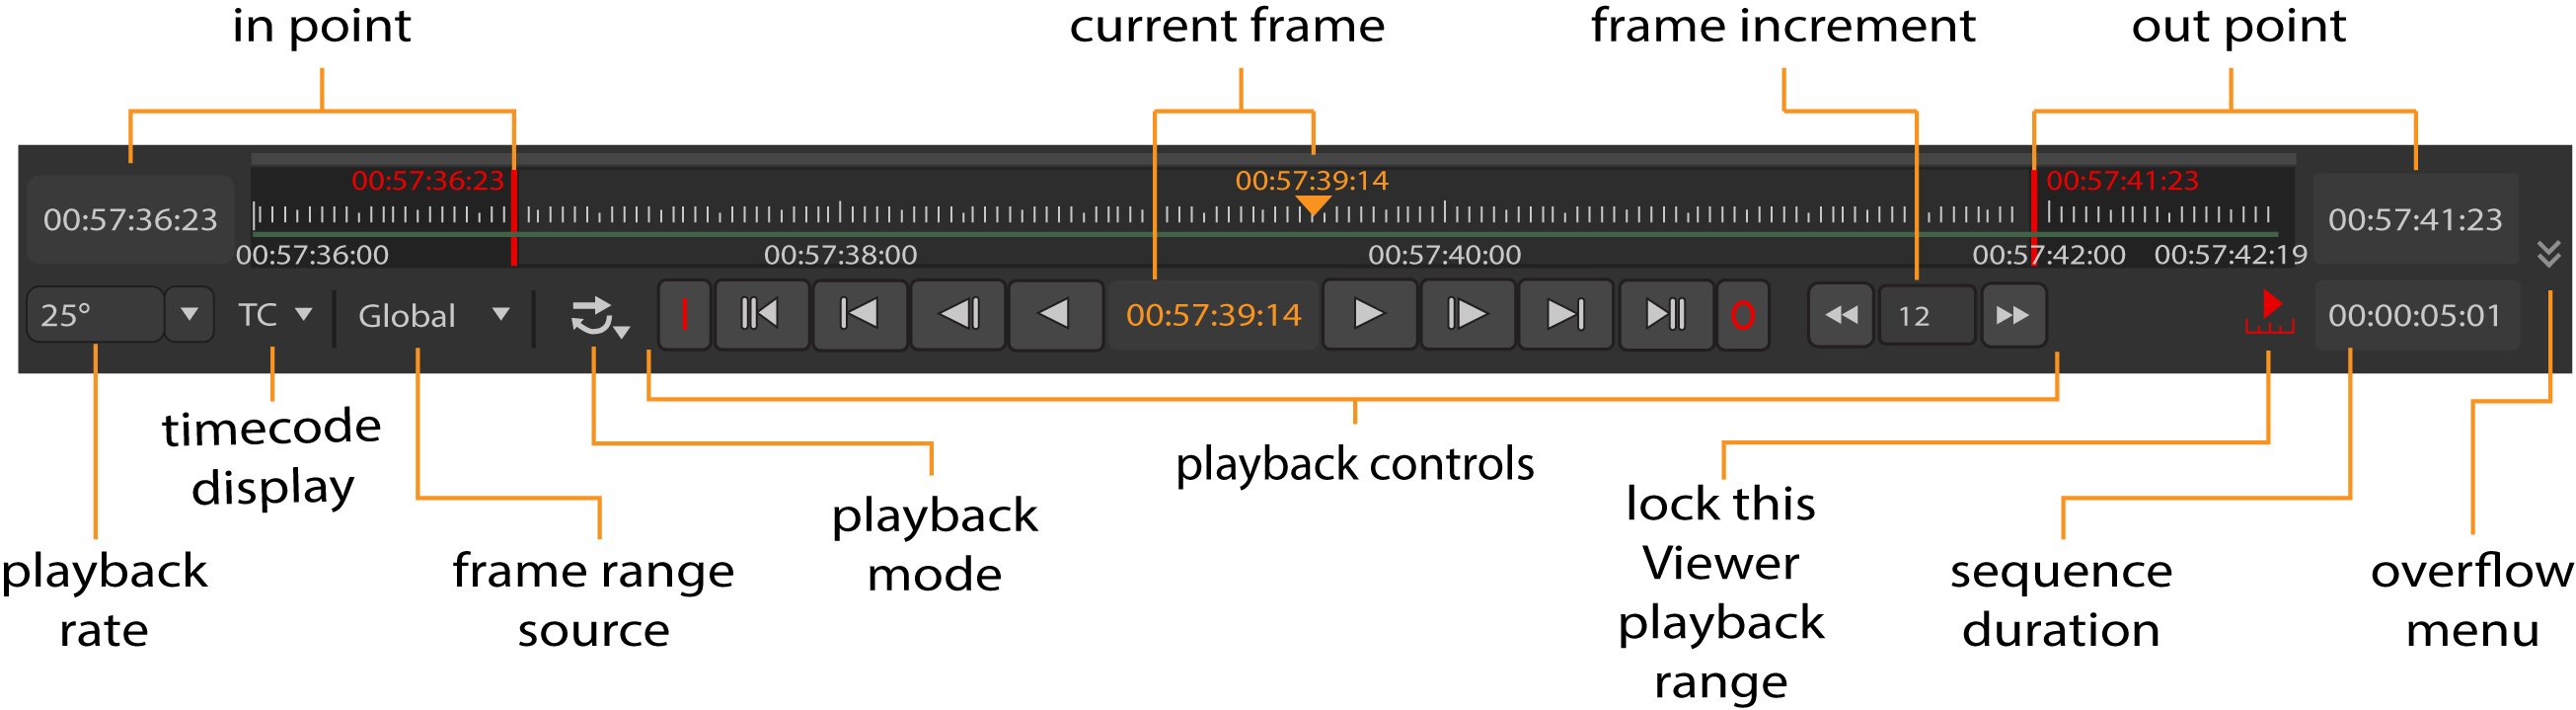
Drag the orange marker along the timeline to quickly cue to a specific frame or timecode. The number of the current frame or timecode appears below the center of the timeline. You can also cue to a frame or timecode by typing its number directly into this field.
Tip: The current frame and in an out point fields accept simple mathematical functions, such as +/-20 to jump forward or backward 20 frames or +/-00002000 to jump forward or backward 20 seconds.
By default, Hiero automatically adjusts the timeline of every Viewer window to show the frame range defined in your Project Settings. If no frame range is defined, the frame range of the first image you read in is used as the global frame range.
Viewer timeline controls also have a frame range source dropdown menu that you can use to define where the timeline gets its frame range from. You can set this menu to Global, Input, or Custom. Global is the default setting described above.
The playback rate field (frames-per-second) initially displays the project’s playback speed. Hiero attempts to maintain this speed throughout playback, although this adjusts depending on the resolution of the imagery and your hardware configuration.
Note: The asterisk (*) denotes the Sequence playback speed selected using the Frame Rate dropdown or, for new projects, the Project Settings > Sequence > Frame Rate dropdown.
In and Out Points
In and Out markers enable you to alter the duration of a clip to just the portions of the source that you require.
When a clip containing In and Out points is added to a timeline, you can slip the clip around the markers to adjust the clip’s output. See Timeline Editing Tools for more information.
You can also use In and Out points to export certain portions of a clip or sequence. See Transcoding for more information.
To set In and Out markers:
| 1. | Right-click on the required clip or sequence and select Open In > Timeline View. |
Clips opened in a timeline have a purple background in the timeline.
| 2. | Move the playhead to the location of the In point and press I on your keyboard. |
The In point is marked by the In tab and the time is recorded in the playback controls.
| 3. | Move the playhead to the location of the Out point and press O on your keyboard. |
The Out point is marked by the Out tab and the time is recorded in the playback controls.
Note: You can also set markers by navigating to View > Mark In or Mark Out, by using the Timeline menu to Mark Selection or Mark Clip dependent on clip selections on the timeline, or by right-clicking a shots and selecting Open In > Viewer.

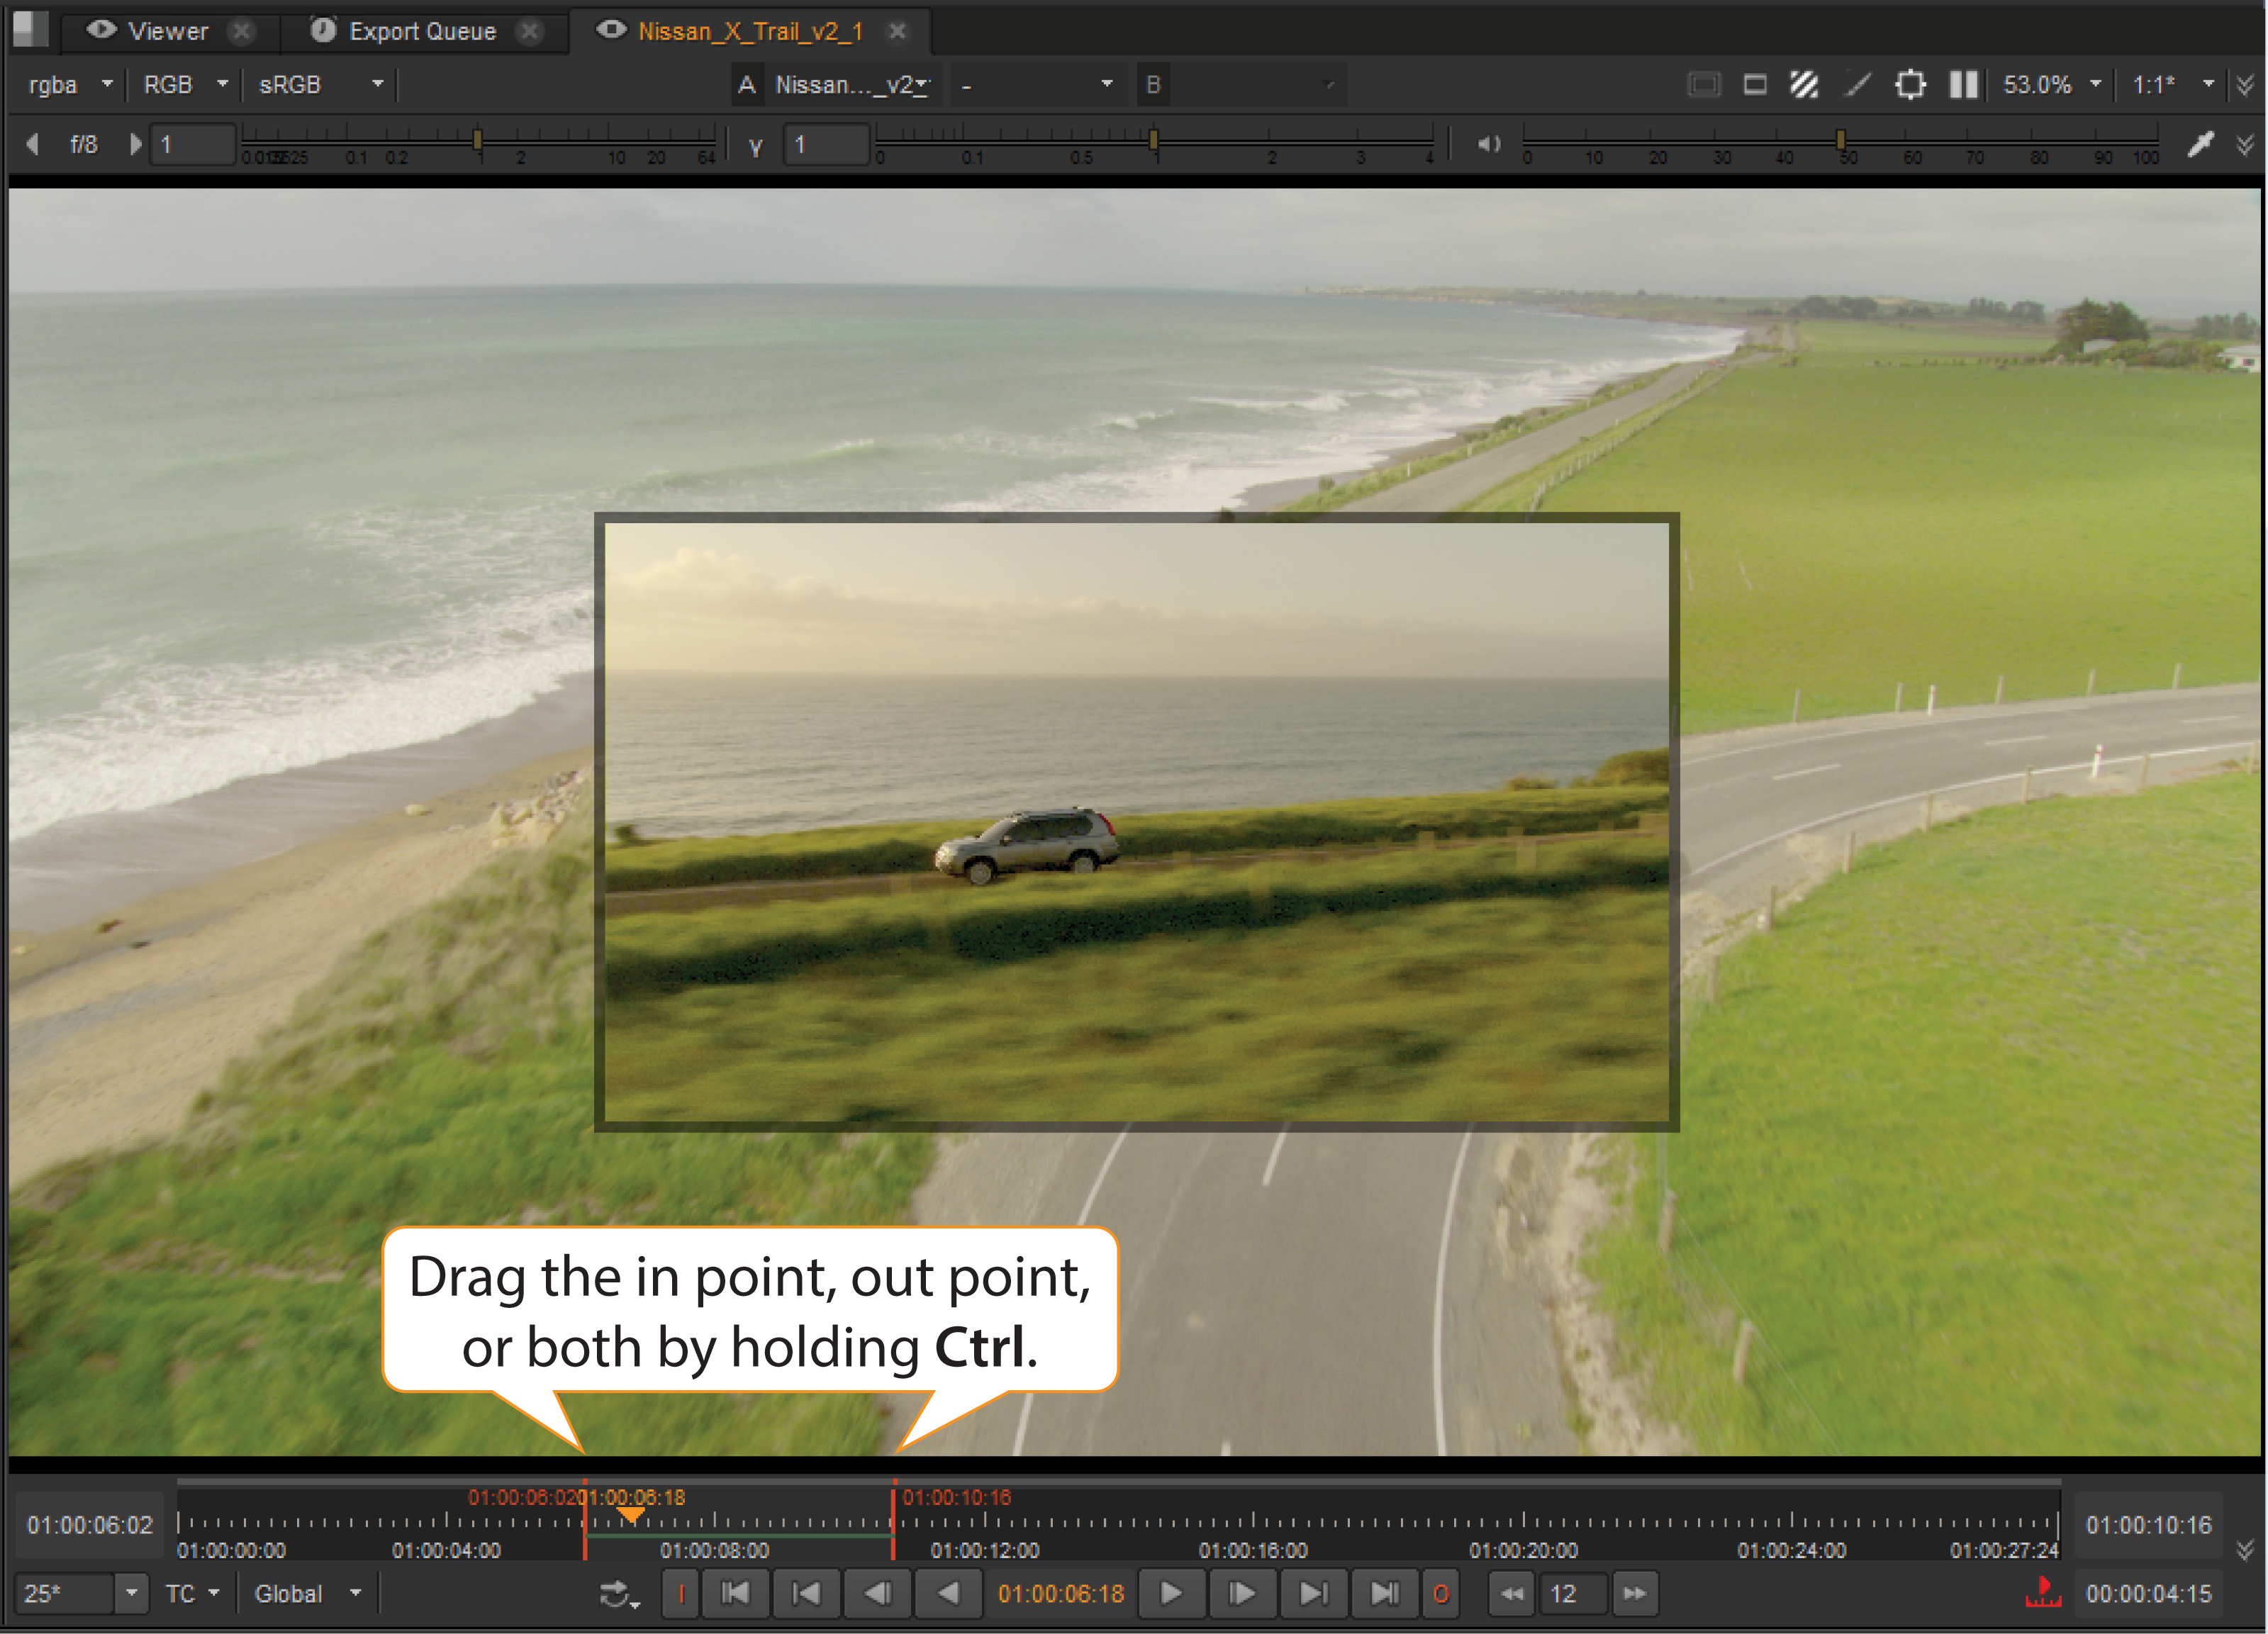
Click and drag the markers to adjust their position, or hold Ctrl/Cmd to move both markers at once, retaining their relative positions. A Viewer preview shows the current frame for the selected marker(s) and a timecode/frame popup helps to set the new position.
Clear the markers from your clip by navigating to Viewer > ClearIn Point (Alt+I) and Clear OutPoint (Alt+O). The markers are removed completely, but you can reapply them by repositioning the playhead and pressing I or O.
Tip: You can also press Alt+U to remove both markers at once.
When the playhead is positioned near In and Out markers, the top half of the timecode scale controls the playhead and bottom half controls the markers.
Playback Controls
The playback rate field (frames-per-second) initially displays the project’s playback speed. The Viewer attempts to maintain this speed throughout playback, although this adjusts depending on the resolution of the imagery and your hardware configuration.
The following table lists the functions of the playback buttons:
|
Buttons |
Functions |
|
|
The Play backward and Play forward buttons play the sequence backward or forward at the script’s frame rate. When you press a play buttons, it toggles to a stop a button. |
|
|
The Back 1 Frame and Forward 1 Frame buttons cue the sequence to the previous or next frame. |
|
|
The Previous keyframe and Next keyframe buttons cue the sequence to the script’s previous or next keyframe. |
|
|
The First frame and Last frame buttons cue the sequence to the first and last frame. |
|
|
The Frame Increment field allow you to specify the number of frames by which the Previous increment/Next increment buttons cue the sequence. This is set to 10 frames by default. |
The J, K, and L keyboard shortcuts also control playback. The K keyboard shortcut is mapped to Pause/Play. J and L are mapped to backward and forward. Combinations are also supported:
• K+J - frame backward.
• K+L - frame forward.
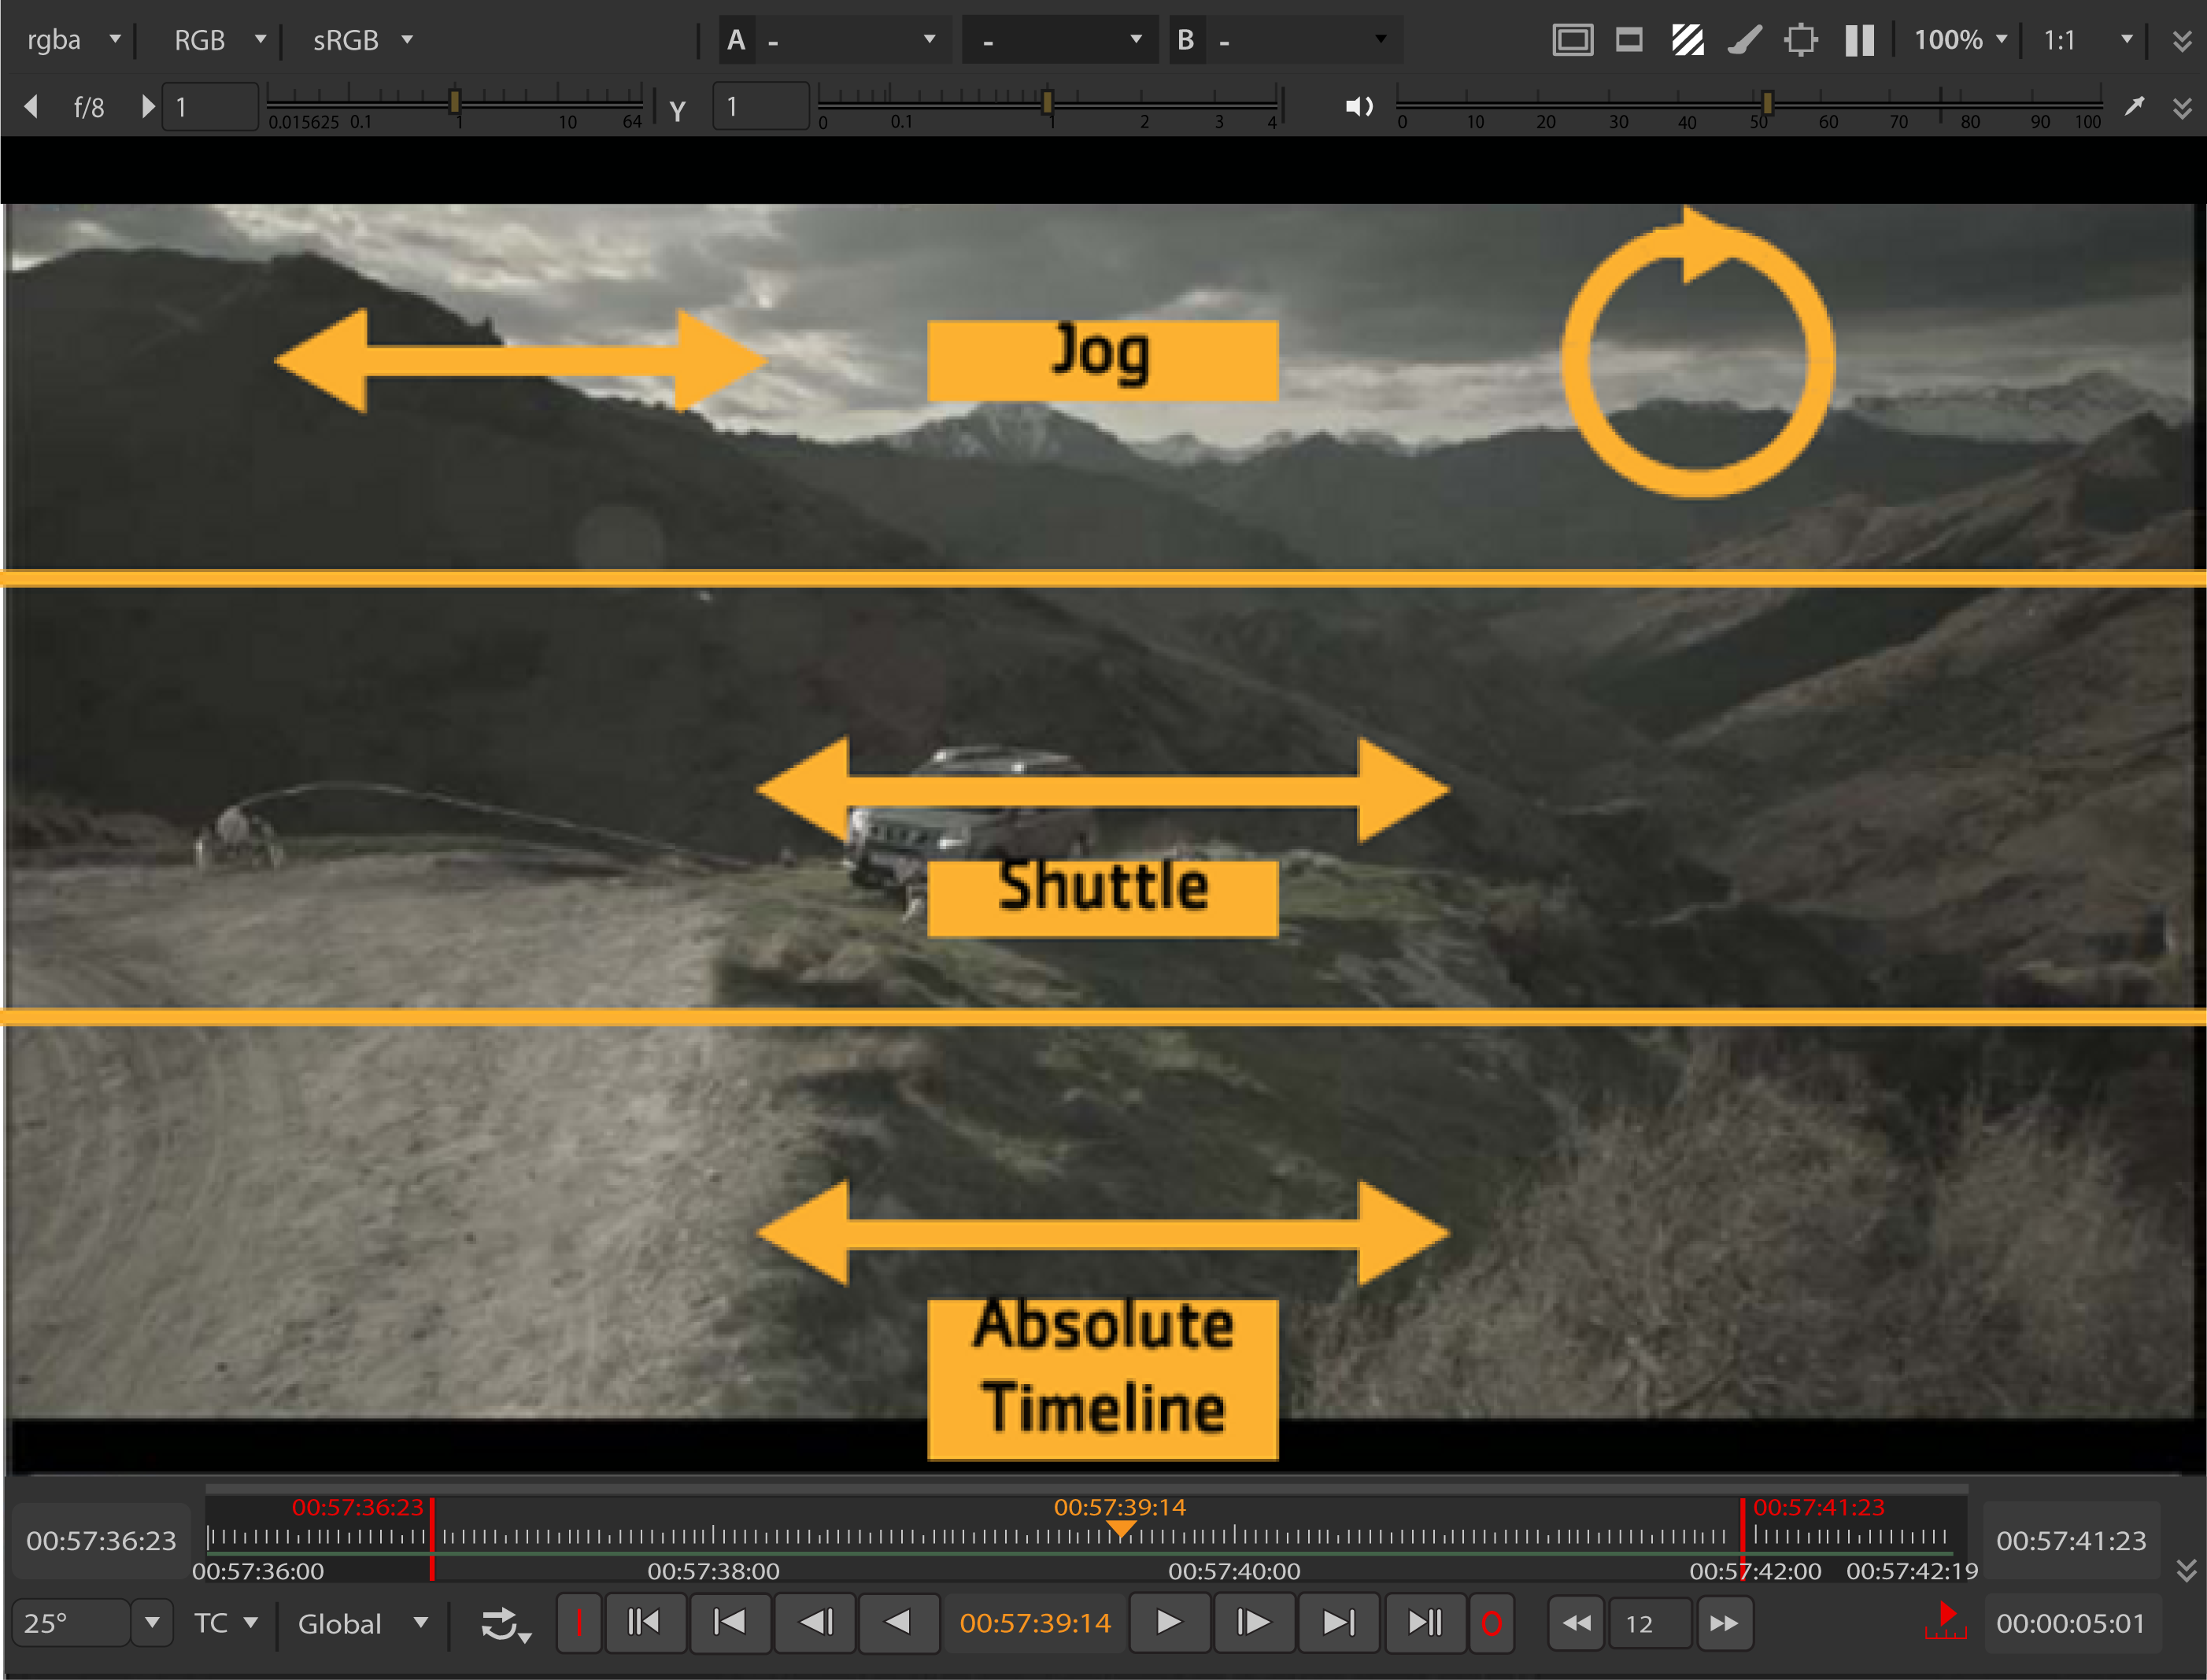
• K+drag in the top third of the Viewer - standard jog controls. Dragging the cursor left and right moves the playhead backward and forward, frame-by-frame.
• The jog controls also detect rotary motion to jog through frames. Clockwise motion in the top third of the Viewer, while holding K, advances the playhead and anti-clockwise reverses the playhead.
• K+drag in the middle third of the Viewer - standard shuttle controls. Dragging the cursor left and right plays backward and forward, with increased frame rate toward the edges of the Viewer.
• K+drag in the bottom third of the Viewer - skips the playhead to absolute timeline position.
The Playback Mode button lets you control how many times and in what direction the Viewer plays back the sequence. Click the button to toggle between the following modes:
|
Button |
Function |
|
|
Repeatedly plays the sequence in a loop. |
|
|
Repeatedly plays the image back and forth from head to tail. |
|
|
Plays once through the section between in and out point and stops at the out point. If these are not marked, then it plays from the beginning to the end of the sequence. |
|
|
Plays once from the beginning to the end of the sequence, ignoring any in and out points. |


Viewer Tools
The Viewer has two sets of tools for manipulating your media: the Viewer tools and the playback tools. The Viewer tools, located at the top of the Viewer, are used to affect the mouse pointer as you move over the Viewer, and to select Viewer preferences:
|
Icon |
Function |
Description |
|
|
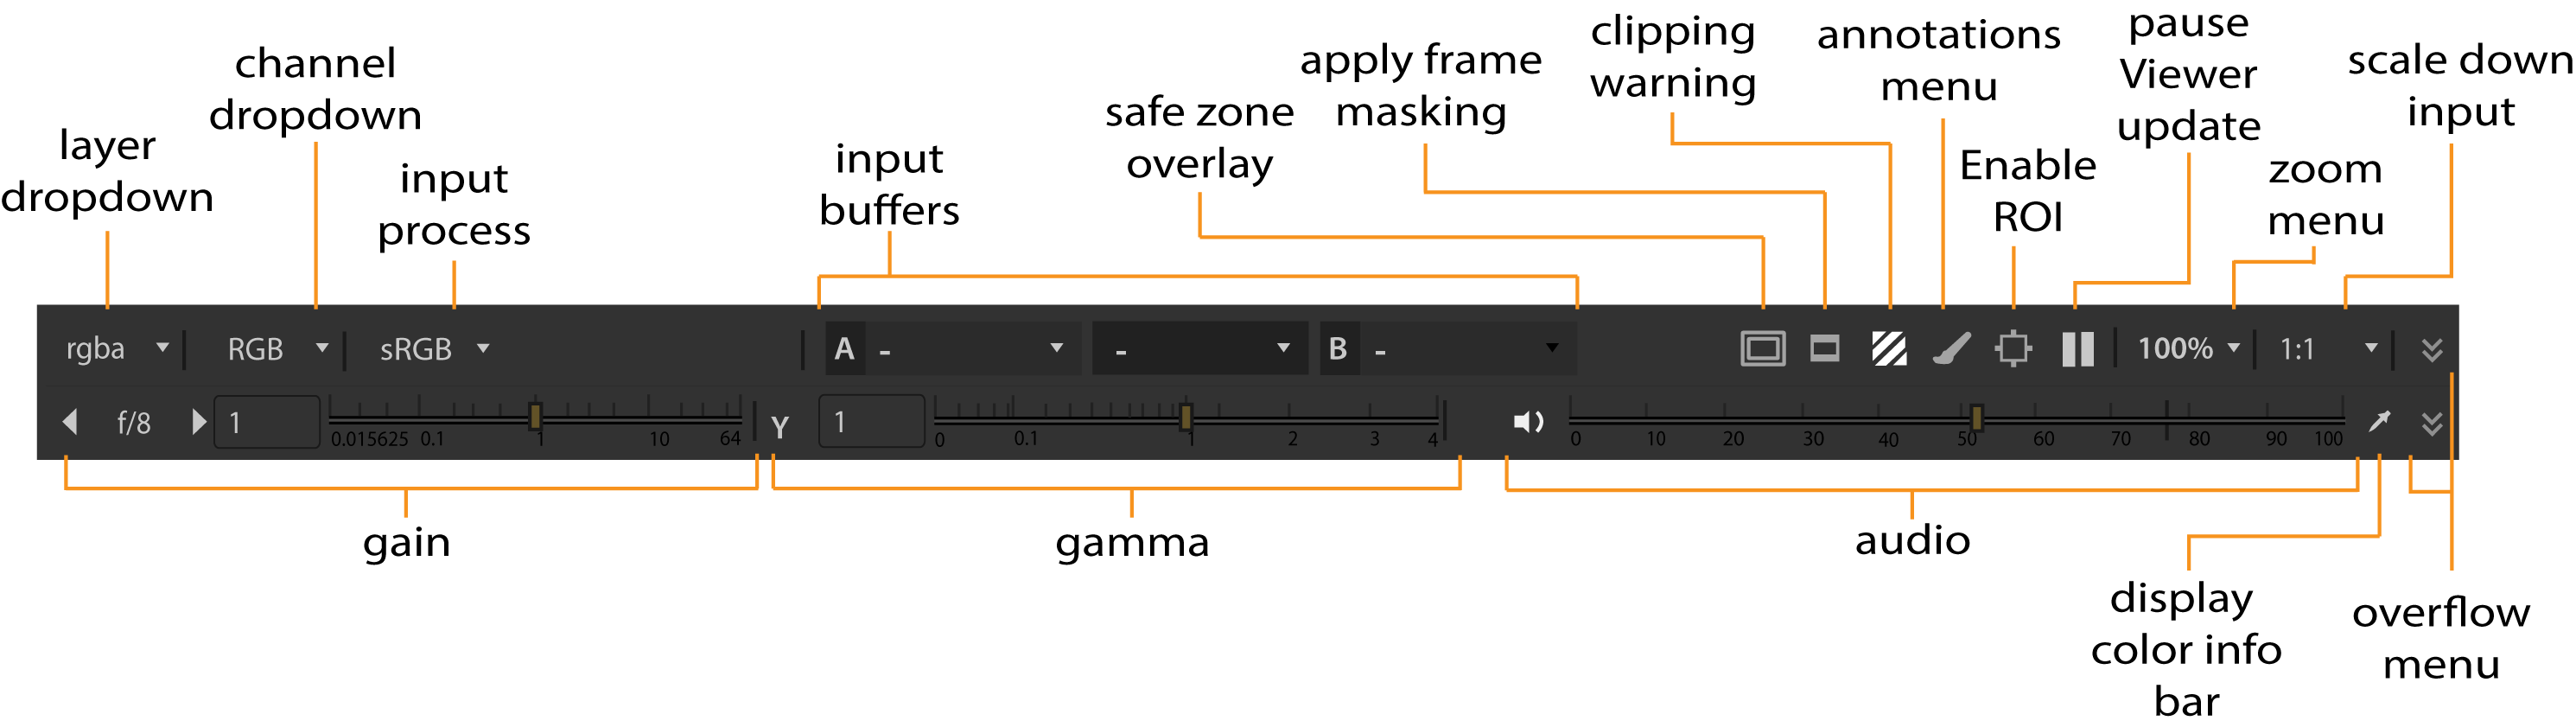
Layers |
Select the layer to output to the Viewer, for example forward motion vectors or disparityL. Only layers available in the clip are displayed - check the clip’s thumbnail to see at a glance which layers are present:
Note: You can scroll through available layers using PgUp or PgDn. |
|
|
Channels |
Select the channel(s) to output to the Viewer, for example RGB, single channel, Alpha, or Luma. |
|
|
Viewer color |
Set the colorspace used to display images in the Viewer, for example sRGB and rec709. Note: If you have specified an OpenColorIO configuration file in the Preferences, you may have more colorspace choices available. |
|
A/B |
Viewer |
Click the A or B dropdown and select what you want to view. This can be selected tracks or tracks with selected tags. When both Viewer buffers contain an image, enable wipe to compare the two images. You can also use the center drop down to set the blend mode between images in the Viewer, for example Onion Skin or Difference, and the A/B buffer configuration. |
|
|
Guides |
Enable or disable Viewer overlays: • title safe - any text intended for the audience should reside within this zone. • action safe - any visual elements intended for the audience should reside within this zone. • format center - adds a crosshair in the center of the format currently in the Viewer. • Format - adds a red, format-dependent box for the clip or sequence in the Viewer. Sequences support multi-format clips, see Viewing Multi-Format Timelines for more information. |
|
|
Mask |
Enable or disable a range of Viewer masks, for example 16:9 or 1.85:1. |
|
|
Clipping |
Enable or disable Viewer warnings: • No Warnings - all clipping warnings are disabled. • Exposure - alerts you when the image is under (blue) or over (red) exposed. |
|
|
Annotations |
Click to enable the Annotations tool bar. Annotations allow you draw and add text to clips in the Viewer. See Annotations for more information. Note: The Annotations button also controls existing annotation visibility. |
|
|
ROI |
Click and drag to define a Region of Interest (ROI) in the Viewer. The scopes only display information within the ROI, when active. |
|
|
Pause |
Pause or release Viewer playback caching, indicated by the green bar under the Viewer. |
|
Scale |
Set the scale applied to the clip in the Viewer, for example 25%, 75%, or Fit. |
|
|
Image Quality |
Set the Viewer image quality, for example 1:1, 1:4, or 1:16. The default setting, Auto, resizes the image dependent on the Viewer zoom level, which may re-cache the image at a higher resolution. Note: Image quality, or proxy, for RED clips is dependent on the clip’s Decode Resolution in the Media panel. |
|
|
|
Non RT Playback |
Sets the Viewer playback mode: • Play All Frames - the default setting, plays all frames in real-time (dependent on hardware). • Skip Frames - plays frames in real-time skipping where necessary to maintain the frame rate. • Play All Frames, Buffering - plays all frames by buffering and playing frames back as they become available. |
|
See through missing media |
When disabled, any offline media on a timeline is treated as a blank clip so the Viewer cannot display the track underneath. This setting also applies to missing frames within a clip. Note: This control only affects the current Viewer. |
|
|
|
View |
Select the Viewer display mode, for example Audio and Video or Video Only. |
|
Obey Alpha |
Allows you to control the alpha channel independent of the Viewer Blend Mode. • Enabled - any alpha channel present in the image is treated as premultiplied transparency. • Disabled - the alpha channel is ignored. |
|
|
Audio latency |
Sets the audio latency, in milliseconds, for the current Viewer only. Audio latency allows you to correct audio and video synchronization by changing the point at which audio playback starts. Positive values cause the audio track to start earlier in relation to the video track, and vice versa. |
|
|
|
Gain |
Adjusts the gain applied to the linear input image before viewing, but doesn’t affect your exported image. |
|
|
Gamma |
Adjusts the gamma applied to the image after the viewing transform, but doesn’t affect your exported image. |
|
|
Mute / Audio |
Click to mute audio output for the current Viewer or use the slider to control the audio output level. Tip: You can also control volume on a per track and per shot basis. See Audio and the Timeline for more information. |
|
|
Color |
Enable or disable the RGBA color information bar in the Viewer. Note: The Color Sample tool displays color information from the source file, not the colorspace selected in the Viewer color transform dropdown. See Working with Colorspaces for more information. |
 - red color layer.
 - green color layer.
 - blue color layer.
 - alpha layer.
 - depth layer.
 - forward motion vector layers.
 - backward motion vector layers.
 - all other custom layers, such as disparity.
Using In and Out Markers
In and Out markers enable you to alter the duration of a clip to just the portions of the source or sequence that you require.
Tip: You can use the source clip/shot properties original range controls in similar way to In and Out points. See Setting Source Clip Ranges for more information.
When a clip containing In and Out points is added to a timeline, you can slip the clip around the markers to adjust the clip’s output. See Timeline Editing Tools for more information. You can also use In and Out points to export certain portions of a clip or sequence. SeeTranscoding for more information.
To set In and Out markers:
| 1. | Right-click on the required clip or sequence and select Open In > Timeline View. |
Tip: Source clips opened in the timeline view have a purple background in the timeline.
| 2. | Move the playhead to the location of the In point and press I on your keyboard. |
The In point is marked by the In tab and the time is recorded in the playback controls.
| 3. | Move the playhead to the location of the Out point and press O on your keyboard. |
The Out point is marked by the Out tab and the time is recorded in the playback controls.
Note: You can also set markers by navigating to View > Mark In or Mark Out, by using the Timeline menu to Mark Selection or Mark Clip dependent on clip selections on the timeline, or by right-clicking a shots and selecting Open In > Viewer.
Click and drag the markers to adjust their position, or hold Ctrl/Cmd to move both markers at once, retaining their relative positions. A Viewer preview shows the current frame for the selected marker(s) and a timecode/frame popup helps to set the new position.
Clear the markers from your clip by navigating to View > ClearIn Point (Alt+I) and Clear OutPoint (Alt+O). The markers are removed completely, but you can reapply them by repositioning the playhead and pressing I or O.
Tip: You can also press Alt+U to remove both markers at once.
When the playhead is positioned near In and Out markers, the top half of the timecode scale controls the playhead and bottom half controls the markers.