Search is based on keyword.
Ex: "Procedures"
Do not search with natural language
Ex: "How do I write a new procedure?"
Using the Importomatic
The Importomatic node is used to bring in multiple assets and - if needed - assign them a look file or attribute file. Packaging this into one node keeps the recipe simpler to understand and debug.
With the Importomatic node you can:
• Read in multiple Alembic and ScenegraphXML assets in a single node.
• Assign look files to any of the assets (for more on look files, see Look Development with Look Files).
• Assign attribute files to any of the assets.
• Branch from the Importomatic node, allowing multiple outputs.
Tip: Providing a full description of how to describe a scene using XML is beyond the scope of the User Guide. For more information, consult the developer’s documentation accessed through the Help > Documentation menu.
Adding Assets Using the Importomatic
To add assets using the Importomatic:
| 1. | Create the Importomatic node and place it within the project. |
| 2. | Select it and press Alt+E. |
The Importomatic node becomes editable within the Parameters tab.
| 3. | Click |
The asset and output menu is displayed.
| 4. | Select Add Alembic, Add Casting Sheet, or Add ScenegraphXml and select the asset from the file browser or asset management browser. |
The new asset is added to the Importomatic’s hierarchy.
Note: See Importing Assets Using Casting Sheets for more information.
Importing Assets Using Casting Sheets
The Add Casting Sheet option of the Importomatic node opens a .cast file (casting sheet) that contains assets and names for those assets. This allows you to load multiple alembic files at once.
Below is an example of a casting sheet file:
<castingsheet>
    <entry assetid="/tmp/Gnome.abc" name="gnomeA"/>
    <entry assetid="/tmp/Pony.xml" name="ponyA"/>
</castingsheet>
The assetid XML attribute is an asset identifier you can use with whichever asset management system you are working with. If you are working with files then the assetid XML attribute is a file path. For more on Asset IDs, see Concepts.
Note: Make sure to specify a file extension in your file path for the casting sheet to determine which asset type to load.
The name XML attribute is the identifier that is used to reference an instance of that asset in your Katana scene. You can use it to determine the default scene graph location for the asset and to label the node used to import it.
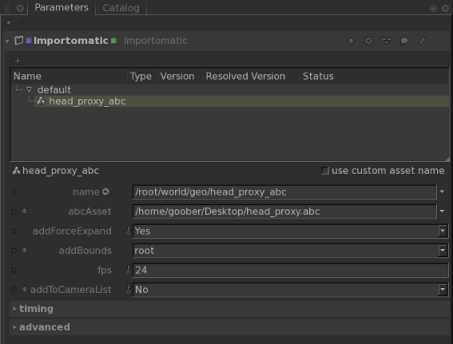
Editing an Importomatic Asset’s Parameters
To edit an asset’s parameters:
| 1. | Select the asset within the Importomatic’s hierarchy within the Parameters tab. |
The asset’s parameters are displayed below the hierarchy.
| 2. | Make any changes to the asset that are needed. The parameters that are available are dependent on the asset type. |
Editing an Asset’s Name
To edit the name:
| 1. | Select the asset within the Importomatic’s hierarchy. |
The asset’s parameters are displayed below the hierarchy.
| 2. | Toggle use custom asset name on. |
The asset name becomes editable.
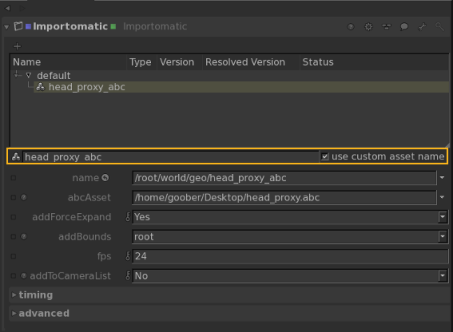
| 3. | Change the asset name in the field directly below the hierarchy. |
Changing the asset’s name within the Importomatic does not influence its location within the Scene Graph tab.
Disabling and Enabling an Asset
To disable an asset:
| 1. | In the Importomatic parameters, right-click on the asset name within the hierarchy. |
| 2. | Select Ignore Asset (or press D). |
The asset is no longer created.
To enable an asset:
| 1. | In the Importomatic parameters, right-click on the asset name within the hierarchy. |
| 2. | Select Unignore Asset (or press D). |
Deleting an Asset from the Importomatic
To delete an asset:
| 1. | In the Importomatic parameters, right-click on the asset name within the hierarchy. |
| 2. | Select Remove Item (or press Delete). |
Assigning a Look File to an Asset
To assign a look file:
| 1. | In the Importomatic parameters, right-click on the asset name within the hierarchy. |
| 2. | Select Assign Look File. |
The file browser or your studio’s asset picker displays.
| 3. | Select the look file from the file browser or asset picker. |
Assigning an Attributes File to an Asset
To assign an attributes file to an asset:
| 1. | In the Importomatic parameters, right-click on the asset name within the hierarchy. |
| 2. | Select Assign Attribute File. |
The file browser or your studio’s asset picker displays.
| 3. | Select the attribute file from the asset picker or file browser. |
Note: Use attribute files to add attributes to existing locations. For a full explanation on using attribute files, see the accompanying PDF, which is accessed through the Help > Documentation.
Adding Additional Outputs to the Importomatic
To add an additional output:
| 1. | In the Importomatic parameters, click |
The asset and output menu is displayed.
| 2. | Select Add New Output. |
A new output is added to the node and hierarchy.
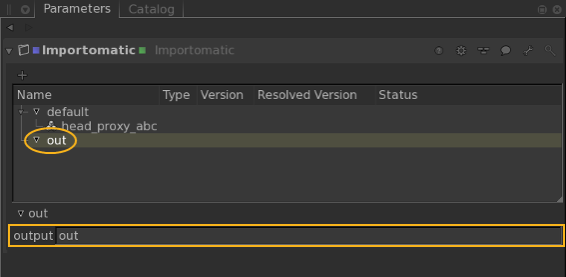
Changing an Output’s Name
Apart from the default output, the outputs from the Importomatic can be changed.
To change the name of an output:
| 1. | In the Importomatic parameters, select the output in the hierarchy. |
| 2. | Type the new output name in the output parameter. |
Sorry you didn't find this helpful
Why wasn't this helpful? (check all that apply)
Thanks for your feedback.
If you can't find what you're looking for or you have a workflow question, please try Foundry Support.
If you have any thoughts on how we can improve our learning content, please email the Documentation team using the button below.
Thanks for taking time to give us feedback.