Defining an AOV Output
Arbitrary output variables (AOVs) allow data from a shader or renderer to be output during render calculations to provide additional options during compositing. This is usually data that is being calculated as part of the beauty pass, so comes with little extra processing cost. The ability to define AOVs is fully supported in Katana and is easy to set up.
Defining and Rendering AOVs with 3Delight
The 3Delight for Katana plugin includes the DlSettings node type, which is a SuperTool that allows you to define AOVs as well as adjustments to the render settings.
- While editing the parameters of a DlSettings node in the Parameters tab, navigate to the Image Layers section and click the Add… button to open the AOV Selector window.
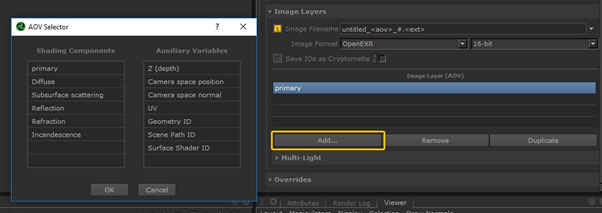
- Under Shading Components, select Reflection, and under Auxiliary Variables select Camera space position and click OK.
- In the Node Graph tab, right click the DlSettings node and click Preview Render.
- Once the render has completed, in a Monitor tab, click the text default for a list of available preview passes.
Note: You will notice that while the Reflection pass displays properly, there is no information from the Camera space position pass. This is because shading component passes get their information from material nodes upstream of the DlSettings node, but Auxiliary Variables need to have their source from the renderer itself.

- Click on a pass name to change what you see in the Monitor tab.
Tip: You can cycle through the AOVs in the monitor using Shift+Page Down to move through the list from first to last, and Shift+Page Up to move from last to first. You can also use Shift+Home to toggle between the default AOV and the last selected AOV.
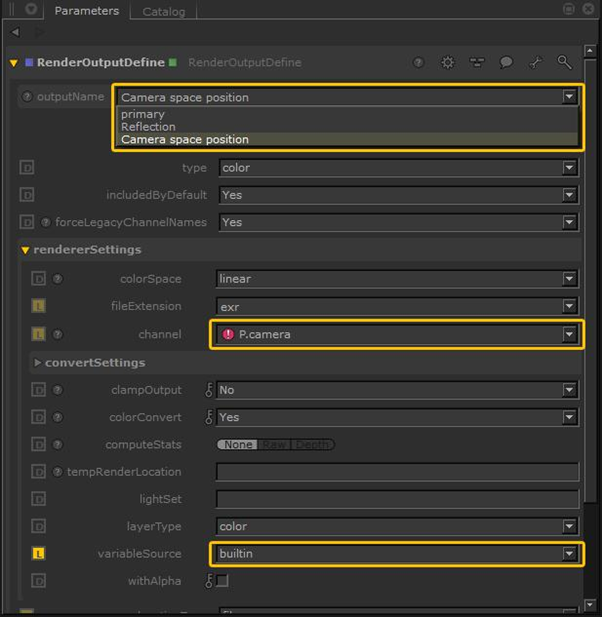
- In the Node Graph tab, add a RenderOutputDefine node and connect it to the output of the DlSettings node. Set the node's edit flag to bring up its parameters in the Parameters tab.
- Set the outputName parameter to Camera space position. The channel value changes automatically to match the selection.
- Change variableSource from shader to builtin.
- Preview render from this node. You will now be able see the position pass render in the Monitor tab.
Defining and Rendering AOVs with Other Renderers
| 1. | Add a RenderOutputDefine node. |
| 2. | In the channel parameter of the RenderOutputDefine node, enter the name of the AOV (this is the actual variable name that is output from the renderer), such as _occlusion or P. |
| 3. | Create a renderer-specific OutputChannelDefine node, for instance PrmanOutputChannelDefine, and add it to the recipe above the RenderOutputDefine node. |
| 4. | Select the <Renderer>OutputChannelDefine node and press Alt+E. |
The <Renderer>OutputChannelDefine node becomes editable within the Parameters tab.
| 5. | Enter the same name as the channel parameter in step 2 into the name parameter (such as _occlusion or P). |
| 6. | At this point, the parameters needed by the renderer-specific OutputChannelDefine node vary depending on the renderer: |
• For an PrmanOutputChannelDefine node, select the data type of the AOV from the type dropdown.
• For an ArnoldOutputChannelDefine node, make sure the parameters match the data type of the AOV.
See the All the 2D nodes that you can use within Katana. for details on the various parameters.
Note: Notes: Please refer to your chosen renderer’s documentation for names and definitions of AOV channels.