Creating Lights using Lighting Tools
Katana's Lighting Tools introduce an artist-friendly environment to set up lights in a GafferThree node within your scene. It allows you to interact directly with your image during a live render session.
Lighting Tools are especially useful when artists want to work in a purely creative way without being slowed down or distracted by unnecessary panels.
How to Place a Light using Lighting Tools
- Create a GafferThree node and place it in your Node Graph.
Note: For more information on the GafferThree node, see Getting to Grips with the GafferThree Node.
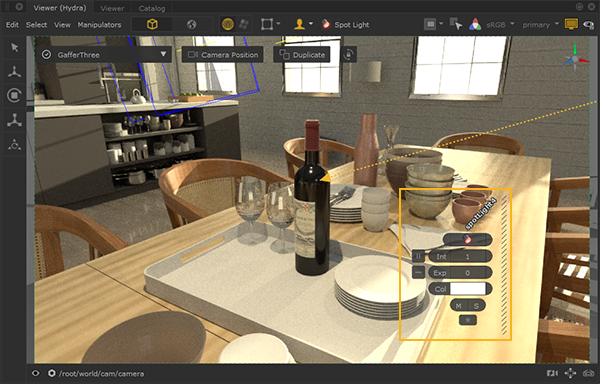
- Click the Lighting Tools button
 in the Viewer (Hydra) tab, or press L on the keyboard to turn on Lighting Tools.
Additional buttons are displayed in the Hydra Viewer.

If you have more than one GafferThree node in your scene, you can select which GafferThree node you would like to use to create your light by clicking on the GafferThree dropdown.

You can no longer select any geometry in the scene.
Tip: Press Spacebar over the Hydra Viewer to enter full-screen mode and work directly on your image.
- Click the dropdown arrow next to the Lighting Tools button to choose a Lighting Mode. You can also hold Shift and press L to cycle Lighting Modes.
Note: For information about each Lighting Mode, see the Lighting Modes section in this topic.
- Choose the light you want to create from the Lights dropdown menu.
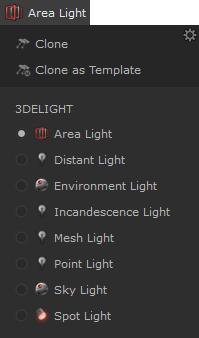
Your default renderer's lights appear in the list. If you want to choose a light from a different renderer you have set up in Katana, click the settings icon
 from within the Lights dropdown menu, and select the renderers you want to access from the dropdown menu.
Note: For information about the Clone and Clone as Template options, see Cloning Lights and Template Materials.
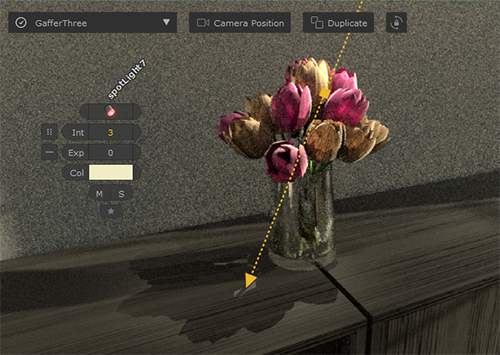
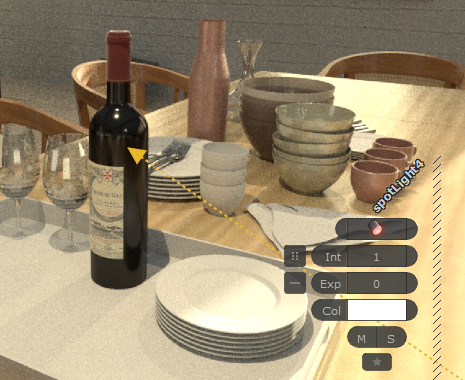
- Shift + Click to place a light.
A light parameter widget is displayed.
Note: For information on editing lights using the light parameter widget, see the Editing Lights using Lighting Tools section of this topic.
You can also place lights at the same position as the camera you are currently looking through, and other lights in you scene.
To place a light at the same position as the camera you are looking through, click the Camera Position button.
To place a light at the same position as an existing light in your scene, select the light and press the Duplicate button.

Note: It is also possible to clone lights using the Clone and Clone as Template options in the Lights dropdown menu.
For more information, see Cloning Lights and Template Materials.
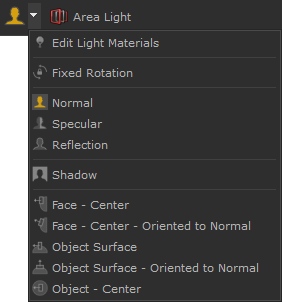
Lighting Modes
The following lighting modes are available from the Lighting Tools dropdown menu:
|
|
When enabled, new lights cannot be created and existing lights cannot be moved. You can only select lights to open their light parameter widget and make edits to their parameters. This mode is useful if you have finalized the light positions in your scene and want to make sure you cannot move them accidentally while adjusting the parameters. |
|
|
Make small adjustments to a light's position without changing the angle of the light. This mode is useful when you have finalized the angle of light you want but want to change the position slightly. Note: For more information, see the Fixed Rotation section of this topic. |
|
|
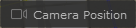
The direction of the light is oriented to the normal of the geometry. This mode places the light directly above the point of placement on the geometry and gives a diffuse appearance.
|
|
|
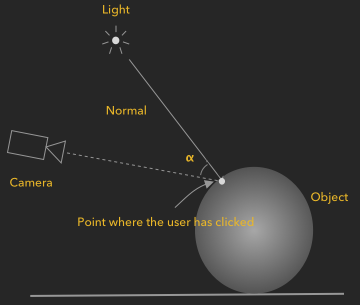
The direction of light is exactly halfway between the normal and the reflection angles. This mode is useful if you want a soft transition between a diffuse light and a sharp reflection.
|
|
|
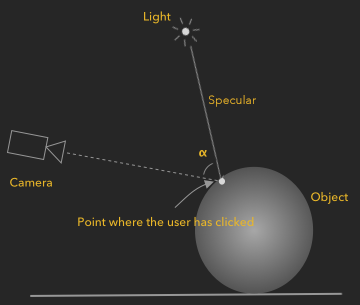
The direction of the light is oriented to the reflection of the object's surface. This mode is useful for placing a specific light reflection precisely where you want it to appear on your geometry.
|
|
|
When enabled, you can create a light as normal and also create a shadow point beyond the light which can be positioned. This mode give you full control over where shadows are cast. Note: For a workflow example using Shadow mode, see the Shadow Mode Workflow Example section in this topic. |
 /
/


 /
/
 /
/

|
|
These modes come from the Snapping toolset, they allow you to snap a light to a target location's Faces, Center, or Object. These modes can be useful for placing a light in a specific location on a piece of geometry. For example, if you would like to place a light in the very center of a light bulb object, you can use Object Center mode to ensure the light is placed precisely in the correct position. Note: For more information about Snapping modes, see Snapping Modes.
|
|
|
|
|
|
|
|
|
|
|
|
 /
/
 /
/
 /
/
 /
/
 /
/
How to Position Lights Using Lighting Tools
There are a few different ways of positioning lights using Lighting Tools:
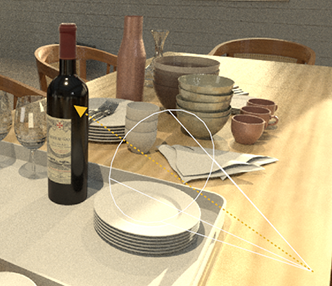
- Click + Drag a light's arrowhead to move it along the surface of the object.
- Ctrl + Click + Drag to move the light towards and away from the object.

- Ctrl + Shift + Click + Drag to scale the light uniformly.
- Use the manipulators in the toolbar to the left of the Viewer (Hydra) tab to Translate, Rotate, and Scale the light.
You can also use the Center of Interest manipulator to position your lights.
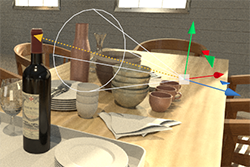
Translate light
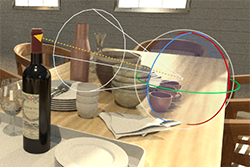
Rotate light
Scale light
If you want to make small adjustments to a light's position without changing the angle of the light, you can use Fixed Rotation mode. Fixed Rotation mode allows you to move a light by snapping the Center of Interest head to the surface of the geometry, without rotating the light.
- Click on the Fixed Rotation button
 in the Hydra Viewer or press O on the keyboard to activate Fixed Rotation mode. You can also select Fixed Rotation mode from the Lighting Mode dropdown menu.
Note: Press and hold O to temporarily activate Fixed Rotation mode.
- Click or marquee select the light(s) you want to move.
- Click +Drag the light(s) into position.
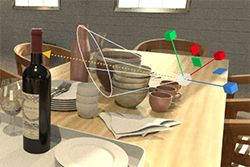
Shadow Mode Workflow Example
Shadow mode allows you to place a light while taking into account where you would like the shadow from the light to be cast in your scene. This is useful if you want a shadow from a particular object to be cast in a specific location. Shadow mode is a fast and accurate way of placing lights and provides you with a high level of control in situations where shadow placement is important.
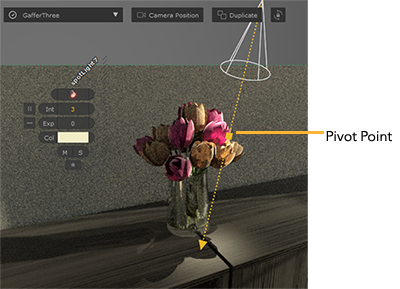
Shadow mode provides a pivot point on each light so you can control which part of geometry the light hits, and where you want the shadow cast from that geometry to fall.
To place a light using Shadow Mode:
- Select Shadow mode
 from the Lighting Tools dropdown menu.
 - Choose a light type from the Lights dropdown menu.
- Shift + Click to place the pivot point of the light.
The light is created.
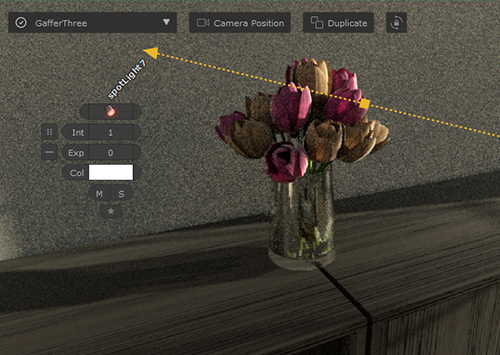
- Click and drag the pivot point to target the section of geometry you want the light to affect.

- Click and drag the arrowhead to control where the shadow falls.