See a Nuke Comp of Your Project in Katana Using the Nuke Bridge
Why Get a Comp from Nuke?
It’s important for artists to be able to assess that Katana scenes are accurate for the next stages in the pipeline. However, as the work progresses down the pipeline and iterations are applied, elements of the scene such as lighting or materials may need to be changed to make them fit more accurately with the results of the composited image.
This process is usually done by producing offline/disk renders from Katana and passing them on to the next stage of the pipeline. Only once these renders were imported and set up in Nuke, would Artists be able to review the results. In some cases, this is a lengthy and manual process, adding time to the overall production process.
Katana’s Nuke Bridge is a game-changing feature that lets you stream a render to Nuke for compositing, and then streams the comped pixels back to Katana for review or refinement. You see the results of the comp within Katana’s render window, eliminating the need for viewing offline and waiting for renders.
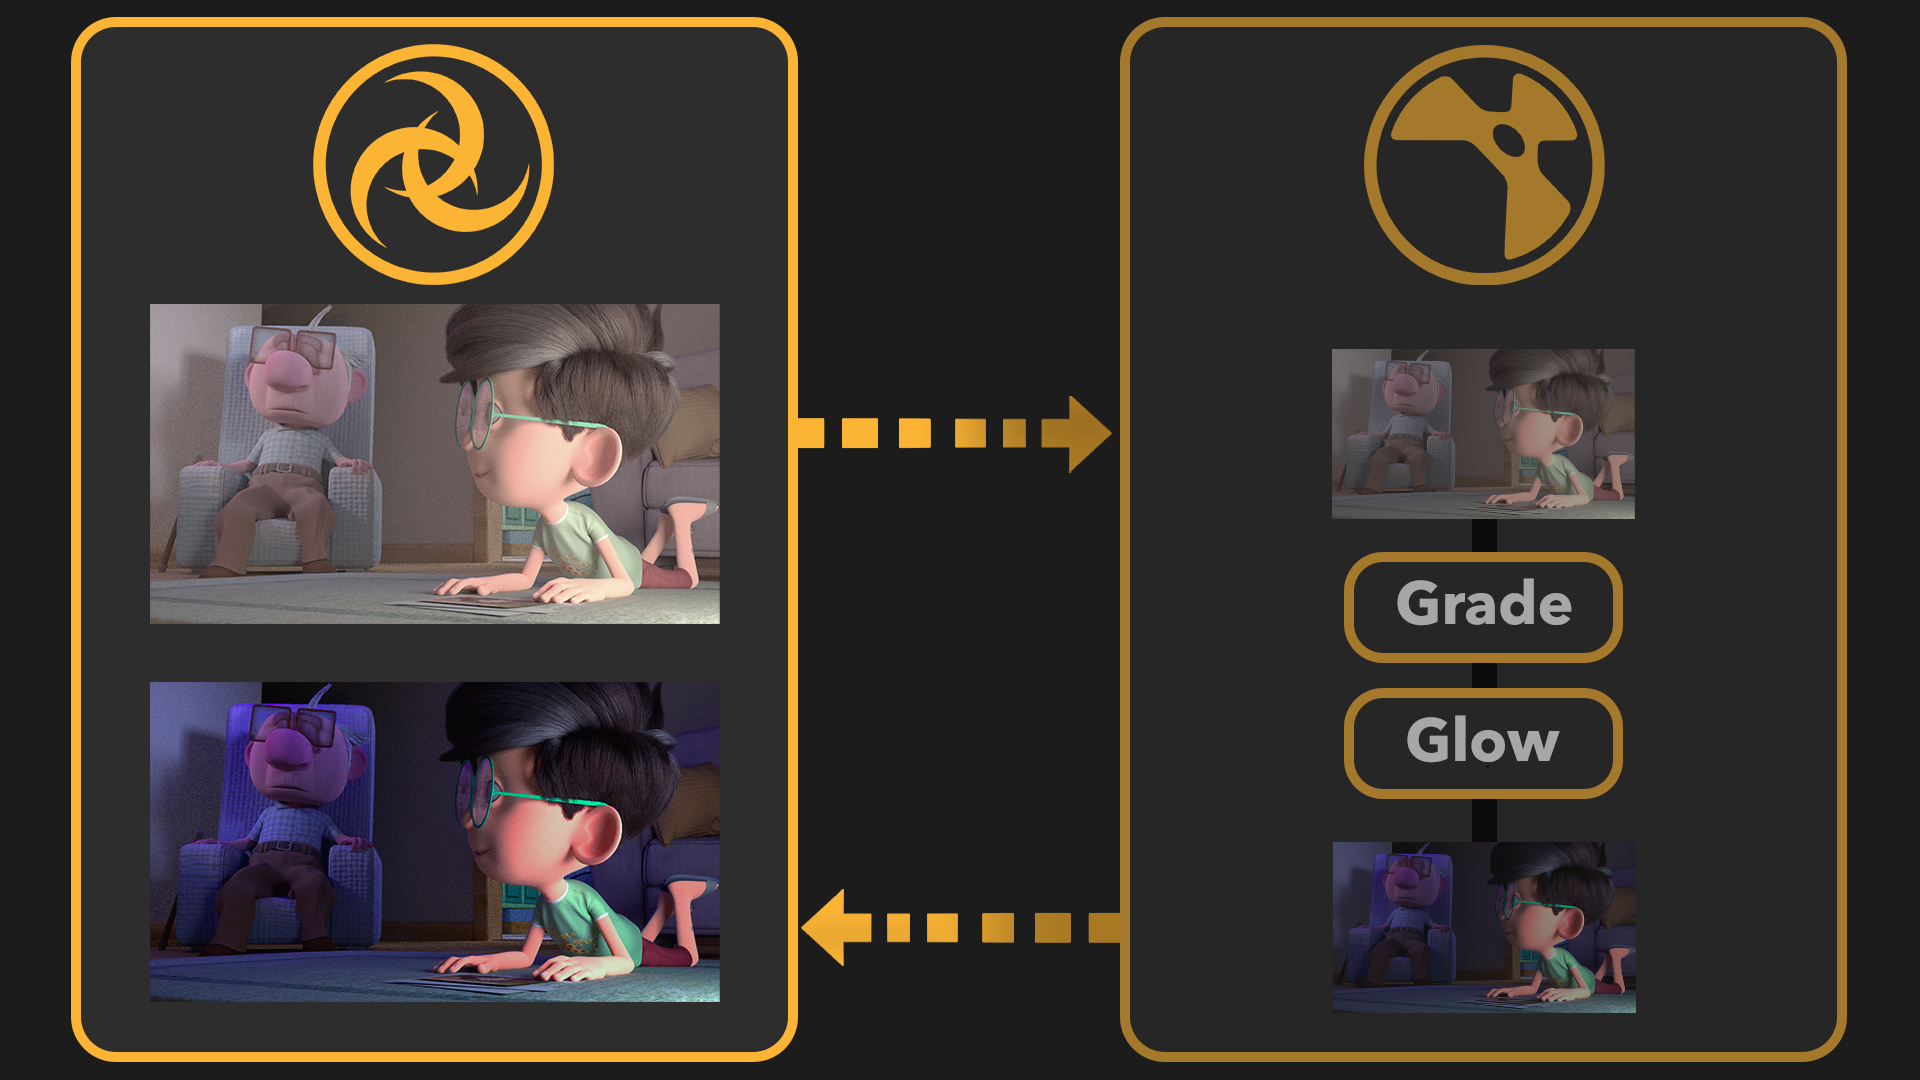
In the Nuke Bridge a Katana render is streamed to Nuke, composited using a Nuke script, and the result streamed back to Katana as a new render.
What Do I Need to Use Nuke Bridge?
To get Nuke Bridge up and running you’ll need the following:
- Katana 4.5 or later.
- Nuke 13.0 or later.
- A nuke_i (interactive) and nuke_r (render) license to run all three comping modes, though a nuke_i license can support all three with additional configuration. See below for details on license compatibility.
- A custom Nuke launcher script with a variable set to load the Katana Nuke plug-ins.
- A Nuke script containing KatanaReader and KatanaWriter nodes.
- A Katana launcher script with a variable set to your version of Nuke.
Full instructions for creating the scripts are given in the following sections.
You can download a Nuke test script and a simple Katana project to try the Nuke Bridge from here.
Nuke and Katana are available for download on the following pages:
Which Nuke Licenses do I Need to Use Nuke Bridge?
The table below shows you which comping modes are available depending on your Nuke license, nuke_i (interactive GUI) or nuke_r (render only).
| nuke_i and nuke_r | nuke_i | nuke_r | |
|---|---|---|---|
| Preview Comp | Yes | Yes (with extra configuration*) | Yes |
| Live Comp | Yes | Yes (with extra configuration*) | Yes |
| Interactive Comp | Yes | Yes (with extra configuration*) | No |
Note: *If you only own a nuke_i license, you need to create a custom launcher script for Nuke and customize the Katana launcher script to reference this additional Nuke launcher script. Instructions on how to write a launcher script for a nuke_i license are outlined in Additional Steps for Setting up the Nuke Bridge With Only a nuke_i License, however you should still follow all preceding set-up instructions given in the following sections.
- To check which licenses you have, user the Foundry Licensing Utility, available here.
Choose How to Work With Nuke Using Three Comp Modes
Nuke Bridge offers three modes of operation depending on how you want to work with your render and the comp.
Preview Mode
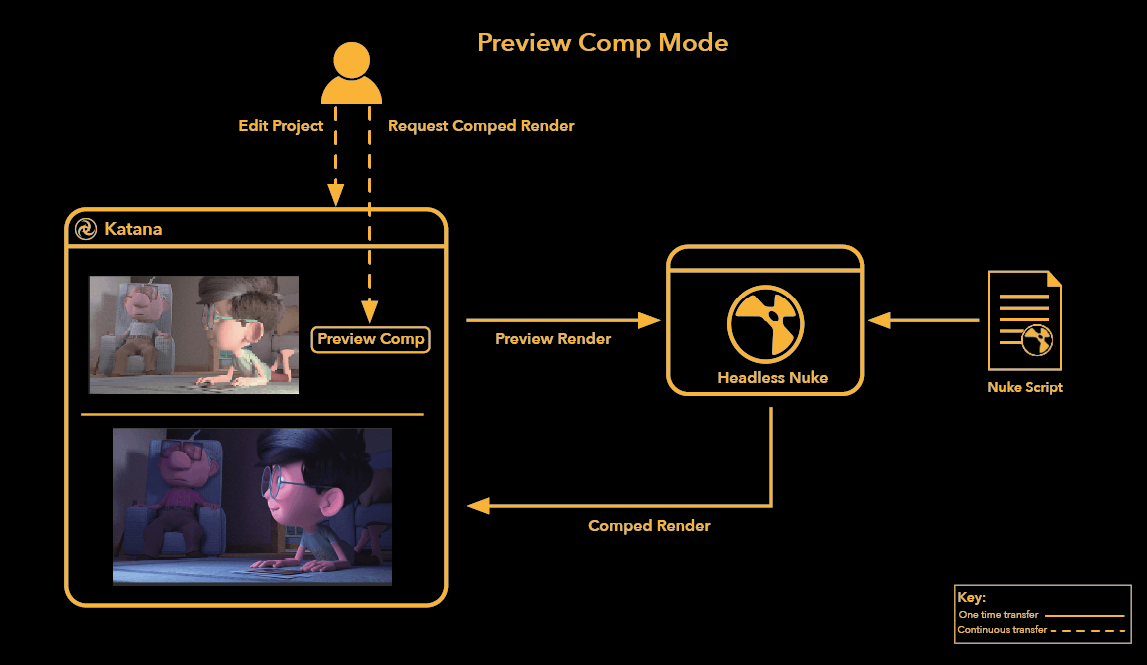
Preview mode allows you to send preview renders from Katana, to a headless version of Nuke and then view a composited version of the preview render within Katana, allowing for a quick snapshot of how your final image may look. Whenever a new preview render is created, preview mode will need to be manually re-triggered so that the updated render is comped.
This mode runs Nuke as a background process, meaning you cannot interact with Nuke once the Preview Comp process has been triggered.
The version of Nuke launched by Preview Comp can be installed on a local machine or on a network.
Live Mode
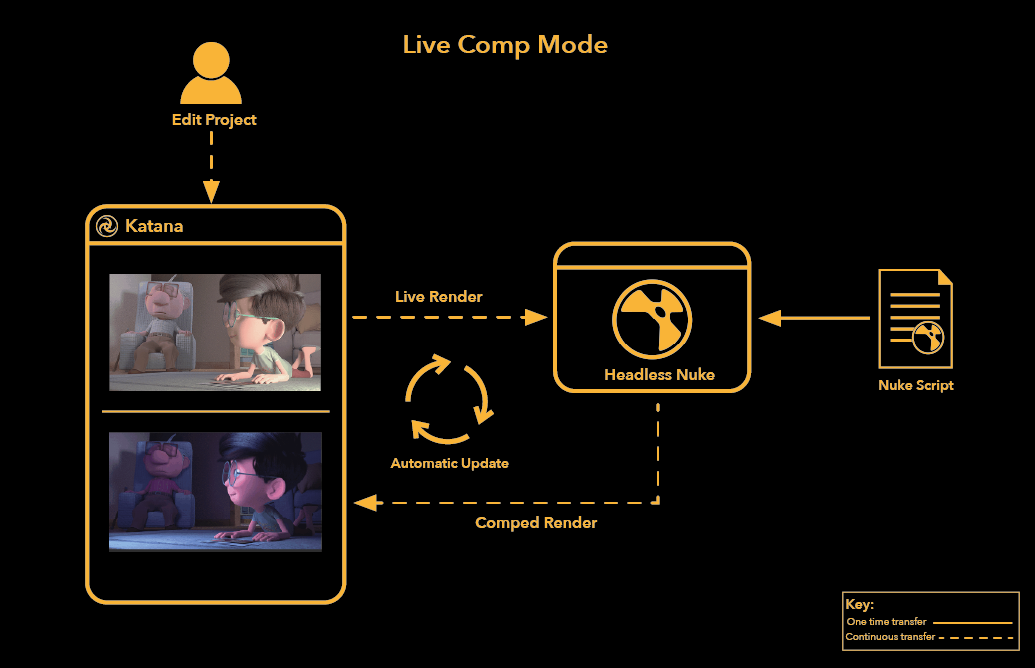
Live mode allows you to send a live render from Katana to a headless version of Nuke, so a comped version of your live render can be viewed in Katana, while still being able to edit your lights and materials. Any edits to your live render are automatically streamed into Nuke and the comped render will update in real time.
This allows you to be able to edit your scene in the context of a Nuke script and make sure that your lighting setup is compatible with a final grade or composite that your project may be using.
As with preview comp, Nuke is run as a background process and cannot be interacted with.
The version of Nuke launched by Live Mode can be installed on a local machine or on a network.
Note: For information on the differences between Live and Preview renders in Katana, see Rendering Types
Interactive Mode
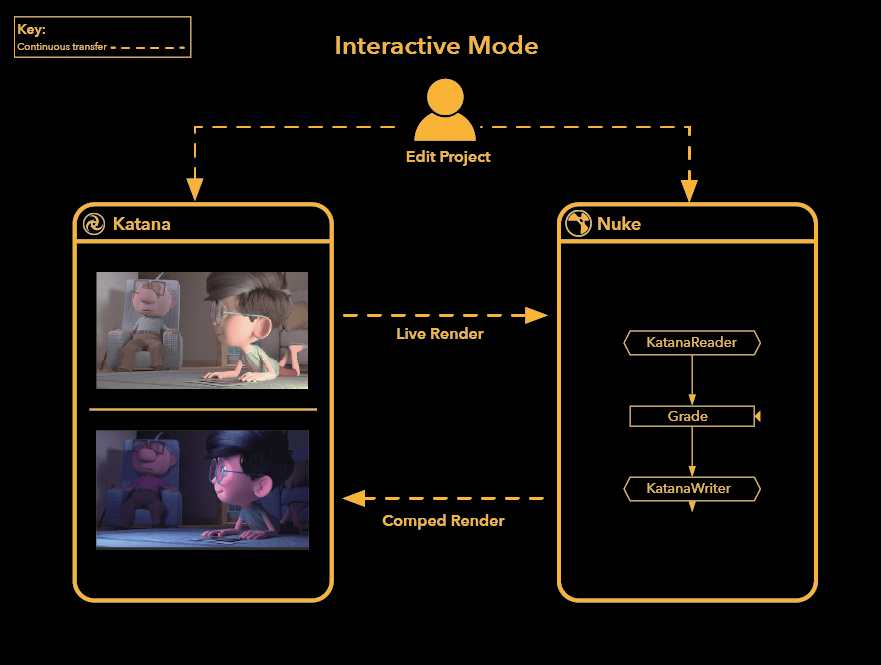
Interactive mode can be used with Live or Preview renders, and when triggered the Nuke application opens. The most flexible of the three modes, Interactive allows you to continue to edit your Katana scene, whilst also being able to adjust your Nuke script within Nuke.
When working with live renders, edits made in Katana are automatically streamed to Nuke, while edits to your Nuke script are automatically streamed back into Katana. When working with preview renders, any edits made to your scene need to be re-rendered and interactive mode needs to be re-triggered for the new render to be seen in Nuke. However, any changes to your Nuke script are reflected automatically in Katana, regardless of the type of render that is being streamed to nuke.
The version of Nuke launched by Interactive Mode must be installed locally and is not able to be used with versions of Nuke installed across a network
Set Up Nuke Bridge for Katana
This section assumes you’re setting up Nuke Bridge on a single machine to work in any of the three comp modes. To set up Nuke Bridge across a network or render farm, each machine in your network will need to point to the same file path destinations set in the scripts and environment variables.
There are three main stages to the setup:
- Configure a custom launcher script for Nuke to launch standalone so that you can create a compatible Nuke Script with the Katana plug-ins.
- In Nuke, create a script including at least one KatanaReader and KatanaWriter node, which allows Nuke Bridge to stream renders to and from Katana.
- Configure a custom launcher script to launch Katana with the correct settings.
Configuring a Nuke Launcher Script for the Katana Nuke Plug-in
For Nuke Bridge to work, you must create, or have access to, a Nuke Script that includes at least one KatanaReader and KatanaWriter node. To create these nodes in a standalone Nuke session, a custom launcher script should be created with a variable to define the location of the Katana Nuke plug-in. You can then use this script to run Nuke and add the Katana nodes.
The script performs the following actions:
- Set the location of the Katana Nuke Plug-in
- Launch Nuke
- Allow users to create KatanaReader and KatanaWriter nodes in a Nuke script
Configure a Nuke Launcher Script for Windows
You can copy and edit the template from the code below:
Nuke Launcher script for Nuke Bridge
@echo off

set "NUKE_PATH=%NUKE_PATH%;C:\<PathToKatana>\<KatanaVersion>\plugins\Resources\Nuke\<NukeVersion>"

"C:\<PathToNuke>\<NukeVersion>\<NukeApplication>.exe"
To use KatanaReader and KatanaWriter nodes in Nuke standalone sessions, Nuke must be launched using a script that specifies the NUKE_PATH.
Tip: A quick way to get file paths is to navigate to the directory using your file explorer and copy the path from the explorer bar.
- Edit the Katana installation location to include the versions of Katana and Nuke being used:
set "NUKE_PATH=%NUKE_PATH%;C:\<PathToKatana>\<KatanaVersion>\plugins\Resources\Nuke\<NukeVersion>"
- Edit the launcher variable With the version of Nuke and Nuke application you’re using:
- Save the file with a .bat extension.
For example:
set "NUKE_PATH=%NUKE_PATH%;C:\Program Files\Katana5.0v1\plugins\Resources\Nuke\13.1"
"C:\<PathToNuke>\<NukeVersion>\<NukeApplication>.exe"
This should match the version added to previous variable. For example:
C:\Program Files\Katana5.0v1\plugins\Resources\Nuke\13.1
For example, KatanaNuke.bat would be an appropriate filename for a launcher script.
Configure a Nuke Launcher Script for Linux
You can copy the example below to create a template:
Nuke Launcher script for Nuke Bridge
#!/bin/bash

export NUKE_PATH="/<katana installation directory>/plugins/Resources/Nuke/<nuke version>"

"/<path to nuke installation directory>/<version of nuke>/<nuke application>"
Set an environment variable on Linux in the terminal, or in your own custom launcher script for Katana:
export NUKE_PATH="/<katana installation directory>/plugins/Resources/Nuke/<nuke version>"
For example, if you’re running Katana 5.0v1 and Nuke 13.1:
export NUKE_PATH="/opt/Foundry/Katana5.0v1/plugins/Resources/Nuke/13.1"
If you're using a script, also edit the path to the Nuke application.
Warning: If you set the environment variable using the terminal, Nuke must launch from the same terminal.
Configure a Katana Launcher Script for Nuke Bridge
To use Nuke Bridge you need to launch Katana with a launcher script that sets the file path of the custom Nuke launcher. The script performs the following actions:
- Sets the location of the Nuke executable for Nuke Bridge to use.
- Launches Katana.
Windows and Linux sample launcher scripts for Katana containing the Nuke Bridge environment variable are available for download here.
To Configure a Katana Launcher Script for Windows:
You can use the template given below:
@echo off

rem --------------------------------------
rem -------- KATANA Specific ------------
rem --------------------------------------

set "KATANA_ROOT=C:\<KatanaInstallationDirectory>\Katana<version>"
set "PATH=%PATH%;%KATANA_ROOT%\bin"

rem --------------------------------------
rem ----------- NUKE BRIDGE --------------
rem --------------------------------------

set KATANA_NUKE_EXECUTABLE=C:\<NukeFolderLocation>\<NukeVersion>\<NukeApplication>.exe

rem -------- Start KATANA ------------
"%KATANA_ROOT%\bin\katanaBin.exe" - Edit the Katana installation location to include the version of Katana:
set "KATANA_ROOT=C:\<KatanaInstallationDirectory>\Katana<version>"
For example: - Set and/or edit the Nuke executable location to include the file path of the custom Nuke launcher script:
set KATANA_NUKE_EXECUTABLE=C:\<NukeFolderLocation>\<NukeVersion>\<NukeApplication>.exe
For example:set KATANA_NUKE_EXECUTABLE=C:\Program Files\Nuke13.1v1\Nuke13.1.exe
set "KATANA_ROOT=C:\Program Files\Katana5.0v1”
Tip: If you are already using your own custom Katana launcher script, you can simply add this variable to your script and set the variable to the correct location.
To Configure a Katana Launcher Script for Linux
If you're using a script, you can copy and edit the template:
#!/bin/bash

export KATANA_NUKE_EXECUTABLE="/<nuke installation directory>/<version of nuke>/<nuke application>"

"/<katana installation directory>/<version of katana>/<katana application>"
You can set this variable in the terminal, or in your custom launcher script for Katana.
export KATANA_NUKE_EXECUTABLE="/<nuke installation directory>/<version of nuke>/<nuke application>"
Add the file path of the Nuke executable file.
For example:
export KATANA_NUKE_EXECUTABLE="/opt/Foundry/Nuke13.1v1/Nuke13.1"
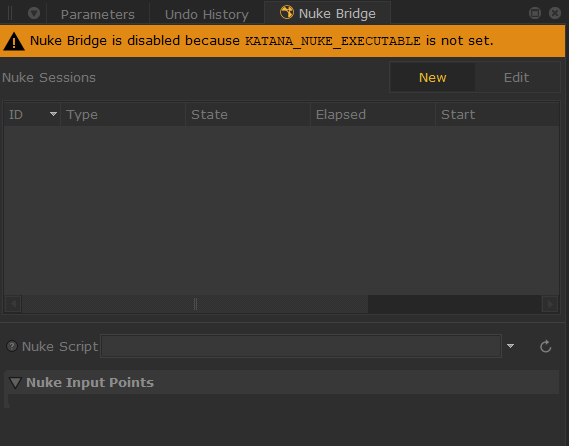
Note: If the KATANA_NUKE_EXECUTABLE variable in your Katana launcher script has been incorrectly set, a warning message at the top of the window will appear with a diagnostic.
If you're using a script, edit the path to the Katana executable.
Additional Steps for Setting up the Nuke Bridge With Only a nuke_i License
If you only have a nuke_i license, you can use all the feature of Nuke Bridge, with the following additional steps:
- Create a custom launcher script for Nuke, in addition to the one that has been set up for standalone sessions.
- Customize your Katana launcher script to reference this additional Nuke launcher script.
Creating an Additional Custom Launcher Script for nuke_i Licenses
Users will need to create a Nuke launcher script that contains an instruction to run the Nuke application with the correct flags.
- Windows: "C:\<PathToNuke>\<NukeVersion>\<NukeApplication>.exe" -i %*
- Linux: "/<path to nuke installation directory>/<version of nuke>/<nuke application>" -i "$@"
Setting a Custom Environment Variable for Katana’s Launcher Script for nuke_i Licenses
The environment variable for set KATANA_NUKE_EXECUTABLE in Katana’s launcher script will then need to point to the additional custom launcher created for Nuke, instead of the Nuke application.
- Windows: set KATANA_NUKE_EXECUTABLE=C:\<path to launcher>\nuke_launcher.bat
- Linux: export KATANA_NUKE_EXECUTABLE="<path to launcher>/nuke_launcher"
Launch Nuke and Prepare a Script for Nuke Bridge
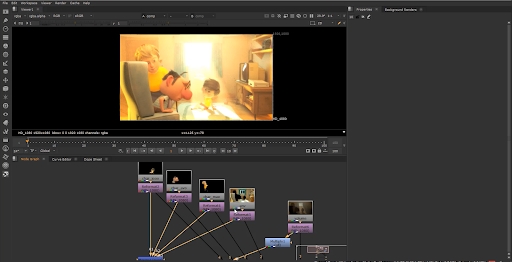
A Nuke script used by Nuke Bridge must contain at least one of the following nodes:
- KatanaReader - This node indicates to Nuke Bridge at which point the rendered image from Katana should be going into the Nuke script.
- KatanaWriter - This node indicates to Nuke Bridge at what point the composite should be fed back into Katana.
KatanaReader and KatanaWriter nodes work much like normal Read and Writer nodes but instead allow you to bring in renders from Katana and export them back out, and work with multiple renders and outputs at once.
Note: When performing an interactive comp, any KatanaWriter nodes in your Nuke Script must be connected to an active viewer node in Nuke in order for the comp to be streamed properly across both Katana and Nuke.
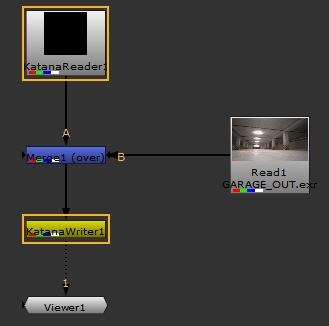
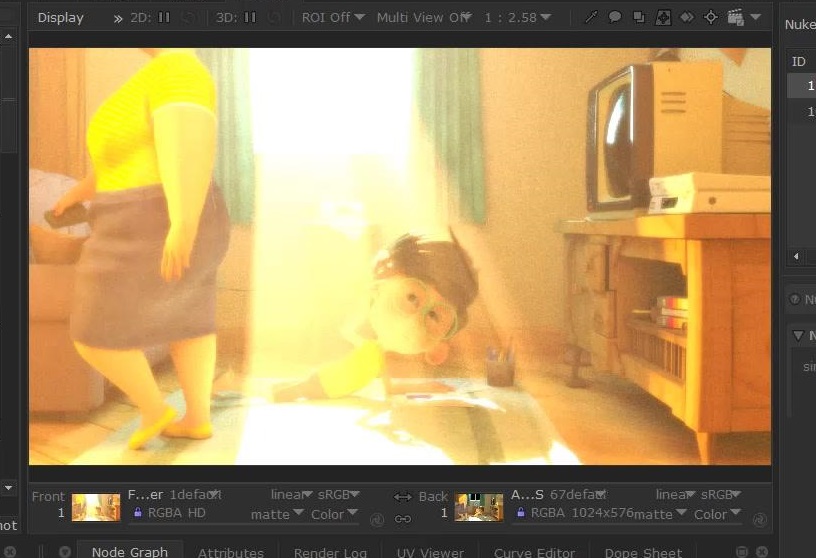
A node graph example for a simple composite of a backplate image set up for Nuke Bridge.
You can download the script of this node graph in the sample project.
Launch Katana and Test Nuke Bridge is Working
To test Nuke Bridge in Katana you can use our sample Katana scene or use your own project.
To test Nuke Bridge is operational:
- Double-click on your Katana launcher script to run Katana.
- In Katana, select Tabs > Nuke Bridge to open the Nuke Bridge window.
- Specify a Nuke Script for Nuke Bridge to use, select a render in the Nuke Input Points section, the correct Output Node and Destination for your comp. Information on how to perform these steps can be found inUsing Nuke Bridge .
- Perform a Preview, Live or Interactive comp.
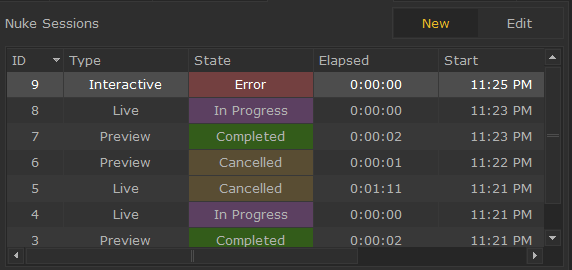
- If something in this process has been performed incorrectly, or the connection across your machine network has failed the State will change from In Progress to Error.
- Additional diagnostic information on the failed session can then be accessed in the Render Log tab for troubleshooting.
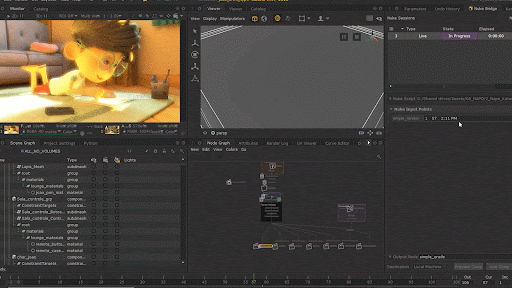
You can see an example in the image below:
Using Nuke Bridge
The workflow for using Nuke Bridge has the same initial steps for all three comp modes:
- Create a render, or multiple simultaneous renders using the Katana Queue.
- Choose a Nuke script in the Nuke Bridge panel to list the KatanaReader and KatanaWriter nodes.
- Choose a render to send to a KatanaReader node.
- Choose the KatanaWriter node to send the comp back to Katana.
Once you’ve done this, you’re ready to choose a comp mode to work with.
For detailed steps, follow these instructions:
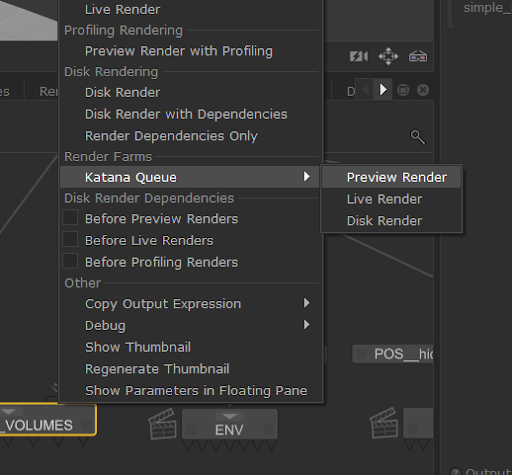
- Trigger a render by right-clicking the Render node in your scene, and selecting either Preview Render, Live Render, or Disk Render.
- Open Nuke Bridge by going to Tabs >Nuke Bridge, selecting the
 button in the section of Katana you want Nuke Bridge to open in.
 - Provide Nuke Bridge with a Nuke script by clicking the dropdown arrow and selecting Browse.
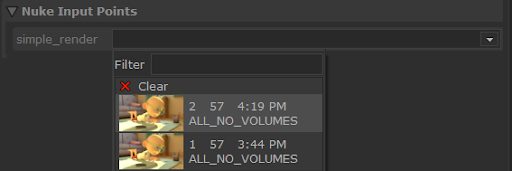
- Once the Nuke script has been processed by Nuke Bridge, any KatanaReader nodes in the script then appear under the Nuke Input Points section.
Renders from Katana can then be fed into these input points through the dropdown menu. - Any KatanaWriter nodes in the Nuke script appear under the Output Nodes section.
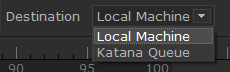
You can toggle between different KatanaWriter nodes for your output by using the dropdown menu. - Set the destination of the comp to either your Local Machine, or the Katana Queue. This determines where the comp is performed.
- Click Preview Comp, Live Comp or Interactive Comp.
- The output of the comp is streamed to the Monitor tab in Katana and added to the catalog.
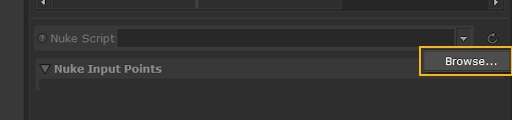
This opens an explorer window where you can find and import the Nuke script.

Note: Interactive Comps are unavailable when Katana Queue is selected as the destination.

Note: When an Interactive Comp is launched, the output across Nuke’s Viewer tab and Katana’s Monitor tab are synced.
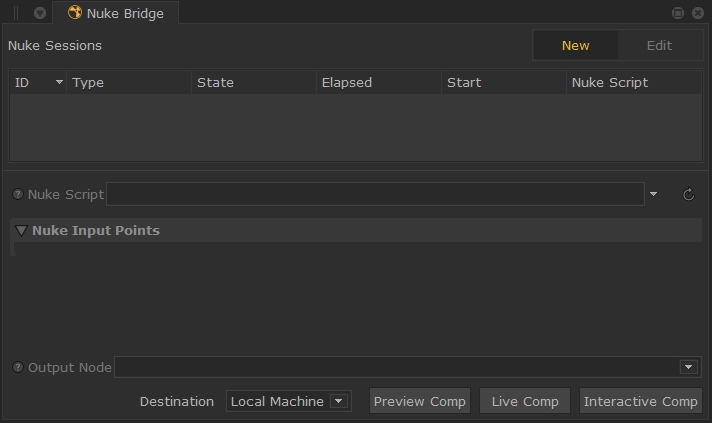
What’s in the Nuke Bridge Panel?
The Nuke Bridge panel lets you start new comp modes and edit existing ones.
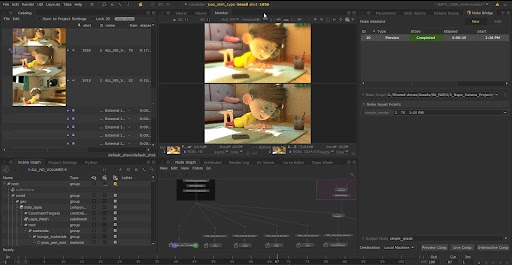
For example, you can see an example of Nuke Bridge’s comp sessions running in the screenshot below:

- Nuke Sessions - Records details (ID, Status, Time, Nuke Script) of all comps started in the Nuke Bridge
- ID - An ID number assigned on the order in which the comp was performed. For example, the 9th comp performed in Nuke Bridge will be given the ID number 9.
- Type - The type of composite mode performed.
- State - Either Completed, Cancelled, In Progress, or Error.
- Elapsed - Runtime of the comp session.
- Start - When the comp session was performed.
- Nuke Script - The Nuke script used for the comp.
- New - Start a new comp in Nuke Bridge.This allows you to run multiple live or interactive comps simultaneously.
- Edit - Edit an existing ‘in progress’ comp.
- Nuke Script - Input the Nuke script for Nuke Bridge to perform a composite from the dropdown. The
 button next to the dropdown allows you to reload the script in the event that changes have been made
to it.
button next to the dropdown allows you to reload the script in the event that changes have been made
to it. - Nuke Input Points - All KatanaReader nodes in the Nuke Script. Users map renders from Katana directly into these nodes.
- Output Node - All KatanaWriter nodes in the Nuke Script. These are used to view the output from Nuke.
- Destination - Determines where the output from the Nuke Bridge comp will be streamed to. Options are:
- Local Machine - Runs the comp and Nuke locally.
- Katana Queue - Runs the comp across a render farm, or machine network.
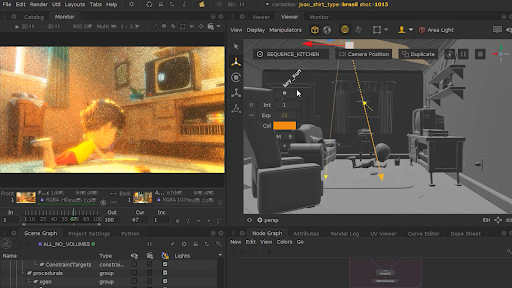
Preview Comp Mode: Trigger a Quick Preview of a Render from Nuke
Preview Comp mode is the most basic mode where Katana receives a snapshot of a render from a comp that’s been made in Nuke.
To see any changes being made to your Katana scene, another render would need to be triggered, or another preview comp performed.
Nuke is run as a background process either locally, or on the farm.
You would use Preview Comp Mode if you want to get a quick and easy preview of your Katana render after a compositing process has been performed.
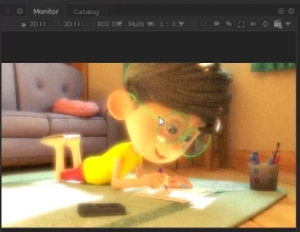
A render from Katana composited through Nuke Bridge with a preview comp.
Typical Workflow for Preview Comp Mode with Nuke Bridge
To use Preview Comp mode, Nuke is run in as a background process (headless) on either your local machine or the render farm. As this comp does not automatically update with changes from Katana, it is recommended you trigger either a preview or disk render of the scene to use with this mode.
In summary, preview comp mode has the following steps:
- Set up Nuke Bridge according to the Set Up Nuke Bridge for Katana for Katana section.
- Perform a preview, disk or live render.
- Destination is either Local Machine or Katana Queue, depending on where Nuke is running.
- Perform a Preview Comp.
- Check the Monitor tab in Katana for the output of the preview comp. Details of the comp will also appear in the Nuke Sessions tab.
To see how to do this in Katana, follow these instructions:
- With Nuke Bridge set up for Katana, perform a Preview Render, Live Render, or Disk Render.
- Open Nuke Bridge, set up the comp with Inputs, Outputs, and a Destination. Then click the Preview Comp button.
- The results from the composite are then streamed to your Monitor tab, registered as a Catalog entry, and the comp’s metadata is recorded in the Nuke Sessions field.
- Once the session is registered as complete, you can perform another Preview Comp to view new changes to the scene or a new render of the scene. To view changes that have been made to a Nuke script, users can use the Reload
button
 next to the Nuke Script dropdown.
Get Live Updates from a Nuke Process with Live Comp Mode
In Live Comp mode the results of the comp are streamed back to Katana as you make changes to your scene. Like Preview Comp mode, the results are streamed from a headless Nuke process that is using a Nuke script. However, unlike Preview Comp, renders or scene edits are updated automatically as you change them in Katana.
You would use Live Comp Mode to switch between different renders in a comp. What renders you choose to perform will depend on what the purposes of the Live Comp are. With Live Comp, users may switch between different renders under the Input Points section without needing to start a new comp. When Live Comp is used with live rendering, you can make changes to the properties of the scene such as lighting or graph state variables, and see those changes fed back through Nuke.
Typical Workflow for Live Comp Mode with Nuke Bridge
In summary, Live Comp mode has the following steps:
- Set up Nuke Bridge according to the instructions in Set Up Nuke Bridge for Katana section.
- Perform a preview, disk or live render. It is recommended that users use live renders with this feature, but preview or disk renders may also be used.
- Destination is either Local Machine or Katana Queue, depending on where Nuke is running.
- Perform a Live Comp.
- Check the Monitor tab in Katana for the output of the live comp. Details of the comp will also appear in the Nuke Sessions tab.
- Edit the details of your Katana scene to get live results fed back through Nuke.
To see how to do this in Katana in more detail, follow these steps:
- With Nuke Bridge set up for Katana, perform a Preview Render, Live Render, or Disk Render.
- Open Nuke Bridge, set up the comp with Inputs, Outputs, and a Destination. Then click Live Comp.
- The output of the Live Comp will appear in the Monitor tab, with a corresponding Catalog entry and Nuke Sessions entry. You can then switch between different renders in the Input Points dropdown without needing to start a new comp.
- If you’re using a live render to drive a Live Comp, you can make adjustments to the properties of the scene, such as lighting or graph state variables.
- All updates from those changes are then communicated back to the Monitor tab through Nuke without needing to start a new comp, or a new render.

Interactive Mode: Run the Katana and Nuke Applications Together for Shared Edits
Interactive Comp Mode launches Nuke with the Nuke Script that was imported into Katana pre-loaded. You can then make edits in both your Nuke Script and Katana scene side by side, and receive corresponding updates in Katana, and vice versa.
You would use Interactive Comp Mode if you want to continue to make improvements in either application side-by-side. This provides a complete lighting and compositing environment for a single user.
Users in possession of only a nuke_i license can create a custom launcher script for Nuke as per the Nuke Licensing for Nuke Bridge section.
Typical Workflow for Interactive Comp Mode with Nuke Bridge
To use Interactive Comp mode, you need to have both Katana and Nuke running on your machine.
Your Nuke script must include KatanaReader and KatanaWriter nodes, and the KatanaWriter node must be connected to an active Viewer node.
In summary, interactive comp mode has the following steps:
- Set up Nuke Bridge according to the Set Up Nuke Bridge for Katana section.
- Ensure the Destination is Local Machine and select Interactive Comp.
- Edit both the Nuke script and Katana side by side.

To learn how to do this, follow these instructions:
- With Nuke Bridge set up for Katana, perform a Preview Render, Live Render, or Disk Render.
- Open Nuke Bridge, set up the comp with Inputs, Outputs, and a Destination. Then click Interactive Comp.
- Nuke then launches with the Nuke script that was specified to the Nuke Script dropdown in Nuke Bridge.
- You can then make changes to your Nuke script. For example, perform color correction or grading.
- Any changes made to the Nuke script are communicated back to the Monitor tab in Katana.
- If you’re using a Live Render to drive your Interactive Comp, you can also make edits to the properties of your Katana scene and have those changes fed back to Katana through Nuke, as with Live Comps.

Stopping a Nuke Bridge Comp
Once you’re finished with Nuke Bridge comps, there are two ways in which they can be canceled:
- Selecting the active Nuke Bridge comp you want to cancel, and hit the Esc key.
- Ensure the Nuke Bridge comp you want to cancel is set as the front buffer in the Catalog tab, and go to Render>Cancel Current Render.
Additional Steps for Setting up the Nuke Bridge With Only a nuke_i License
Users in possession of only a nuke_r license will need to acquire a nuke_i license from Foundry to perform interactive comps.
If you only have a nuke_i license, you can use all the feature of Nuke Bridge, with the following additional steps:
- Create a custom launcher script for Nuke, in addition to the one that has been set up for standalone sessions.
- Customize your Katana launcher script to reference this additional Nuke launcher script.
Creating an Additional Custom Launcher Script for nuke_i Licenses
Users will need to create a Nuke launcher script that contains an instruction to run the Nuke application with the correct flags.
- Windows: "C:\Path\To\NukeVersion\NukeApplication.exe" -i %*
- Linux: "/opt/Foundry/Nuke13.1v1/Nuke13.1" -i "$@"
Setting a Custom Environment Variable for Katana’s Launcher Script for nuke_i Licenses
The environment variable for set KATANA_NUKE_EXECUTABLE in Katana’s launcher script will then need to point to the additional custom launcher created for Nuke, instead of the Nuke application.
- Windows: set KATANA_NUKE_EXECUTABLE=C:\path\to\additional\nuke_launcher.bat
- Linux: export KATANA_NUKE_EXECUTABLE="/path/to/additional/nuke_launcher"