Autosaves
Your autosave preferences can be set under Edit > Preferences > application > crashFile.
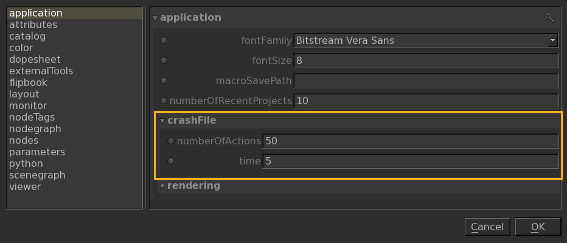
The crashFile gives you two options, numberOfActions and time, to choose how frequently you want an autosave of your current scene to take place.
| 1. | numberOfActions - specifies the number of actions before automatically saving the current project to a file from which the project can be restored after a crash. |
| 2. | time - specifies the time in minutes before automatically saving the current project to a file from which the project can be restored after a crash. |
Note: Setting either preference to zero disables the corresponding autosave trigger. If both are set to zero, no autosave files are created.
Note: After an autosave file has been created another one cannot be saved until 15 seconds have past, even if the conditions set by numberOfActions or time are met.
Loading an Autosave File
There are two ways to load an autosave file, you can either open it using a command line or you can locate the file within your temporary directory.
Loading an Autosave File using a Command Line
To load an autosave file using a command line:
- Open a new Command Prompt (cmd) for Windows , or a Terminal for Linux.
- Specify the path to the Katana executable and add the --crash command line option as demonstrated in the commands below.
Windows launch command:
C:\Program Files\[KATANA_VERSION]\bin\katanaBin.exe --crash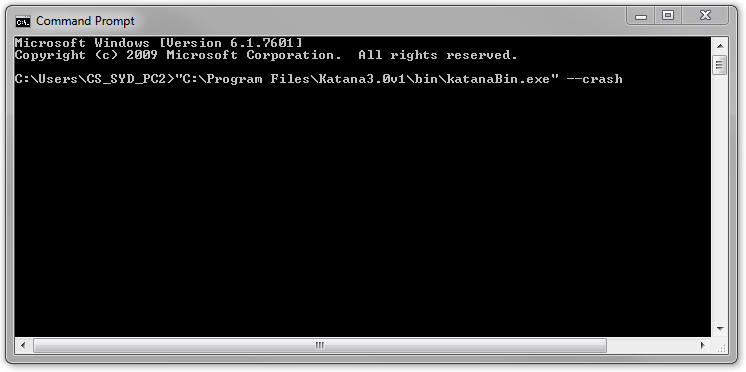
Linux launch command:
/opt/Foundry/[KATANA_VERSION]/katana --crash
- Execute the command to open Katana.
Katana will open the Katana Crash File Selector window before launching the Katana GUI. This window displays any and all Katana project files found in your temporary directory.
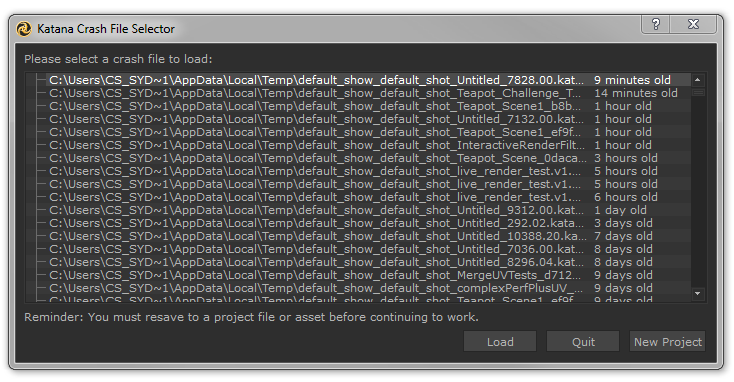
-
The latest autosaved file is the crashFile saved when an unexpected exit occurred. Select the latest file and press the Load button to load the project in Katana.
Note: If the crashed scene file had not yet been saved, Katana calls the resulting autosave Untitled
- Once open, make sure to save the file in the location of the original project before continuing to work. You may want to consider saving this under a different name to the original project, to create a version history of the file.
Loading an Autosave File by Locating it within your Temporary Directory
When Katana creates a crashFile, it is saved to the machine’s temporary directory. The file can be restored manually from there using the following steps:
Windows:
-
Open the start menu and enter %TEMP% in the search bar:
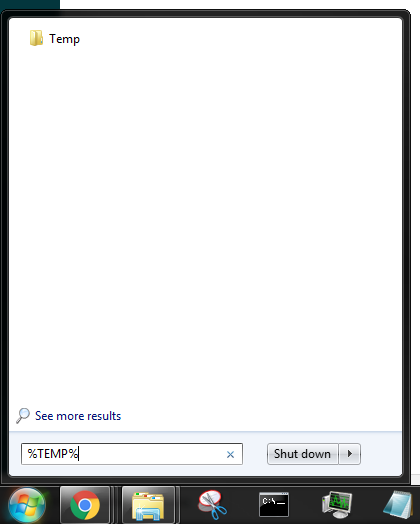
- Open the Temp folder and locate the most recent Katana crashFile. The file name should follow a convention similar to the following.
default_show_default_shot_<projectFileName>_<crashFileId>.<version>.katana
Note: If the crashed scene file had not yet been saved, Katana calls the resulting autosave Untitled
-
Open the project in Katana and re-save the file elsewhere.
Linux:
- Navigate to the temporary directory, which should be located at /tmp, using either the Terminal or a file browser.
- Locate the most recent Katana crashFile.
- Open this in Katana and re-save the project file elsewhere.